 Printable View (12193 KB) Printable View (12193 KB)
|
TSB
10-7-5 |
- 6.4L DIESEL COOLING SYSTEM CONTAMINATION FLUSH PROCEDURE
|
| Publication Date: April 14, 2010 |
FORD: | 2008-2010 F-Super Duty |
ISSUE:
Some 2008-2010 F-Super Duty vehicles equipped with a 6.4L engine may experience engine oil, transmission fluid or diesel fuel contaminating the cooling system. This flushing procedure is to be performed after the source of the cooling system contamination has been identified and repaired.
ACTION:
Follow the Service Procedure steps to correct the condition.
SERVICE PROCEDURE
| Locally Obtained Supplies |
| Quantity |
Description |
| 1 |
Rotunda Make-Up Water Test Strip 5 pk - 328-00007 - Call 1-800-ROTUNDA (768-8632) Option 2 |
| 3 Gal. |
Simple Green® Heavy-Duty Cleaner And Degreaser |
| 4-12 Gal. |
Distilled Water (quantity depends on failure) |
| 2 |
Heater Hose, 3/4" (19 mm) diameter hose by 24" (61 cm) long |
| 1 |
Garden Hose 5/8" (16 mm) or 3/4" (19 mm) diameter |
| 6 |
Hose Clamps, Number 12 |
| 3 |
Hose Coupling Adaptors, 3" (7.6 cm) to 4" (10 cm) in length |
| |
* Using 5/8" (16 mm) garden hose - use 5/8" (16 mm) x 3/4" (19 mm) coupling adaptors |
| |
* Using 3/4" (19 mm) garden hose - use 3/4" (19 mm) x 3/4" (19 mm) coupling adaptors |
- Fabrication - Prior to starting the flush procedure, obtain the following items:
- Obtain two (2) hose coupling adapters and one (1) garden hose. The garden hose can be either a 5/8" (16 mm) or 3/4" (19 mm). The couplings can be 5/8" (16 mm) x 3/4" (19 mm) or 3/4" (19 mm) x 3/4" (19 mm) depending on the size garden hose used. On the vehicle the hose and thermostat ports are 3/4" (19 mm) size. (Figure 1)

Figure 1 - Article 10-7-5
- Using a 3/4" (19 mm) coupling adapter and hose clamps, cut the garden hose to length (the hose must reach from the vehicle to a fresh water supply faucet). Attach a 2' (61 cm) length of heater hose to the garden hose to be used as the fresh water supply. The heater hose will prevent kinking in tight areas of the engine compartment. (Figure 2)

Figure 2 - Article 10-7-5
- Using a 3/4" (19 mm) coupling adapter and hose clamps, attach a 2' (61 cm) length of heater hose to the remaining section of garden hose to be used as the drain hose. (Heater hose will prevent kinking in tight areas of the engine compartment). (Figure 3)

Figure 3 - Article 10-7-5
 | WARNING: | ALWAYS ALLOW ENGINE TO COOL BEFORE OPENING THE COOLING SYSTEM. DO NOT UNSCREW THE COOLANT PRESSURE RELIEF CAP WHEN THE ENGINE IS OPERATING OR COOLING SYSTEM IS HOT. THE COOLING SYSTEM UNDER PRESSURE; STEAM AND HOT LIQUID CAN COME OUT FORCEFULLY WHEN THE CAP IS LOOSENED SLIGHTLY. |
| NOTE: | USE OF HOT WATER DURING THIS PROCEDURE, IF AVAILABLE, WILL IMPROVE REMOVAL OF PETROLEUM BASED COOLING SYSTEM CONTAMINANTS. |
- Syringe all contents/contaminants from the cooling system degas bottle.
- Remove the thermostat and housing assembly. Refer to the WSM, Section 303-03. Leave radiator draincock open.
- Clean the degas bottle in a solvent tank.
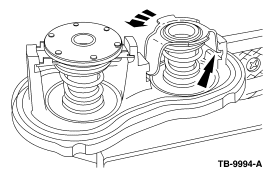
- Position thermostat housing assembly in a suitable vise. Press down on the low temperature thermostat crossbar and rotate thermostat to remove it from the thermostat housing assembly. Do not remove the high temperature (bypass) thermostat. (Figure 4)

Figure 4 - Article 10-7-5
- Reuse the old O-ring seal during the flushing procedure. Install the thermostat housing assembly without the low temperature thermostat; refer to the WSM, Section 303-03. Do not reinstall degas bottle assembly at this point.
- Disconnect heater return hose at the heater return port. (Figure 5)

Figure 5 - Article 10-7-5
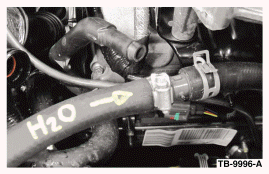
- Connect the fabricated fresh water supply hose to the heater return hose. (Figure 6)

Figure 6 - Article 10-7-5
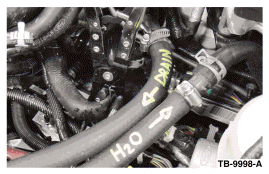
- Using a 3/4" (19 mm) coupling adapter and clamps, attach the fabricated drain hose to the heater return port. (Figure 7)

Figure 7 - Article 10-7-5
- Install pinch-off pliers onto degas bottle supply hose. (Figure 8)

Figure 8 - Article 10-7-5
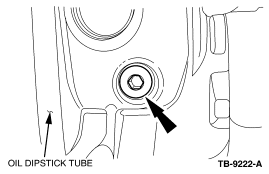
- Remove the left hand (LH) cylinder block drain plug and drain the cylinder block. (Figure 9)

Figure 9 - Article 10-7-5
- Position drain pans under the radiator draincock and engine block.
- Place the drain hose into the pan.
- Turn on fresh water supply and allow the water to flush the left hand (LH) cylinder block of contaminants.
- Turn water off.
- Lightly lubricate O-ring seal on the cylinder block drain plug with clean engine oil before installing. Install the LH cylinder block drain plug. Tighten to 177 lb-in (20 N-m).
- Disconnect the fresh water supply and drain hoses from the heater return port and heater return hose.
- Connect heater return hose to the heater return port.
- Close radiator draincock.
- Remove pinch-off pliers.
- Reinstall the degas bottle. Refer to WSM, Section 303-03.
- Fill the cooling system with an appropriate mixture of water and Simple Green® Heavy Duty Cleaner and Degreaser. Follow manufacturer's direction for heavy cleaning.
- Allow full flow through the heater core by performing the following:
- Vehicles with standard heater: Disconnect the vacuum hose at the heater control valve to open the heater core flow.
- Vehicles with EATC: Tturn the ignition key to the run position and adjust the heater control to highest temp setting.
- Start engine. Using a scan tool, select active command and set engine RPM to 2,000. Run engine for one (1) hour.
| NOTE: | FAILURE TO RUN ENGINE AT 2,000 RPM FOR ONE (1) HOUR WILL RESULT IN INSUFFICIENT CLEANING OF THE COOLING SYSTEM. |
| NOTE: | ADJUST THE HEATER CONTROL TO THE FULL HOT POSITION TO ALLOW COOLANT FLOW DURING THE COOLING SYSTEM FLUSH. RECONNECT THE HEATER CONTROL VALVE VACUUM HOSE IF PREVIOUSLY DISCONNECTED. |
- Return engine to idle speed, shut engine off and allow engine to cool before opening the cooling system. Do not unscrew coolant pressure relief cap when cooling system is hot. Once pressure is released, remove the pressure relief cap.
- Syringe all contents/contaminants from the degas bottle.
- Open radiator draincock and drain the cooling system.
- Remove the degas bottle assembly. Refer to WSM, Section 303-03.
- Clean degas bottle in a solvent tank.
- Reinstall degas bottle. Refer to WSM, Section 303-03.
- Remove the LH cylinder block drain plug and drain the cylinder block.
| NOTE: | THE RIGHT HAND (RH) CYLINDER BLOCK DRAIN PLUG IS NOT REMOVED AT THIS TIME. |
- Lightly lubricate O-ring seal on the cylinder block drain plug with clean engine oil before installing. Install the LH cylinder block drain plug and tighten to 177 lb-in (20 N-m).
- Repeat steps 22 though 32 two (2) additional times.
- Fill the cooling system with water and two (2) quarts (1.89 L) of Motorcraft® Engine Cooling System Iron Cleaner. For vehicles with auxiliary or aftermarket heaters, use three (3) quarts (2.83 L) of Motorcraft®Engine Cooling System Iron Cleaner.
| NOTE: | ONCE THE ENGINE HAS BEEN FILLED WITH MOTORCRAFT® ENGINE COOLING SYSTEM IRON CLEANER THE FOLLOWING REMAINING STEPS OF THIS PROCEDURE ARE REQUIRED TO BE COMPLETED WITHIN A 24 HOUR PERIOD. |
- Allow full flow through the heater core by performing the following:
- Vehicles with standard heater: Ddisconnect the vacuum hose at the heater control valve to open the heater core flow.
- Vehicles with EATC: Turn the ignition key to the run position and adjust the heater control to highest temp setting.
- Start engine and using a scan tool, select active command and set engine RPM to 2,000. Run engine for one (1) hour.
| NOTE: | FAILURE TO RUN ENGINE AT 2,000 RPM FOR ONE (1) HOUR WILL RESULT IN INSUFFICIENT CLEANING OF THE COOLING SYSTEM. |
| NOTE: | ADJUST THE HEATER CONTROL TO THE FULL HOT POSITION TO ALLOW COOLANT FLOW DURING THE COOLING SYSTEM FLUSH. RECONNECT THE HEATER CONTROL VALVE VACUUM HOSE, IF PREVIOUSLY DISCONNECTED. |
- Return engine to idle speed, shut engine off and allow engine to cool before opening the cooling system. Do not unscrew coolant pressure relief cap when cooling system is hot. Once system has cooled and pressure is released, remove the pressure relief cap.
- Open radiator draincock and drain the cooling system. Leave radiator draincock open.
- Remove the LH cylinder block drain plug and drain the cylinder block.
- Remove the starter. Refer to WSM, Section 303-06.
- Remove the RH cylinder block drain plug and drain the cylinder block.
- Disconnect the lower radiator hose at the midpoint between the engine and radiator end tank and allow all contaminates to drain.
- Reconnect the lower radiator hose at the midpoint between the engine and radiator end tank.
- Close radiator draincock.
- Lightly lubricate O-ring seal on the cylinder block drain plug with clean engine oil and install the RH cylinder block drain plug.
- Lightly lubricate O-ring seal on the cylinder block drain plug with clean engine oil and install the LH cylinder block drain plug.
- Disconnect heater return hose at the heater return port below the degas bottle assembly.
- Remove the degas bottle. Refer to WSM, Section 303-03.
- Connect the drain hose to the heater return port below the degas bottle assembly.
- Using a 3/4" (19 mm) coupling adapter and clamps, attach the fresh water supply hose to the heater return hose.
- Install pinch-off pliers onto the degas bottle supply hose and the EGR coolant return hose adjacent to the degas bottle connection.
- Turn on fresh water supply and allow water to flush the heater core system until drain water is clear of foam, bubbles or discoloration. Use a 1 quart clear jar or similar container to verify that the drain water is flushing out clear.
| NOTE: | FAILURE TO FLUSH ALL THE MOTORCRAFT® ENGINE COOLING SYSTEM IRON CLEANER FROM THE COOLING SYSTEM WILL RESULT IN SHORTENED COOLANT PROTECTION AGAINST CORROSION OF THE COOLING SYSTEM |
- Turn off fresh water supply.
- Open radiator draincock and drain the cooling system. Use a quart jar to verify that the drain water is clear of foam, bubbles or discoloration.
- Remove the LH cylinder block drain plug and drain the cylinder block. Use a quart jar to verify that the drain water is clear of foam, bubbles or discoloration.
- Remove the RH cylinder block drain plug and drain the cylinder block. Use a quart jar to verify that the drain water is clear of foam, bubbles or discoloration.
- Disconnect the lower radiator hose at the midpoint between the engine and radiator end tank and allow water to drain. Use a quart jar to verify that the drain water is clear of foam, bubbles or discoloration.
- If any of the drain water in steps 52 through 56 shows signs of foam, bubbles or discoloration then repeat steps 52 through 57.
- Remove pinch-off pliers from degas bottle supply hose and EGR coolant return hose.
- Disconnect the fresh water supply and drain hoses from the heater return hose and heater return port.
- Reinstall the degas bottle assembly. Refer to WSM, Section 303-03.
- Reconnect the heater return hose to the heater return port.
- Close radiator draincock.
- Reconnect the lower radiator hose at the midpoint between the engine and radiator end tank.
- Lightly lubricate O-ring seal on the cylinder block drain plug with clean engine oil and install the RH cylinder block drain plug.
- Lightly lubricate O-ring seal on the cylinder block drain plug with clean engine oil and install the LH cylinder block drain plug.
- Fill the cooling system with low hardness, low chloride water. Tap water which is verified with Rotunda Water Test Strip 5 pk 328-00007 or equivalent is acceptable. Alternatively, use water treated by reverse osmosis, or water that is de-ionized or distilled. Refer to WSM, Section 303-03 for filling procedure.
- Open the radiator draincock and drain the cooling system. Leave the radiator draincock open.
- Remove the LH cylinder block drain plug and drain the cylinder block.
- Remove the RH cylinder block drain plug and drain the cylinder block.
- Disconnect the lower radiator hose at the midpoint between the engine and radiator end tank and allow all contaminants to drain.
- Reconnect the lower radiator hose at the midpoint between the engine and radiator end tank.
- Close radiator draincock.
- Lightly lubricate O-ring seal on the cylinder block drain plug with clean engine oil and install the RH cylinder block drain plug. Tighten to 177 lb-in (20 N-m).
- Lightly lubricate O-ring seal on the cylinder block drain plug with clean engine oil and install the LH cylinder block drain plug. Tighten to 177 lb-in (20 N-m).
- Install the starter. Refer to WSM, Section 303-06B.
- Replace both thermostats. Refer to WSM, Section 303-03.
- Fill the cooling system with an appropriate mixture of coolant and distilled water. Refer to WSM, Section 303-03.
| PART NUMBER |
PART NAME |
| VC-9 |
Motorcraft® Engine Cooling System Iron Cleaner |
| VC-7-B |
Motorcraft® Premium Gold Engine Coolant with Bittering Agent |
WARRANTY STATUS:
Eligible Under Provisions Of New Vehicle Limited Warranty Coverage
IMPORTANT: Warranty coverage limits/policies are not altered by a TSB. Warranty coverage limits are determined by the identified causal part.
| OPERATION |
DESCRIPTION |
TIME |
| 100705A | 2008-2010 F-Super Duty 6.4L: Flush The Engine Cooling System Using The Service Procedure | 9.4 Hrs. |
DEALER CODING
| BASIC PART NO. |
CONDITION CODE |
| 6A642 |
01 |
NOTE: The information in Technical Service Bulletins is intended for use by trained, professional technicians with the knowledge, tools, and equipment to do the job properly and safely. It informs these technicians of conditions that may occur on some vehicles, or provides information that could assist in proper vehicle service. The procedures should not be performed by "do-it-yourselfers". Do not assume that a condition described affects your car or truck. Contact a Ford, Lincoln, or Mercury dealership to determine whether the Bulletin applies to your vehicle.
Warranty Policy and Extended Service Plan documentation determine Warranty and/or Extended Service Plan coverage unless stated otherwise in the TSB article. The information in this Technical Service Bulletin (TSB) was current at the time of printing. Ford Motor Company reserves the right to supercede this information with updates. The most recent information is available through Ford Motor Company's on-line technical resources.
Copyright © 2010 Ford Motor Company
 Printable View (12193 KB)
 Printable View (12193 KB)


