 Printable View (316 KB)
TSB
06-18-13
06-18-13
- ERRATIC FLUID LEVEL READING ON TRANSAXLE DIPSTICK - LEAKS - 4F50N, AX4N, AX4S
|
Printable View (316 KB)
| |
TSB 06-18-13 |
|
| Publication Date: September 5, 2006 | |
FORD: | 2000-2007 Taurus 2000-2003 Windstar 2004-2007 Freestar |
MERCURY: | 2000-2005 Sable 2004-2007 Monterey |
This article supersedes TSB 05-14-5 to update the Service Procedure and vehicle model years.
Some 2000-2007 Taurus, 2000-2005 Sable, 2000-2003 Windstar, and 2004-2007 Freestar/Monterey vehicles, equipped with a 4F50N, AX4N, or AX4S transaxle, may exhibit an erratic fluid level reading on the transaxle dipstick and possible leaks around the filler tube and grommet. The condition may be due to a restricted transaxle vent.
Repair the transaxle vent restriction by replacing the transaxle vent with a 90° vent stem, small hose clamp, two (2) tie raps, and 24" (61 cm) of 5/16" (8 mm) vacuum hose. The 5/16" (8 mm) vacuum hose will be routed from the 90° vent on the transaxle back to the cowl area, next to the brake master cylinder and tie rapped in place with the end of the hose facing down. Refer to the following Service Procedures.
| NOTE: | ON WINDSTAR, FREESTAR AND MONTEREY SEAL THE COWL PANEL GRILLE (COWL TOP VENT PANEL) AREA, SEE TSB 06-14-10. |
| NOTE: | LEAKS MAY BE MISDIAGNOSED AS COMING FROM THE PAN GASKET. ALWAYS FOLLOW WORKSHOP MANUAL, SECTION 307-01 TO LOCATE THE SOURCE OF A LEAK, AND LEAK CHECK WITH BLACK LIGHT AND DYE. |
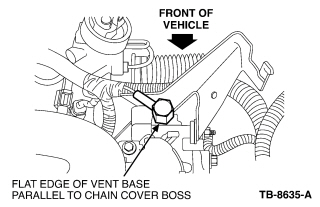
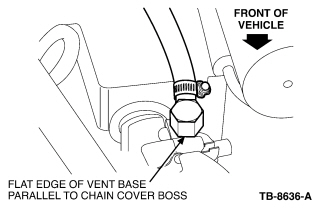
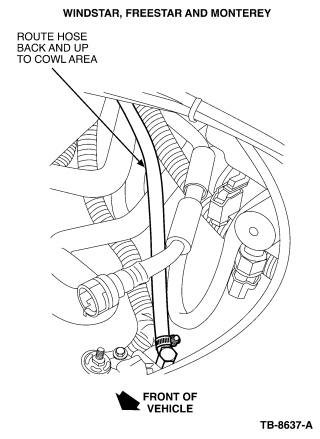
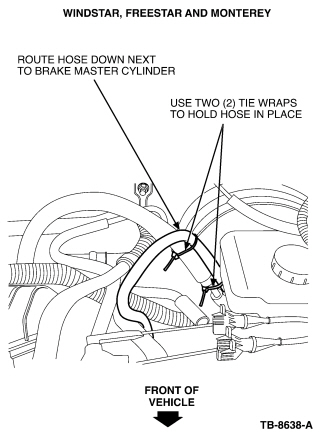
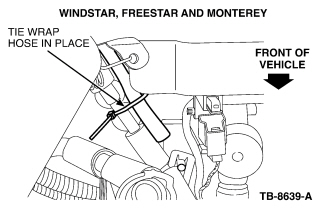
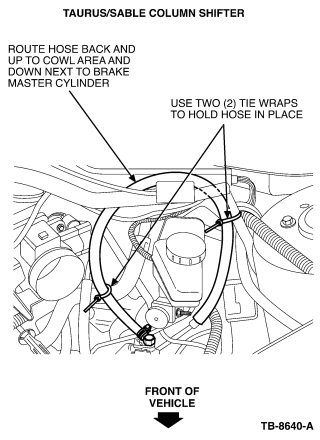
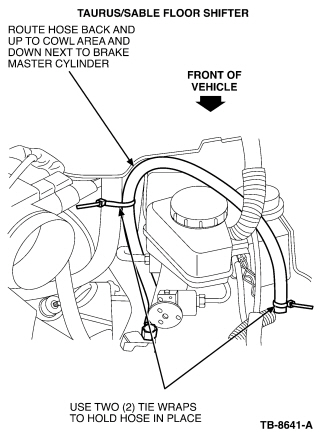
| NOTE: | USE THE ALIGNMENT NOTCHES TO CORRECTLY ALIGN THE AIR CLEANER COVER TO THE AIR CLEANER TRAY. |
| PART NUMBER | PART NAME |
|---|---|
| 1C3Z-7034-AA | Vent |
Eligible Under Provisions Of New Vehicle Limited Warranty Coverage
| OPERATION | DESCRIPTION | TIME |
|---|---|---|
| 061813A | 2000-2007 Taurus, 2000-2005 Sable: Replace Transaxle Vent Following Service Procedure, Includes Time To Check And Fill Transmission Fluid (Do Not Use With 17526A, 17566A, 17508A, 17603A, 9600A, 9601A) | 0.5 Hr. |
| 061813B | 2004-2007 Freestar/Monterey, 2000-2003 Windstar: Replace Transaxle Vent Following Service Procedure, Includes Time To Remove And Reseal The Cowl Panel Grille, Check And Fill Transmission Fluid (Do Not Use With 17526A, 17566A, 17508A, 17603A, 9600A, 9601A, 061410A) | 1.3 Hrs. |
| BASIC PART NO. | CONDITION CODE |
|---|---|
| 7L282 | 41 |
NOTE: The information in Technical Service Bulletins is intended for use by trained, professional technicians with the knowledge, tools, and equipment to do the job properly and safely. It informs these technicians of conditions that may occur on some vehicles, or provides information that could assist in proper vehicle service. The procedures should not be performed by "do-it-yourselfers". Do not assume that a condition described affects your car or truck. Contact a Ford, Lincoln, or Mercury dealership to determine whether the Bulletin applies to your vehicle. Warranty Policy and Extended Service Plan documentation determine Warranty and/or Extended Service Plan coverage unless stated otherwise in the TSB article. The information in this Technical Service Bulletin (TSB) was current at the time of printing. Ford Motor Company reserves the right to supercede this information with updates. The most recent information is available through Ford Motor Company's on-line technical resources.
Copyright © 2006 Ford Motor Company