
This view of the Owner’s Manual contains the very latest information, which may vary slightly from the printed Owner’s Manual originally provided with your vehicle. It may also describe content that is not on or operates differently on your vehicle. Please consider the Owner’s Manual originally provided with your vehicle as the primary source of information for your vehicle.

The information contained in this publication was correct at the time of release.In the interest of continuous development, we reserve the right to change specifications, design or equipment at any time without notice or obligation.No part of this publication may be reproduced, transmitted, stored in a retrieval system or translated into any language in any form by any means without our written permission.Errors and omissions excepted.
Copyright © 2025 Ford Motor Company
Jump Starting the Vehicle
 WARNING:
The gases around the battery can explode if exposed to flames, sparks, or lit cigarettes. An explosion could result in personal injury or vehicle damage.
WARNING:
Batteries contain sulfuric acid which can burn skin, eyes and clothing, if contacted.
WARNING:
Use only an adequate-sized cable with insulated clamps.
WARNING:
The gases around the battery can explode if exposed to flames, sparks, or lit cigarettes. An explosion could result in personal injury or vehicle damage.
WARNING:
Batteries contain sulfuric acid which can burn skin, eyes and clothing, if contacted.
WARNING:
Use only an adequate-sized cable with insulated clamps. |
Preparing Your Vehicle
Note:
Do not attempt to push-start your automatic transmission vehicle. Automatic transmissions do not have push-start capability. Attempting to push-start a vehicle with an automatic transmission may cause transmission damage.
Note:
Use only a 12-volt supply to start your vehicle.
Note:
Do not disconnect the battery of the disabled vehicle as this could damage the vehicle's electrical system.
Park the booster vehicle close to the hood of the disabled vehicle, making sure the two vehicles do not touch. Turn all accessories off.
Connecting the Jumper Cables
|
WARNING:
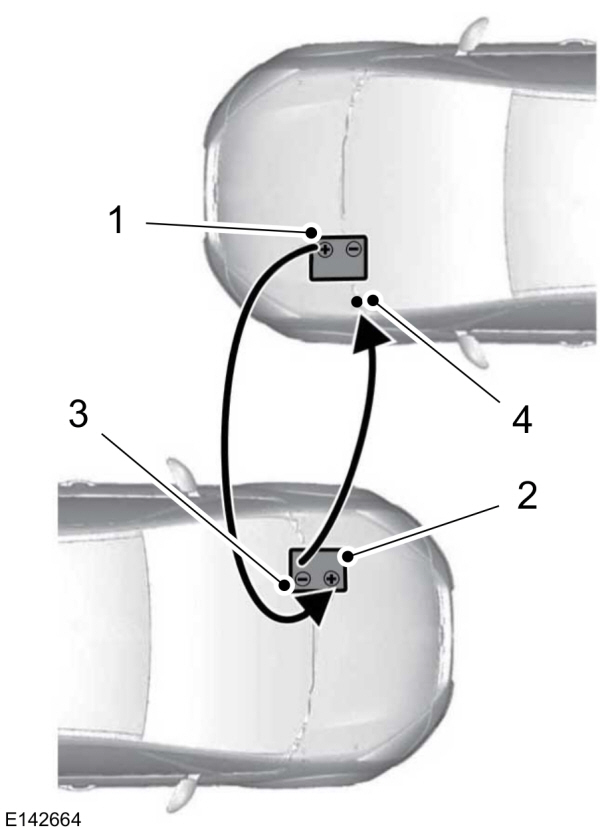
Do not attach the cables to fuel lines, engine rocker covers, the intake manifold or electrical components as grounding points. Stay clear of moving parts. To avoid reverse polarity connections, make sure that you correctly identify the positive (+) and negative (-) terminals on both the disabled and booster vehicles before connecting the cables. Battery positions may vary. |
Note:
In the illustration, the bottom vehicle represents the booster vehicle.
- Connect the positive (+) jumper cable to the positive (+) terminal of the discharged battery.
- Connect the other end of the positive (+) cable to the positive (+) terminal of the assisting battery.
- Connect the negative (-) cable to the negative (-) terminal of the assisting battery.
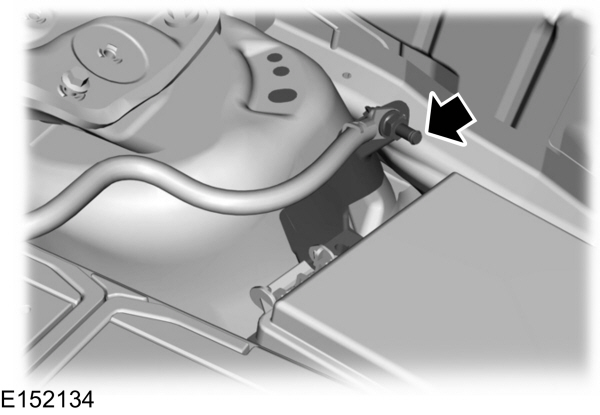
- Make the final connection of the negative (-) cable to an exposed metal part of the stalled vehicle's engine, or connect the negative (-) cable to the ground connection point, if available.
|
WARNING:
Do not connect the end of the second cable to the negative (-) terminal of the battery to be jumped. A spark may cause an explosion of the gases that surround the battery. |
Jump Starting
- Start the engine of the booster vehicle and rev the engine moderately, or press the accelerator gently to keep your engine speed between 2000 and 3000 rpms, as shown in your tachometer.
- Start the engine of the disabled vehicle.
- After starting the disabled vehicle, run both vehicle engines for an additional three minutes before disconnecting the jumper cables.
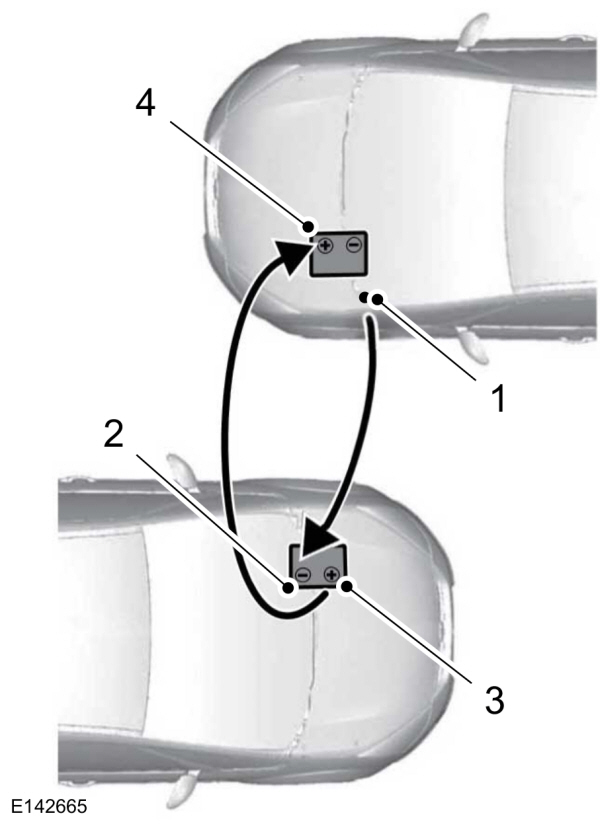
Removing the Jumper Cables
Remove the jumper cables in the reverse order that they were connected.
- Remove the jumper cable from the ground metal surface or connecting point, if available.
- Remove the jumper cable on the negative (-) terminal of the booster vehicle's battery.
- Remove the jumper cable from the positive (+) terminal of the booster vehicle's battery.
- Remove the jumper cable from the positive (+) terminal of the disabled vehicle's battery.
After starting your disabled vehicle and removing the jumper cables, allow your vehicle to idle for several minutes so the battery can recharge.
- Please note that Ford will not respond to individual feedback.
- Please only provide detailed feedback regarding any inaccuracies in the content or any missing content in the Owner's Manual.
- Your feedback will be investigated, and any necessary changes will be updated in the online Owner's Manual.
- Please do not submit any vehicle related feedback. To submit feedback related to your vehicle, please click the link to find the correct contact information for your market.
Your input is valuable in helping us improve our Owner's Manual. Thank you for taking the time to provide your feedback.
North America
| Country | Phone | |
|---|---|---|
| United States | 1-800-392-3673 (FORD) | |
| Canada | 1-800-565-3673 (FORD) | |
| Mexico | 1-800-719-8466 | |
| Guam | 1-800-392-3673 (FORD) | |
| North Mariana Islands | apemcrc@ford.com | |
| Puerto Rico | (800) 841-3673 | prcac@ford.com |
| US Virgin Islands | (800) 841-3673 | prcac@ford.com |
IMG
| Country | Phone | |
|---|---|---|
| Algeria | nafcrc@ford.com | |
| Angola | ssacrc@ford.com | |
| Benin | ssacrc@ford.com | |
| Botswana | ssacrc@ford.com | |
| Burkina FASO | ssacrc@ford.com | |
| Burundi | ssacrc@ford.com | |
| Cameroon | ssacrc@ford.com | |
| Cape Verde | ssacrc@ford.com | |
| Central African Republic | ssacrc@ford.com | |
| Chad | ssacrc@ford.com | |
| Comoros | ssacrc@ford.com | |
| Dem Republic of Congo | ssacrc@ford.com | |
| Djibuti | ssacrc@ford.com | |
| Egypt | nafcrc@ford.com | |
| Equitorial Guinea | ssacrc@ford.com | |
| Eritrea | ssacrc@ford.com | |
| Ethiopia | ssacrc@ford.com | |
| Gabon | ssacrc@ford.com | |
| Gambia | ssacrc@ford.com | |
| Ghana | ssacrc@ford.com | |
| Guinea | ssacrc@ford.com | |
| Guinea-Bissau | ssacrc@ford.com | |
| Ivory Coast | ssacrc@ford.com | |
| Kenya | ssacrc@ford.com | |
| Liberia | ssacrc@ford.com | |
| Libya | nafcrc@ford.com | |
| Madagascar | ssacrc@ford.com | |
| Malawi | ssacrc@ford.com | |
| Mauritania | ssacrc@ford.com | |
| Mauritius | ssacrc@ford.com | |
| Morocco | nafcrc@ford.com | |
| Mozambique | ssacrc@ford.com | |
| Namibia | ssacrc@ford.com | |
| Niger | ssacrc@ford.com | |
| Nigeria | ssacrc@ford.com | |
| Republic of Congo | ssacrc@ford.com | |
| Rwanda | ssacrc@ford.com | |
| Sao Tome and Principe | ssacrc@ford.com | |
| Senegal | ssacrc@ford.com | |
| Sychelles | ssacrc@ford.com | |
| Sierra Leone | ssacrc@ford.com | |
| South Africa | 860011022 | fordcrc2@ford.com |
| South Sudan | ssacrc@ford.com | |
| Swaziland | ssacrc@ford.com | |
| Tanzania | ssacrc@ford.com | |
| Togo | ssacrc@ford.com | |
| Tunisia | nafcrc@ford.com | |
| Uganda | ssacrc@ford.com | |
| Zambia | ssacrc@ford.com | |
| Zimbabwe | ssacrc@ford.com | |
| American Somoa | apemcrc@ford.com | |
| Australia | (13 FORD) 13 3673 | foacust1@ford.com |
| Bangladesh | apemcrc@ford.com | |
| Bhutan | apemcrc@ford.com | |
| Brunei | apemcrc@ford.com | |
| Cambodia | apemcrc@ford.com | |
| Fiji | apemcrc@ford.com | |
| French Polynesia | apemcrc@ford.com | |
| India | apemcrc@ford.com | |
| Indonesia | apemcrc@ford.com | |
| Japan | apemcrc@ford.com | |
| Laos | apemcrc@ford.com | |
| Macao | apemcrc@ford.com | |
| Malaysia | apemcrc@ford.com | |
| Marshall Islands | apemcrc@ford.com | |
| Mongolia | apemcrc@ford.com | |
| Myanmar | apemcrc@ford.com | |
| Nepal | apemcrc@ford.com | |
| New Caledonia | apemcrc@ford.com | |
| New Zealand | 0800 367 369 (FORDNZ) | fnzcust@ford.com |
| Pakistan | apemcrc@ford.com | |
| Palau | apemcrc@ford.com | |
| Papua New Guinea | apemcrc@ford.com | |
| Philippines | 02-88669408 | emailus@ford.com |
| Singapore | apemcrc@ford.com | |
| South Korea | 82-2-1600-6003 | infokr1@ford.com |
| Sri Lanka | apemcrc@ford.com | |
| Tahiti | apemcrc@ford.com | |
| Thailand | 1383 | fordthai@ford.com |
| Timor Leste | apemcrc@ford.com | |
| Vanuatu | apemcrc@ford.com | |
| Vietnam | 1800588888 | fordvn@ford.com |
| Wallis and Futuna | apemcrc@ford.com | |
| Western Somoa | apemcrc@ford.com | |
| Afghanistan | menacac@ford.com | |
| Bahrain | menacac@ford.com | |
| Iraq | menacac@ford.com | |
| Israel | 08-9139995 | service1@kelekmotors.co.il |
| Jordan | menacac@ford.com | |
| Kuwait | 965 1 898900 | menacac@ford.com |
| Lebanon | menacac@ford.com | |
| Oman | menacac@ford.com | |
| Qatar | menacac@ford.com | |
| Saudi Arabia | 8008443673 | menacac@ford.com |
| Syria | menacac@ford.com | |
| United Arab Emirates | 80004441066 | menacac@ford.com |
| Yemen | menacac@ford.com |
Greater China
| Country | Phone | |
|---|---|---|
| China-Imported Vehicles | 400-690-1886 | |
| China-CAF | 951995 | |
| China-JMC | 400-003-1111 | |
| China-Lincoln | 400-988-6789 | |
| Taiwan | 0800-032100 | |
| Hong Kong | (852) 3768-4898 |
South America
| Country | Phone | |
|---|---|---|
| Argentina | 0800-888-3673 | |
| Bolivia | Contact Your Local Ford Distributor | |
| Brazil | 0800-703-3673 | central@ford.com |
| Chile | Contact Your Local Ford Distributor | |
| Colombia | Contact Your Local Ford Distributor | |
| Ecuador | Contact Your Local Ford Distributor | |
| French Guiana | Contact Your Local Ford Distributor | |
| Guyana | Contact Your Local Ford Distributor | |
| Paraguay | Contact Your Local Ford Distributor | |
| Peru | Contact Your Local Ford Distributor | |
| Suriname | Contact Your Local Ford Distributor | |
| Uruguay | Contact Your Local Ford Distributor | |
| Venezuela | Contact Your Local Ford Distributor |
Europe
| Country | Phone | |
|---|---|---|
| Albania | Contact Your Local Ford Distributor | |
| Andorra | Contact Your Local Ford Distributor | |
| Armenia | Contact Your Local Ford Distributor | |
| Austria | 01 20 609 2424 | kundenz@ford.com |
| Azerbaijan | Contact Your Local Ford Distributor | |
| Belarus | Contact Your Local Ford Distributor | |
| Belgium | 32 2 700 67 76 | custfobe@ford.com |
| Bosnia | Contact Your Local Ford Distributor | |
| Bulgaria | Contact Your Local Ford Distributor | |
| Croatia | Contact Your Local Ford Distributor | |
| Cyprus | Contact Your Local Ford Distributor | |
| Czech Republic | 800 3673 29 | zakaznik@ford.com |
| Denmark | 43 68 2000 | crcdk@ford.com |
| Estonia | 372 6710 060 | ford@infoauto.ee |
| Falkland Islands | Contact Your Local Ford Distributor | |
| Finland | 09 725 22022 | palvelut@ford.com |
| France | 0800 005 005 | crcfr@ford.com |
| Georgia | Contact Your Local Ford Distributor | |
| Germany | 0221 9999 2 999 | kunden@ford.com |
| Girbraltar | Contact Your Local Ford Distributor | |
| Greece | 216 900 88 99 | info11@ford.com |
| Hungary | +36 1 7777 555 | Contact Your Local Ford Distributor |
| Iceland | Contact Your Local Ford Distributor | |
| Ireland | 1800 771 199 | crcirela@ford.com |
| Italy | 800 22 44 33 | tu@ford.com |
| Kazakhstan | Contact Your Local Ford Distributor | |
| Latvia | +371 67303020 | |
| Liechtenstein | Contact Your Local Ford Distributor | |
| Lithuania | 370 5216 8226 | forduzklausos@inchcape.lt |
| Luxembourg | +352 248 71 800 | custfobe@ford.com |
| Macedonia | Contact Your Local Ford Distributor | |
| Malta | Contact Your Local Ford Distributor | |
| Moldova | Contact Your Local Ford Distributor | |
| Monaco | Contact Your Local Ford Distributor | |
| Montenegro | Contact Your Local Ford Distributor | |
| Netherlands | 70 7703 777 | klanten@ford.com |
| Norway | 47 66819739 | infonor@ford.com |
| Poland | 48 22 522 27 27 | kontakty@ford.com |
| Portugal | 800 210 373 | clientes@ford.com |
| Romania | 40 312298798 | crcro@ford.com |
| Russia | Contact Your Local Ford Distributor | |
| San Marino | Contact Your Local Ford Distributor | |
| Serbia | Contact Your Local Ford Distributor | |
| Serbia and Montenegro | Contact Your Local Ford Distributor | |
| Slovakia | Contact Your Local Ford Distributor | |
| Slovenia | Contact Your Local Ford Distributor | |
| South Georgia | Contact Your Local Ford Distributor | |
| Spain | 900 80 70 90 | crcspain@ford.com |
| Sweden | 08-593 66 333 | fordkund@ford.com |
| Switzerland | 044 511 14 45 | assistch@ford.com |
| Turkey | Contact Your Local Ford Distributor | |
| Ukraine | Contact Your Local Ford Distributor | |
| United Kingdom | 020 3564 4444 | UKCRC1@ford.com |
Caribbean and Central America
| Country | Phone | |
|---|---|---|
| Anguilla | (313) 594-4857 | expcac@ford.com |
| Antigua | (313) 594-4857 | expcac@ford.com |
| Aruba | (313) 594-4857 | expcac@ford.com |
| Bahamas | (313) 594-4857 | expcac@ford.com |
| Barbados | (313) 594-4857 | expcac@ford.com |
| Bermuda | (313) 594-4857 | expcac@ford.com |
| Bonaire and St. Eustatius | (313) 594-4857 | expcac@ford.com |
| Cayman Islands | (313) 594-4857 | expcac@ford.com |
| Curacao | (313) 594-4857 | expcac@ford.com |
| Dominica | (313) 594-4857 | expcac@ford.com |
| Dominican Republic | (313) 594-4857 | expcac@ford.com |
| Grenada | (313) 594-4857 | expcac@ford.com |
| Haiti | (313) 594-4857 | expcac@ford.com |
| Jamaica | (313) 594-4857 | expcac@ford.com |
| Martinique | (313) 594-4857 | expcac@ford.com |
| Montserrat | (313) 594-4857 | expcac@ford.com |
| St. Kitts and Nevis | (313) 594-4857 | expcac@ford.com |
| St. Lucia | (313) 594-4857 | expcac@ford.com |
| St. Martin | (313) 594-4857 | expcac@ford.com |
| St. Vincent and the Grenadines | (313) 594-4857 | expcac@ford.com |
| Trinidad and Tobago | (313) 594-4857 | expcac@ford.com |
| Turks and Caicos | (313) 594-4857 | expcac@ford.com |
| British Virgin Islands | (313) 594-4857 | expcac@ford.com |
| Netherlands Antilles | (313) 594-4857 | expcac@ford.com |
| Belize | (313) 594-4857 | expcac@ford.com |
| Costa Rica | (313) 594-4857 | expcac@ford.com |
| El Salvador | (313) 594-4857 | expcac@ford.com |
| Guatemala | (313) 594-4857 | expcac@ford.com |
| Honduras | (313) 594-4857 | expcac@ford.com |
| Nicaragua | (313) 594-4857 | expcac@ford.com |
| Panama | (313) 594-4857 | expcac@ford.com |