
This view of the Owner’s Manual contains the very latest information, which may vary slightly from the printed Owner’s Manual originally provided with your vehicle. It may also describe content that is not on or operates differently on your vehicle. Please consider the Owner’s Manual originally provided with your vehicle as the primary source of information for your vehicle.

The information contained in this publication was correct at the time of release.In the interest of continuous development, we reserve the right to change specifications, design or equipment at any time without notice or obligation.No part of this publication may be reproduced, transmitted, stored in a retrieval system or translated into any language in any form by any means without our written permission.Errors and omissions excepted.
Copyright © 2024 Ford Motor Company
Changing a Bulb
 Headlamp assembly:

Lamp Assembly Condensation
Exterior lamps are vented to accommodate normal changes in pressure. Condensation can be a natural by-product of this design. When moist air enters the lamp assembly through the vents, there is a possibility that condensation can occur when the temperature is cold. When normal condensation occurs, a thin film of mist can form on the interior of the lens. The thin mist eventually clears and exits through the vents during normal operation. Clearing time may take as long as 48 hours under dry weather conditions.
Examples of acceptable condensation are:- Presence of thin mist (no streaks, drip marks or droplets).
- Fine mist covers less than 50% of the lens.
- Water puddle inside the lamp.
- Large water droplets, drip marks or streaks present on the interior of the lens.
Take your vehicle to an authorized dealer for service if any of the above conditions of unacceptable moisture are present.
Replacing the Headlamp Bulbs
 WARNING:
Handle a halogen headlamp bulb carefully and keep out of children’s reach. Grasp the bulb by only its plastic base and do not touch the glass. The oil from your hand could cause the bulb to break the next time the headlamps are operated.
WARNING:
Handle a halogen headlamp bulb carefully and keep out of children’s reach. Grasp the bulb by only its plastic base and do not touch the glass. The oil from your hand could cause the bulb to break the next time the headlamps are operated. |
Note:
If the bulb is accidentally touched, it should be cleaned with rubbing alcohol before being used.
Headlamp assembly:- Side marker lamp bulb
- High beam headlamp bulb
- Low beam headlamp bulb
- Front parking/Turn signal lamp bulb
Replacing the High Beam Headlamp Bulb
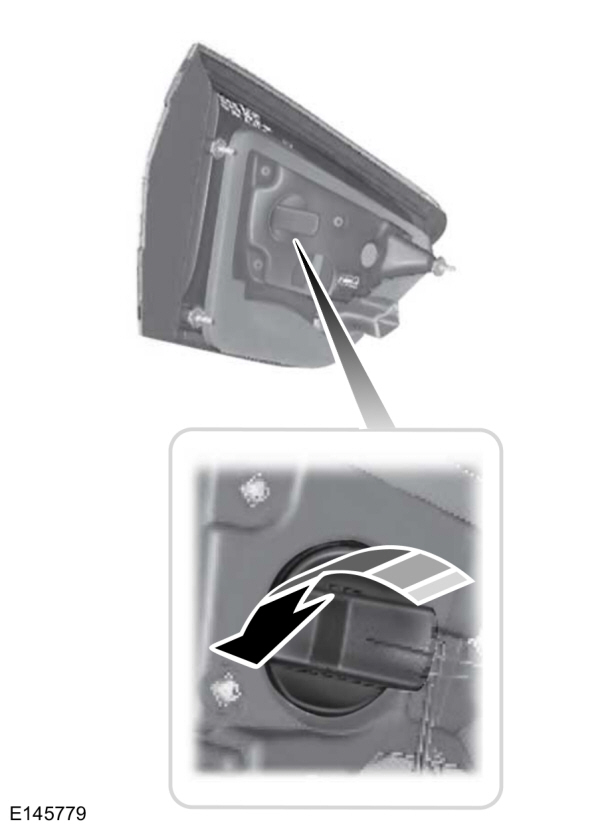
- Remove the headlamp assembly.
- Remove the service cap.
- Disconnect the electrical connector.
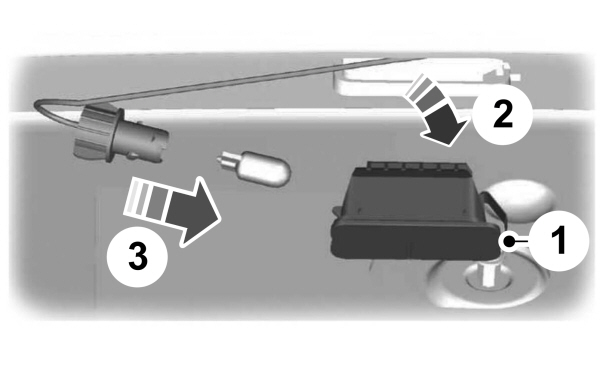
- Turn the bulb counterclockwise and remove it from the headlamp assembly.
- Install the new bulb in reverse order.
Replacing the Low Beam Headlamp Bulb
- Remove the headlamp assembly.
- Remove the service cap.
- Disconnect the electrical connector.
- Release the retainer spring and remove it from the headlamp assembly.
- Install the new bulb in reverse order.
Replacing the Front Parking/Turn Signal Lamp Bulb
- Remove the headlamp assembly.
- Turn the bulb assembly counterclockwise and remove it from the headlamp assembly.
- Separate the bulb from the bulb socket.
- Install the new bulb in reverse order.
Replacing the Side Marker Lamp Bulb
- Remove the headlamp assembly.
- Remove the service cap.
- Depress the tabs on the socket and remove the socket and bulb together.
- Separate the bulb from the bulb socket.
- Install the new bulb in reverse order.
Replacing the Tail, Brake, High-Mount Brake Lamp, and Turn Signal Lamp Bulbs
These lamps are designed with LED light sources. For replacement, see your authorized dealer.
Replacing a Reverse Lamp Bulb
- Make sure the lighting control is in the off position.
- Open the trunk deck lid.
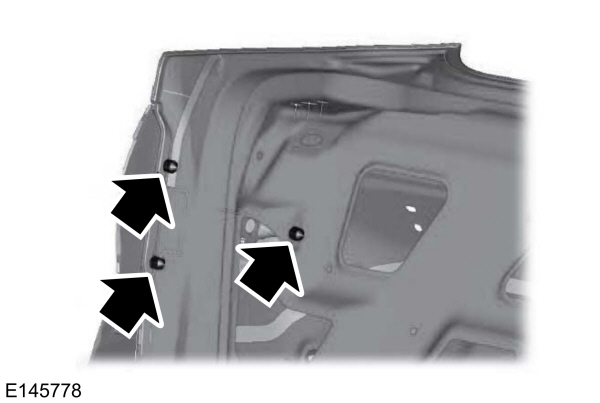
- Remove the push pins and reposition the inner body side trim.
- Remove the three lamp assembly nuts.
- Gently pull the lamp assembly away from the vehicle.
- Turn the bulb holder counterclockwise and remove the bulb holder.
- Remove the bulb from the bulb holder.
Install the new bulb in reverse order.
Replacing the License Plate Lamp Bulb
- Carefully release the spring clip.
- Remove the lamp.
- Remove the bulb.
Install the new bulb in reverse order.
Thank You For Your Feedback