
This view of the Owner’s Manual contains the very latest information, which may vary slightly from the printed Owner’s Manual originally provided with your vehicle. It may also describe content that is not on or operates differently on your vehicle. Please consider the Owner’s Manual originally provided with your vehicle as the primary source of information for your vehicle.

The information contained in this publication was correct at the time of release.In the interest of continuous development, we reserve the right to change specifications, design or equipment at any time without notice or obligation.No part of this publication may be reproduced, transmitted, stored in a retrieval system or translated into any language in any form by any means without our written permission.Errors and omissions excepted.
Copyright © 2024 Ford Motor Company
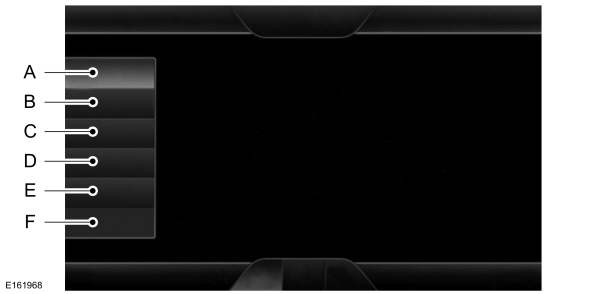
Settings

Only the photograph(s), which meets the following conditions display:

You can also access Help using the voice commands. The system provides allowable voice commands for the current mode.
| Item | Message |
|---|---|
| A | Clock |
| B | Display |
| C | Sound |
| D | Vehicle |
| E | Settings |
| F | Help |
Clock
Under this menu, you can set the clock, access and adjust the display, sound and vehicle settings as well as access settings for specific modes or the help feature.
To make adjustments using the touchscreen, select:
| Menu Item | Action and Description |
|---|---|
Settings | Press the settings icon. |
Clock | Press the + or - to adjust the time. From this screen, you can also make other adjustments such as 12-hour or 24-hour mode, activate GPS time synchronization and have the system automatically update new time zones. You can also switch the outside air temperature display off and on. It appears at the top center of the touchscreen, next to the time and date. |
Note:
You cannot manually set the date. Your vehicle’s GPS does this for you.
Note:
If the battery has been disconnected, your vehicle needs to acquire a GPS signal to update the clock. Once your vehicle acquires the signal, it may take a few minutes for the update to display the correct time.
Display
You can adjust the display using the touchscreen or the voice button on the steering wheel controls.
To make adjustments using the touchscreen, select:
| Menu Item | Action and Description | |
|---|---|---|
Settings | Press the settings icon. | |
Display | ||
| Then select from the following: | ||
Auto Dim | When set to On, lets you use the automatic dimming feature. When set to Off you are able to adjust the brightness of the screen. | |
Brightness | Make the screen display brighter or dimmer. | |
Mode | Allows you to switch the display off. It also allows you to set the screen to a certain brightness or have the system automatically change based on the outside light level. If you also select: | |
Auto | These features will allow you to adjust the dimming of your screen. | |
Night | ||
Auto Dim Manual Offset | Allows you to adjust screen dimming as the outside lighting conditions change from day to night. | |
Edit Wallpaper | Allows you to display the default photo or upload your own. | |
To make adjustments using the voice button, press the button and when prompted, say:
| Voice command |
|---|
Display Settings |
Uploading Photos for Your Home Screen Wallpaper
Note:
You cannot load photos directly from your camera. You must access the photos either from your USB mass storage device or from an SD card.
Note:
Photographs with extremely large dimensions (such as 2048 x 1536) may not be compatible and appear as a blank (black) image on the display.
The system allows you to upload and view up to 32 photos.
To upload your photos, select:
| Menu Item | Action and Description |
|---|---|
Settings | Press the settings icon. |
Display | |
Edit Wallpaper | Follow the system prompts to upload your photographs. |
Only the photograph(s), which meets the following conditions display:
- Compatible file formats are as follows: JPG, GIF, PNG, BMP.
- Each file must be 1.5 MB or less.
- Recommended dimensions: 800 x 384.
Sound
To make adjustments using the touchscreen, select:
| Message |
|---|
Settings |
Sound |
| Then select from the following: |
Bass |
Midrange |
Treble |
Set Balance and Fade |
Occupancy Mode |
Speed Compensated Volume |
DSP |
Note:
Your vehicle may not have all of these sound settings.
Vehicle
To make adjustments using the touchscreen, select:
| Message | |
|---|---|
Settings | |
Vehicle | |
| Then select from the following: | |
Ambient Lighting | |
Vehicle Health Report | * |
Camera Settings | |
Enable Valet Mode | |
* US only
Ambient Lighting (If Equipped)
When you switch this feature on, ambient lighting illuminates the dashboard, footwells, doors, cupholders, and console with a choice of colors.
To make adjustments using the touchscreen, select:
| Menu Item | Action and Description |
|---|---|
Settings | Press the settings icon. |
Vehicle | |
Ambient Lighting |
- You can then touch the desired color.
- Use the scroll bar to increase or decrease the intensity.
- To switch the feature on or off, press the power button.
Vehicle Health Report (If Equipped, US Only)
To make adjustments using the touchscreen, select:
| Message | Action and Description |
|---|---|
Settings | Press the settings icon. |
Vehicle | |
Vehicle Health | |
Automatic Reminders | Turn on and off and set the mileage interval at which you would like to receive the reports. Press the ? for more information on these selections. |
Mileage Interval (Miles) | |
Run Vehicle Health Report Now | To run the vehicle health report immediately. |
You can find more information on Vehicle Health Report in this chapter.
Camera Settings
To make adjustments using the touchscreen, select:
| Message | Action and Description |
|---|---|
Settings | Press the settings icon. |
Vehicle | |
Camera Settings | |
| Then select from the following: | |
Enhanced Park Aids | |
Rear Camera Delay | |
You can find more information on the rear view camera system in another chapter. See
Parking Aids.
Enable Valet Mode
Note:
If the system locks, and you need to reset the PIN, please contact the Customer Relationship Center. United States: 1-800-392-3673 Canada: 1-800-565-3673
To make adjustments using the touchscreen, select:
| Menu Item | Action and Description |
|---|---|
Settings | Press the settings icon. |
Vehicle | |
Enable Valet Mode | Then enter a four digit PIN twice, as prompted. |
Continue | After you press Continue the system locks until you enter the PIN again. |
Settings
Access and adjust system settings, voice features, as well as phone, navigation and wireless settings.
System
To make adjustments using the touchscreen, select:
| Message | Action and Description |
|---|---|
Settings | Press the settings icon. |
System | |
| Then select from the following: | |
Language | Select to have the touchscreen display in English, Spanish or French. |
Distance | Select to display units in kilometers or miles. |
Temperature | Select to display units in Celsius or Fahrenheit. |
System Prompt Volume | Adjust the volume of voice prompts from the system. |
Touch Screen Button Beep | Select to have the system beep to confirm choices made through the touchscreen. |
Keyboard Layout | Have the touchscreen keyboard display in QWERTY or ABC format. |
Install Applications | Install any downloaded applications or view the current software licenses. |
Master reset | Select to restore factory defaults. This erases all personal settings and personal data. |
Voice Control
To make adjustments using the touchscreen, select:
| Message | Action and Description |
|---|---|
Settings | |
Voice Control | |
| Then select from the following: | |
Interaction Mode | Novice interaction mode provides more detailed interaction and guidance. Advanced mode has less audible interaction and more tone prompts. |
Confirmation Prompts | Have the system ask you short questions if it has not clearly heard or understood your request. Note: Even with confirmation prompts turned off, the system may occasionally ask you to confirm settings. |
Media Candidate Lists | Candidate lists are possible results from your voice commands. The system simply makes a best guess at your request with these turned off. |
Phone Candidate Lists | Candidate lists are possible results from your voice commands. The system simply makes a best guess at your request with these turned off. |
Voice Control Volume | This allows you to adjust the system’s voice volume level. |
Media Player
To make adjustments using the touchscreen, select:
| Message | Action and Description |
|---|---|
Settings | Press the settings icon. |
Media Player | |
| Then select from the following: | |
Autoplay | When this feature is on, the system automatically switches to the media source upon initial connection. This allows you to listen to music during the indexing process. When this feature is off, the system does not automatically switch to the inserted media source. |
Bluetooth Devices | Select to connect, disconnect, add or delete a device. You can also set a device as your favorite so that the system automatically attempts to connect to that device at every ignition cycle. |
Gracenote® Database Info | This allows you to view the version level of the Gracenote Database. |
Gracenote® Management | With this feature on, the Gracenote Database supplies metadata information for your music files. This overrides information from your device. This feature defaults to off. |
Cover Art Priority | With this feature on, the Gracenote Database supplies cover art for your music files. This overrides any art from your device. This feature defaults to Media Player. |
Navigation
To make adjustments using the touchscreen, select:
| Message | Action and Description |
|---|---|
Settings | Press the settings icon. |
Navigation | |
| Then select from the following: | |
Map Preferences | Turn breadcrumbs on and off. |
| Have the system display your turn list top to bottom or bottom to top. | |
| Turn the Parking POI notification on and off. | |
Route Preferences | Select shortest route, fastest route or ecological route as your preferred route. This route will be displayed first. |
| Always use preferred route. If set to yes, the system will only calculate a single route. This speeds up your destination entry process. | |
| Select a low, medium or high cost for the calculated ecological route. This may incur a time penalty. | |
| Have the system avoid freeways. | |
| Have the system avoid toll roads. | |
| Have the system avoid ferries or car trains. | |
| Have the system use HOV (high-occupancy vehicle) lanes. | |
Navigation Preferences | Have the system use guidance prompts. |
| Have the system automatically fill-in State/Province information. | |
Traffic Preferences | Have the system automatically avoid traffic concerns or allow you to accept or decline an alternative route. |
| Have the system automatically alert you to traffic concerns that occur on your route. | |
| Have the system display accident icons. | |
| Have the system display traffic jam icons. | |
| Have the system display closed roads. | |
| Have the system display areas where road work occurs. | |
| Have the system display incident icons. | |
| Have the system display areas where difficult driving conditions may occur. | |
| Have the system display areas where snow and ice on the road may occur. | |
| Have the system display any smog alerts. | |
| Have the system display weather warnings. | |
| Have the system display where there may be reduced visibility. | |
| Have the system turn on your radio for traffic announcements. | |
Avoid Areas | Enter specific areas that would like to avoid on planned navigation routes. |
Phone
To make adjustments using the touchscreen, select:
| Message | Action and Description |
|---|---|
Settings | Press the settings icon. |
Phone | |
| Then select from the following: | |
Bluetooth Devices | Connect, disconnect, add or delete a device, as well as save it as a favorite. |
Bluetooth | Turn Bluetooth on and off. |
Do Not Disturb | Have all calls go directly to your voice mail and not ring inside your vehicle. With this feature turned on, text message notifications are also suppressed and do not ring inside your vehicle. |
911 Assist | Turn on or turn off the 911 Assist feature. See Information. |
Phone Ringer | Select the type of notification for phone calls - ring tone, beep, text to speech or silent. |
Text Message Notification | Select the type of notification for text messages - alert tone, beep, text to speech, or have it be silent. |
Internet Data Connection | If compatible with your phone, you can adjust your internet data connection. Select to make your connection profile with the personal area network or to turn off your connection. You can also choose to adjust your settings or have the system always connect, never connect when roaming, or query on connect. Press ? for more information. |
Manage Phonebook | Access features, such as automatic phonebook download, re-download your phonebook, add contacts from your phone as well as delete or upload your phonebook. |
Roaming Warning | Have the system alert you when in Roaming mode. |
Wireless and Internet
Your system has a Wi-Fi feature that creates a wireless network within your vehicle, thereby allowing other devices (such as personal computers or phones) in your vehicle to speak to each other, share files or play games. Using this Wi-Fi feature, everyone in your vehicle can also access the internet if you have a USB mobile broadband connection inside your vehicle, your phone supports personal area networking or if you park outside a wireless hotspot.
To make adjustments using the touchscreen, select:
| Menu Item | Action and Description |
|---|---|
Settings | Press the settings icon. |
| Wireless & Internet | |
| Then select from the following: | |
Wi-Fi Settings | Wi-Fi Network (Client) Mode |
| Turns the Wi-Fi feature on and off in your vehicle. Make sure you switch it on for connectivity purposes. | |
Choose a Wireless Network | |
| Allows you to use a previously stored wireless network. You can categorize by alphabetical listing, priority and signal strength. You can also choose to search for a network, connect to a network, disconnect from a network, receive more information, prioritize a network or delete a network. | |
Gateway (Access Point) Mode | |
| Makes SYNC an access point for a phone or a computer when turned on. This forms the local area network within your vehicle for things, such as game playing, file transfer and internet browsing. Press ? for more information. | |
Gateway (Access Point) Settings | |
| Allows you to view and change settings for using SYNC as the internet gateway. | |
Gateway (Access Point) Devices List | |
| Allows you to view recent connections to your Wi-Fi system. | |
USB Mobile Broadband | Instead of using Wi-Fi, your system can also use a USB mobile broadband connection to access the internet. (You must switch on your mobile broadband device on your personal computer before connecting it to the system.) This screen allows you to set up what is your typical area for your USB mobile broadband connection. (USB mobile broadband settings may not display if the device is already on.) You can select the following: |
Country | |
Carrier | |
Phone Number | |
User Name | |
Password | |
Bluetooth Settings | Shows you the currently paired devices as well as giving you your typical Bluetooth options to connect, disconnect, set as favorite, delete and add device. Bluetooth is a registered trademark of the Bluetooth SIG. |
Prioritize Connection Methods | Choose your connection methods and change them as needed. You can select to change order and have the system either always attempt to connect using a USB, mobile broadband, or using Wi-Fi. |
The Wi-Fi CERTIFIED Logo is a certification mark of the Wi-Fi Alliance.
Help
To make adjustments using the touchscreen, select:
| Message | Action and Description | |
|---|---|---|
Settings | Press the settings icon. | |
Help | ||
| Then select from the following: | ||
System Information | Touchscreen system serial number | |
| Your vehicle identification number (VIN) | ||
| Touchscreen system software version | ||
| Navigation system version | ||
| Map database version | ||
| Sirius satellite radio ESN | ||
| Gracenote® Database Information and Library version | ||
Software Licenses | View the licenses for any software and applications installed on your system. | |
Driving Restrictions | Certain features are not accessible when your vehicle is moving. | |
911 Assist | Turn on and turn off the 911 Assist feature. See Information. | |
In Case of Emergency (ICE) Quick Dial | Allows you to save up to two numbers as ICE contacts for quick access if there is an emergency. The ICE contacts you select appear at the end of the Emergency Assistance call process. | |
Edit | Select to access your phonebook and then select the desired contacts. The numbers then appear as options on this screen for the ICE 1 and ICE 2 buttons. | |
Voice Command List | View categorized lists of voice commands. | |
You can also access Help using the voice commands. The system provides allowable voice commands for the current mode.Press the voice button and when prompted say:
| Voice command |
|---|
Help |
You can say help at any time to get assistance with commands, menus or other information.
Thank You For Your Feedback