
This view of the Owner’s Manual contains the very latest information, which may vary slightly from the printed Owner’s Manual originally provided with your vehicle. It may also describe content that is not on or operates differently on your vehicle. Please consider the Owner’s Manual originally provided with your vehicle as the primary source of information for your vehicle.

The information contained in this publication was correct at the time of release.In the interest of continuous development, we reserve the right to change specifications, design or equipment at any time without notice or obligation.No part of this publication may be reproduced, transmitted, stored in a retrieval system or translated into any language in any form by any means without our written permission.Errors and omissions excepted.
Copyright © 2024 Ford Motor Company
Navigation

 Select settings for the system to take into account when planning your route.
 When in navigation mode, press the voice button on the steering wheel controls.
Note:
The navigation SD card must be in the SD card slot to operate the navigation system. If you need a replacement SD card, see an authorized dealer.
Note:
The SD card slot is spring-loaded. To remove the SD card, just push the card in and release it. Do not attempt to pull the card out to remove it; this could cause damage.
Your navigation system is comprised of two main features, destination mode and map mode.
Destination Mode
To set a destination, press the green corner of your touchscreen, then press:
| Menu Item |
|---|
Dest. |
| Choose any of the following: |
My Home |
Favorites |
Previous Destinations |
Point of Interest |
Emergency |
Street Address |
Intersection |
City Center |
Map |
Edit Route |
Cancel Route |
To set your destination, enter the necessary information into the highlighted text fields (in any order).
For an address destination entry, press:
| Menu Item | Action and Description |
|---|---|
Go | Pressing this button makes the address location appear on the map. |
To choose a previous destination, press:
| Menu Item | Action and Description |
|---|---|
Previous Destinations | The last 20 destinations you have selected appear. |
Once you have chosen your destination press:
| Menu Item | Action and Description | |
|---|---|---|
Set as Dest | To make this your destination. You can also choose to set this as a waypoint (have the system route to this point on the way to your current destination) or save it as a favorite. You can then choose your route from three different options. | |
Fastest Route | Uses the fastest moving roads possible. | |
Shortest Route | Uses the shortest distance possible. | |
Eco Route | Uses the most fuel-efficient route. | |
To begin navigation press:
| Menu Item | Action and Description |
|---|---|
Start Route | You can cancel the route or have the system demo the route for you. During route guidance, you can press the talking bubble icon that appears in the upper right navigation corner (green bar) if you want the system to repeat route guidance information. When the system repeats the last guidance instruction, it updates the distance to the next guidance instruction, since it detects when the vehicle is moving. |
Note:
If your vehicle is on a recognized road and you do not press the Start Route button, the system defaults to the Fastest Route option and begins guidance.
Points of Interest (POI) Categories
You can select from a variety of POI categories that display on the screen.
To expand these listings, press the + in front of the listing.
The system also allows you to sort alphabetically or by distance.
cityseekr
Note:
cityseekr point of interest (POI) information is limited to approximately 912 cities (881 in the United States, 20 in Canada and 11 in Mexico).
cityseekr, when available, is a service that provides more information about certain points of interest such as restaurants, hotels and attractions.
When you have selected a point of interest, the location and information appear, such as address and phone number. If cityseekr lists the point of interest, more information is available, such as a brief description, check-in and checkout times or restaurant hours.
For a longer review, a list of services and facilities, the average room, meal price or the website press:
| Menu Item |
|---|
More Information |
This screen displays the point of interest icon such as:
 Hotel
Hotel |  Coffeehouse
 |
 Food & Drink
 |  Nightlife
 |
 Attraction
 |  This icon appears when your selection exists in multiple categories within the system.
 |
When you are viewing more information for hotels, cityseekr also tells you if the hotel has certain services and facilities using icons, such as:
- Restaurant
- Business center
- Handicap facilities
- Laundry
- Refrigerator
- 24 hour room service
- Fitness center
- Internet access
- Pool
- Wi-FI
For restaurants, cityseekr can provide information such as star rating, average cost, review, handicap access, hours of operation, and website address.
For hotels, cityseekr can provide information such as star rating, price category, review, check-in and checkout times, hotel service icons and website address.
Setting Your Navigation Preferences
Select settings for the system to take into account when planning your route.To access the settings options, press
| Menu Item | |
|---|---|
Settings | |
Navigation |
You can then select any of the following options.
| Menu Item | Second Level Messages, Actions and Descriptions | |
|---|---|---|
Map Preferences | ||
| Then select any of the following: | ||
Breadcrumbs | Display your vehicle’s previously traveled route with white dots. You can switch this feature: | |
On | Off | |
Turn List Format | Have the system display your turn list | |
Top to Bottom | Bottom to Top | |
Parking POI Notification | When parking point of interest notification is on, the icons display on the map when you get close to your destination. This may not be very useful in dense areas, and may clutter the map when other points of interest display. Set the automatic parking point of interest notification. You can switch this feature: | |
On | Off | |
| Menu Item | Second Level Messages, Actions and Descriptions | ||
|---|---|---|---|
Route Preferences | |||
| Then select any of the following: | |||
Preferred Route | Choose to have the system display your chosen route type. | ||
Shortest Route | Fastest Route | Ecological | |
Always use Preferred Route | Bypass route selection in destination programming. The system only calculates one route based on preferred route setting. When activated, the system uses your selected route type to calculate only one route to the desired destination. | ||
Eco Time Penalty | Select a level of cost for the calculated Eco Route. The higher the setting, the longer the time allotment is for the route. | ||
Avoid | When activated, you can to choose to have the system avoid highways, toll roads, ferries, and car trains when planning your route. | ||
Use HOV Lanes | Have the system use high-occupancy vehicle lanes, if available, when planning your route. | ||
| Menu Item | Second Level Messages, Actions and Descriptions | ||
|---|---|---|---|
Navigation Preferences | |||
| Then select any of the following: | |||
Guidance Prompts | Select the type of prompts the system uses. | ||
Tones Only | Voice and Tones | ||
Auto - Fill State/Province | Have the system automatically fill in this information based on what you have already entered into the system. You can switch this feature: | ||
On | Off | ||
| Menu Item | Second Level Messages, Actions and Descriptions | |
|---|---|---|
Traffic Preferences | ||
| Then select any of the following: | ||
Avoid Traffic Problems | You can choose how you want the system to handle traffic problems along your route. | |
Automatic | Have the system reroute you to avoid traffic incidents that develop and impact the current route. The system does not provide a traffic alert notification | |
Manual | Have the system always provide a traffic alert notification for traffic incidents along the planned route. You have a choice to accept or ignore the notification before making the route deviation. | |
Traffic alert notification | Activate traffic alert notifications on or off. | |
| You are also able to switch on and off the 11 traffic map icons. | These icons will alert you to traffic and driving conditions including accidents, closures and weather conditions. | |
| Menu Item | Second Level Messages, Actions and Descriptions | |
|---|---|---|
Avoid Areas | Choose areas which you want the system to avoid when calculating a route for you | |
| Then select any of the following: | ||
Add | Once you make a selection, the system tries to avoid the area(s) if possible for all routes. Select this button to program an entry, then choose a destination entry method. You can edit the name or location of a destination or remove it from your selections. | |
Delete | To remove an area from your selection, choose the listing on the screen. The screen will change, then press delete and confirm the deletion. | |
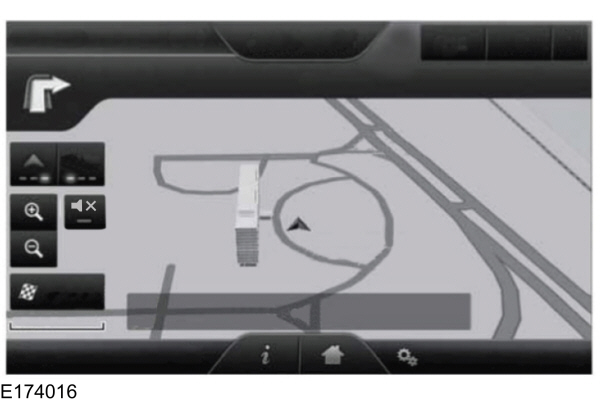
Map Mode
Press the green bar in the upper right area of the touchscreen to view map mode. Map mode shows advanced viewing comprised of both 2D city maps as well as 3D landmarks (when available).
2D city maps show detailed outlines of buildings, visible land use and land elements and detailed railway infrastructure for the most essential cities around the globe. These maps also contain features, such as town blocks, building footprints and railways.
3D landmarks appear as clear, visible objects that are typically recognizable and have a certain tourist value. The 3D landmarks appear in 3D map mode only. Coverage varies and improves with updated map releases.
Change the appearance of the map display by repeatedly pressing the arrow button in the upper left corner of the screen. It toggles between three different map modes: Heading up, North up and 3D.
 Heading up (2D map) always shows the direction of forward travel to be upward on the screen. This view is available for map scales up to 2.5 miles (4 kilometers). The system remembers this setting for larger map scales, but shows the map in North up only. If the scale returns below this level, the system restores Heading up.
 |  North up (2D map) always shows the northern direction to be upward on the screen.
 |
 3D map mode provides an elevated perspective of the map. This viewing angle can be adjusted and the map can be rotated 180 degrees by touching the map twice, and then dragging your finger along the shaded bar with arrows at the bottom of the map.
 |
You can also select the following options:
| Menu Items | Description |
|---|---|
View | Switches between full map, street list and exit view in route guidance. |
Menu | Displays a pop-up box that allows direct access to navigation settings. |
 Press the speaker button on the map to mute route guidance. When the light on the button illuminates, the feature is on. The speaker button appears on the map only when route guidance is active.
 |  Re-center the map by pressing this icon whenever you scroll the map away from your vehicle’s current location.
 |
Auto Zoom
Press the green bar to access map mode, then select the + or - zoom button to bring up the zoom level and Auto buttons on the touchscreen. When you press Auto, Auto Zoom turns on and Auto displays in the bottom left corner of the screen in the map scale. The map zoom level then synchronizes with vehicle speed. The slower your vehicle is traveling, the farther the map zooms in; the faster your vehicle is traveling, the farther the map zooms out. To switch off the feature, just press the + or - button again.
In 3D mode, rotate the map view by swiping your finger across the shaded bar with the arrows.
The ETA box under the zoom buttons appears when a route is active and displays the distance and time to your destination. If the button is pressed, a pop up appears with the destination listed (and waypoint if applicable) along with mileage and time to destination. You may also select to have either the estimated time to reach your destination or your estimated arrival time.
Map Icons
 Vehicle mark shows the current location of your vehicle. It stays in the center of the map display, except when in scroll mode.
 |  Scroll cursor allows you to scroll the map; the fixed icon is in the center of the screen. The map position closest to the cursor is in a window on the top center part of the screen.
 |
 Address book entry default icon(s) indicates the location on the map of an address book entry. This is the default symbol shown after the entry has been stored to the Address Book by any method other than the map. You can select from any of the 22 icons available. You can use each icon more than once.
 |  Home indicates the location on the map currently stored as the home position. You can only save one address from the Address Book as your Home entry. You cannot change this icon.
 |
 POI (Point Of Interest) icons indicate locations of any point of interest categories you choose to display on the map. You can choose to display three point of interest categories on the map at one time.
 |  Starting point indicates the starting point of a planned route.
 |
 Waypoint indicates the location of a waypoint on the map. The number inside the circle is different for each waypoint and represents the position of the waypoint in the route list.
 |  Destination symbol indicates the ending point of a planned route.
 |
 Next maneuver point indicates the location of the next turn on the planned route.
 |  No GPS symbol indicates that insufficient GPS satellite signals are available for accurate map positioning. This icon may display under normal operation in an area with poor GPS access.
 |
Quick-touch Buttons
When in map mode, touch anywhere on the map display to access the following options:
| Menu Item | Action and Description | |
|---|---|---|
Set as Dest | Touch this button to select a scrolled location on the map as your destination. You may scroll the map by pressing your index finger on the map display. When you reach the desired location, simply let go and then touch this button. | |
Set as Waypoint | Touch this button to set the current location as a waypoint. | |
Save to Favorites | Touch this button to save the current location to your favorites. | |
POI Icons | Touch this button to select icons to display on the map. You can select up to three icons to display on the map at the same time. You can switch these features: | |
On | Off | |
View / Edit Route | When on an active route, select any of the following options: | |
View Route | ||
Edit Destination/Waypoints | ||
Edit Turn List | ||
Detour | ||
Edit Route Preferences | ||
Edit Traffic Preferences | ||
Cancel Route | ||
HERE is the digital map provider for the navigation application. If you find map data errors, you may report them directly to HERE by going to www.here.com/mapcreator. HERE evaluates all reported map errors and responds with the result of their investigation by e-mail.
Navigation Map Updates
Annual navigation map updates are available for purchase through your dealership, by calling 1-866-462-8837 (in Mexico, call 01-800-557-5539) or going to www.navigation.com/sync. You need to specify the make and model of your vehicle to determine if there is an update available.
Navigation Voice Commands
When in navigation mode, press the voice button on the steering wheel controls. After the tone, say any of the following or a similar command:
| Voice command |
|---|
Destination |
Zoom Out |
Zoom In |
Where Am I |
Help |
The following commands can only be used when a navigation route is active:
| Voice command |
|---|
Detour |
Cancel Route |
Show Route |
Repeat Instruction |
Turn List |
One-shot Destination Street Address
To set a destination with voice commands, you can say:
| Voice Command | Action and Description |
|---|---|
Find an Address | The system asks you to say the full address. The system displays an example on-screen. |
You can then speak the address naturally, such as "One two three four Main Street, Anytown".
Thank You For Your Feedback