
This view of the Owner's Manual contains the very latest information, which may vary slightly from the printed Owner's Manual originally provided with your vehicle. It may also describe content that is not on or operates differently on your vehicle. Please consider the Owner's Manual originally provided with your vehicle as the primary source of information for your vehicle.

The information contained in this publication was correct at the time of release.In the interest of continuous development, we reserve the right to change specifications, design or equipment at any time without notice or obligation.No part of this publication may be reproduced, transmitted, stored in a retrieval system or translated into any language in any form by any means without our written permission.Errors and omissions excepted.
Copyright © 2024 Ford Motor Company
Trailer Reversing Aids
Trailer Reverse Guidance
 WARNING:
Driving while distracted can result in loss of vehicle control, crash and injury. We strongly recommend that you use extreme caution when using any device that may take your focus off the road. Your primary responsibility is the safe operation of your vehicle. We recommend against the use of any hand-held device while driving and encourage the use of voice-operated systems when possible. Make sure you are aware of all applicable local laws that may affect the use of electronic devices while driving.
WARNING:
Driving while distracted can result in loss of vehicle control, crash and injury. We strongly recommend that you use extreme caution when using any device that may take your focus off the road. Your primary responsibility is the safe operation of your vehicle. We recommend against the use of any hand-held device while driving and encourage the use of voice-operated systems when possible. Make sure you are aware of all applicable local laws that may affect the use of electronic devices while driving. |
Note:
You must always be aware of the vehicle and trailer combination and the surrounding environment.
Note:
The system does not detect or prevent the vehicle or trailer from making contact with obstacles in the surrounding environment.
Note:
Keep in mind that the front end of the vehicle swings out when changing the direction of the trailer.
Note:
The system relies on user measurements to determine sticker placement and system limits. It is critical to take the key measurements correctly. Incorrect measurements can result in the improper function of the system up to and including contact between the vehicle and trailer.
Note:
The system limits vehicle speed when backing up. The system is not a replacement for proper use of the throttle and brake pedals.
Note:
Some features associated with this system do not work until you set it up.
Principle of Operation
Trailer reverse guidance is a driver assistance feature that helps take the guesswork out of getting your trailer positioned where you want it, quickly and easily, when driving in reverse (R).
Each trailer you use with your vehicle has to be setup once. Sticker placement is extremely important and there are specific placement rules.
Setting Up Trailer Reverse Guidance
Note:
Your vehicle saves the trailer information when you enter it into the system. A maximum of 10 trailers can be added to the system.
Step 1: Position your Vehicle and Trailer
Hitch your trailer to the truck and connect the electrical wiring harness. Check to make sure that the wiring is working. See
Essential Towing Checks.
Park your vehicle and hitched trailer on a level surface.
Make sure that the trailer and truck are in line with each other. You can do this by putting the truck in drive (D) and pulling straight forward.
Step 2: Follow the Information Display Prompts
- Use the steering wheel controls to navigate to the towing menu.
- Select Trailer Setup from the available options.
- Select Add a Trailer and press OK to confirm.
- The system asks you to name the trailer. Use the steering wheel controls to choose from the alphanumeric characters. Press the right arrow to advance to the next character. When you finish naming the trailer, press OK to confirm.
- Select the type of brake system for your trailer. Select DEFAULT if your trailer has electric, surge or no brakes. Press OK to select and advance to the next screen
Note:
The default option is low. This is recommended for most trailers. If the trailer's brakes require more initial voltage, or if you prefer more aggressive braking, then select the other options as required.
- The system asks you to select your trailer type. You can use the system with conventional, fifth wheel and goose neck trailers. For fifth wheel and goose neck trailers, set up and sticker placement are not required, however some of the features do not operate automatically with these trailer types. Use the steering wheel controls to select your trailer type.
Note:
You can still manually control the camera views on the touchscreen to help you reverse goose neck and fifth wheel trailers.
- If your vehicle includes a blind spot information system, the system prompts you to setup the trailer blind spot feature. See Blind Spot Information System.
- A message appears in the information display asking if you want to add trailer reverse guidance. Select Yes to continue.
- Straighten out the trailer, if necessary.
- The information display directs you to the quick start guide for how to proceed. The steps are also shown here.
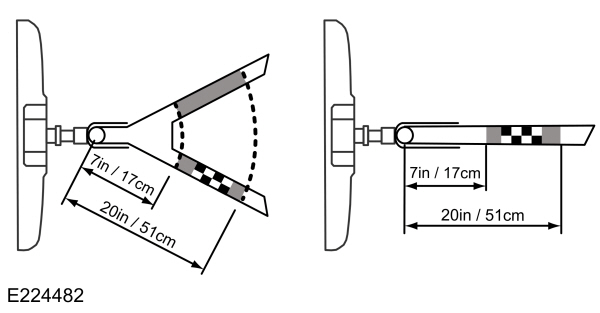
Step 3: Placing the Target
Place the entire sticker in the gray zone on the trailer outlined in the diagram. The sticker is in the back cover pocket of the quick start guide.
Note:
An assistant can help to carry out the following procedure.
Note:
Make sure nothing obstructs the rear view cameras view of the sticker. For example, items such as a jack handle or wiring.
Note:
Position the sticker on a flat, dry and clean horizontal surface. For best results apply the sticker when temperatures are above
32 °F (0 °C).
Note:
Do not move stickers after they are placed. Do not re-use any stickers if removed.
Use the supplied measurement card, a tape measure and pen to carefully mark the area where to attach the sticker. The sticker is supplied in the back cover pocket of your quick start guide. Make sure the entire sticker is within the gray zone between the two arcs or distance markers on the diagram, and is also visible in the rear view camera display. It should be between
7–20 in (17–51 cm) from the trailer ball hitch.
Once you have found the correct location, place the sticker.
Step 4: Take Measurements
After you place the sticker on the trailer you must take some measurements.
Note:
You must take accurate measurements for the system to operate properly.
Note:
Round measurement figures to the nearest half inch.
Note:
Round upward if the measured length is a quarter inch or greater. Round downward if the measure length is less than a quarter inch. For example
12.25 in (31.11 cm) would be rounded up to
12.50 in (31.75 cm).
12.13 in (30.8 cm) would be rounded down to
12.00 in (30.48 cm).
Note:
Use consistent metric or imperial units as required by your country or vehicle.
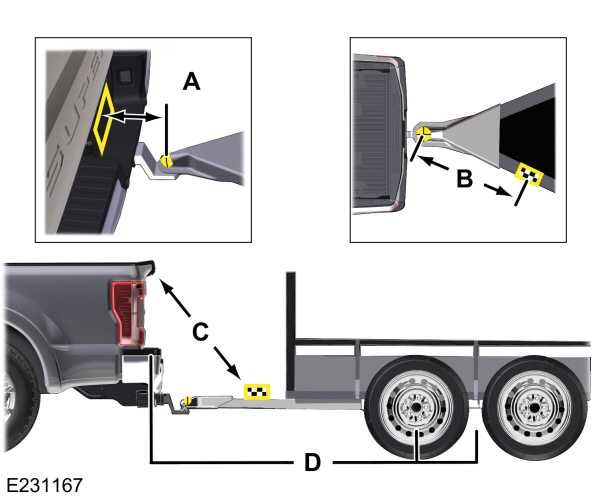
The measurement card requires you to record four key distances (A, B, C, D). Record the trailer name for these measurements.
Distance A
The horizontal distance from the license plate to the center of the ball hitch on the trailer.
Distance B
The horizontal distance from the center of the ball hitch to the center of the sticker.
Distance C
The distance from the rear view camera to the center of the sticker.
Distance D
The distance from the tailgate to the center of the trailer axle (single axle trailers), or the center of the axles (trailers with dual axles or more).
Step 5: Enter Measurements Using the Information Display
Using the measurements you recorded, enter the required data into the system. Follow the on screen prompts to enter each of the measurements taken in step 4. Use the up and down arrows to increase or decrease the numbers as necessary. Press OK to confirm each measurement. Once you add the last measurement, the information display shows all of the entered measurements. You can choose to confirm or change the measurements.
Step 6: Confirming the Sticker Location
Check the rear view camera display to see if the system identifies the sticker. The system marks the sticker with a red circle. Confirm that the red circle shows over the sticker image in the rear view camera display.
Note:
If the system cannot locate the sticker, try cleaning the camera lens. Make sure the sticker is within the zone as indicated in step 3.
The information display shows a confirmation message when you successfully confirm the target.
Calibrating the System
To complete setup, drive your vehicle straight forward between
4–24 mph (6–39 km/h), as directed by the information display.
Note:
Keep the steering wheel straight during the calibration process. If the steering wheel is in a turned position, the calibration pauses. The information display prompts you to drive straight forward to complete the calibration.
The information display shows a message during calibration and after calibration is complete
Note:
For best results, do not calibrate the system at night.
Using Trailer Reverse Guidance
- Shift into reverse (R). Press the rear camera button to expand the menu.
- Press the trailer icon.
- Select the applicable trailer in the information display.
- When in trailer reverse guidance mode, you can see the camera view on the side your trailer is moving, or both sides when the trailer is straight behind you. When the views change with the trailer direction, it is called auto mode. For example, if you turn the trailer to the right, you see the right side of your vehicle and trailer. You can switch this view manually at any time by using the arrow keys. To return to auto mode, press the auto button.
Note:
Auto mode is the default setting.
Use the view that helps you the most when reversing your vehicle and trailer.
 Normal rear view camera view. Use this feature when you want to see your trailer hitch or what is directly behind your vehicle.
 |  Straight back-up mode. Use this feature when you want to keep your trailer completely in line with your truck. In this mode, a steering wheel graphic shows you which way to turn your steering wheel to keep your trailer straight.
 |
Note:
It may be helpful to shift your vehicle into drive (D), pull forward and straighten out the vehicle and trailer before engaging straight back-up mode.
Left and right arrows let you see other views regardless of your trailer angle. Use them to switch views manually.
Note:
If you're using a fifth wheel or goose neck trailer, or if you have not set up the trailer reverse guidance system, auto view is not available.
To change your view, use the arrows. You can see the following views:
- Full driver.
- Partial driver.
- 50/50.
- Partial passenger.
- Full passenger.
 Zoom. Use this feature to zoom in the camera view.
 |  Return. Ths feature takes you back to the 360-degree camera system and out of the trailer reverse guidance feature.
 |
 Auto. Ths feature returns you to auto view.
 |
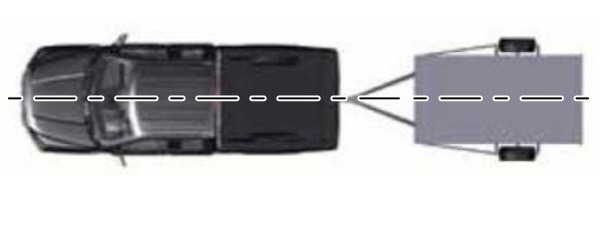
In addition to multiple view options, your touchscreen adds some features to give you more information. For example, after setting up a conventional trailer, the display shows a small top-view representation of your truck and trailer.
This representation shows two, different-colored lines: A black line shows you where your trailer is in relation to your vehicle. A white line gives you a projection of where your trailer may go based on your current steering wheel position
Note:
When you move the steering wheel, the white line indicates where the trailer may go based on your steering wheel input. When you turn your steering wheel to the left, the trailer moves to the right. When you turn your steering wheel to the right, the trailer moves to the left.
When you turn the steering wheel, a small representation shows you two zones to warn you of a possible jackknife condition. The view shows your truck and trailer position and provides visual feedback to help avoid a jackknife condition entirely.
The yellow zone warns you of a potential jackknife position. When you enter into this zone, it is recommended to put your vehicle back into drive (D) and pull forward. Moving forward helps put the truck and trailer back into an in-line position.
The red zone indicates that you need to put the truck into drive (D) and pull forward immediately.
Troubleshooting
Note:
The system requires a clear view of the sticker placed on the trailer. You must keep the camera lens and sticker clean for the system to operate correctly.
Setup
The system is designed to be used with a wide variety of trailers. However, there are some trailers that do not have a proper surface and location to mount the sticker. These trailers are not supported. Attempts to place the sticker on a surface that does not meet the sticker placement requirement listed in Step 3 of the setup instruction, or entering inaccurate measurements to proceed through setup can result in improper system function.
Accurate measurements are critical to correct system function. If you need to check measurements or change them, you can access them through the trailer menus in the information display. Choose the option to change the sticker from the change trailer settings menu. It is not necessary to remove the sticker if you are just reviewing or changing measurements.
The following menu warnings or difficulties may occur during setup. Tips to resolve them are listed below.
Measurement A has reached maximum or minimum value:- The system is designed to work with drawbars that have a license plate to hitch ball center measurement of 9–16 in (229–406 mm) when installed. Do not attempt to use drawbars that have a length outside this range as system performance degrades and could cause improper system function.
- Make sure that the measurement being made is the horizontal distance only from license plate and the hitch ball center. A straight line distance that includes any vertical rise or drop increases the measurement and makes it inaccurate. Inaccurate measurements degrade system performance and could cause improper system function. See step 4 of the setup instruction to review the measurement instructions.
- Make sure you follow the sticker placement instruction in step 3 of the setup. Stickers placed outside the allowed zone adversely affect the system performance and could cause improper feature function.
- Make sure that the measurement being made is the horizontal distance only from center of sticker to the hitch ball center. A straight line distance that includes any vertical rise or drop increases the measurement and causes an inaccurate value to be entered into the system. See step 4 of the setup for additional measurement instructions.
- Make sure you follow the sticker placement instructions in step 3 of the setup. Stickers placed outside the allowed zone adversely affect the system performance and could cause improper feature function. If you have met all the criteria for sticker placement and you see this message, the sticker is either too far below or too close to the camera to properly recognize the sticker. In order for the system to correctly operate, the sticker height must be lowered if you receive the minimum warning or the sticker height must be raised if you receive the maximum warning.Only one sticker can be placed on the trailer for correct system function. The previous sticker must be removed or covered so only one sticker is visible to the camera.Measurement B and C must be measured again if a new sticker is placed on the trailer.
- Make sure that the measurement being made is the horizontal distance only from tailgate to the center of the single axle or the center of all the axles on the trailer. See step 4 of the setup for additional measurement instructions. The system does not support trailer lengths outside the range allowed by the information display.
- Make sure the rear camera is clean and the sticker is clearly visible in the camera image. Clean the camera and sticker if necessary.
- The camera system uses the entered measurements to help locate the sticker. Inaccurate sticker measurements degrade the system's ability to locate the sticker. Verify the measurements entered into the system are accurate.
- Remove the incorrectly circled label or decal if possible.
- If you cannot resolve the issue, a new sticker location should be tried. The new sticker location must meet the requirements noted in step 3 of the setup instructions. Only one sticker can be placed on the trailer for correct system function. The previous sticker must be removed or covered so only one sticker is visible to the camera.
Calibration
The system monitors various vehicle parameters to ensure your vehicle is being driven straight and the trailer straight behind your vehicle. Any steering input or trailer movement pauses the calibration.
For best results:- Use a long, straight and smooth road when attempting to calibrate.
- Drive straight forward.
- Drive between 4–24 mph (6–39 km/h).
System Operation
The following warnings or difficulties may occur during feature operation. Tips to resolve them are listed below.
The system is not available:- The system relies on many sub-systems in your vehicle to correctly operate. If those sub-systems are not correctly operating, the system may not be available.Low battery voltage is one condition which prevents the system from operating. Please make sure the battery is correctly charged if the system is not available.You may need to drive your vehicle straight forward above 25 mph (40 km/h) before the system is available again.
- If the message still displays, take your vehicle to an authorized dealer for service.
- Check for the following if you receive the lost sticker message when using the system.Stop your vehicle as soon as the message displays.Make sure the sticker is visible in the rear view camera image.Clean the sticker and camera to make sure they are unobstructed.Remove any items that may be blocking the view of the sticker. Depending on your trailer configuration and any equipment mounted to your trailer, it is possible for the sticker to be blocked from the view of the camera as it rotates on the hitch ball, but not be blocked during setup. Remove the obstruction if possible. It may be necessary to remove the sticker from its current location if the obstruction cannot be cleared. Place a new sticker that is visible to the camera in all positions of the trailer behind your vehicle.You can change your sticker location by going into the trailer menu, selecting trailer options, selecting change trailer settings and then selecting the change sticker option. The previous sticker must be removed. ONLY ONE STICKER SHOULD BE PLACED ON THE TRAILER FOR CORRECT SYSTEM FUNCTION.The camera system uses the entered measurements to help locate the sticker. Inaccurate measurements reduce the system’s ability to locate the sticker. Check the measurements entered into the system are correct. Refer to the step 4 of trailer reverse guidance setup for instructions on measurements.You can change your measurement by going into the trailer menu, selecting trailer options, selecting change trailer setting and then selecting the change sticker option. Disregard the prompt to remove this sticker and continue to the next step if you only plan to update the measurements for the current sticker location.
- Factors such as the drawbar connection to the hitch receiver, road camber, road grade and compliance in the trailer suspension can influence how straight the system is able to reverse your trailer when the wheel is not turned. You can compensate for the trailer drifting to the right or left by slowly turning the wheel until the trailer is following your desired path and then holding the wheel in that position. If you would like to recalibrate the system for straight backing, you can do so with the following procedure.Go into the trailer menu, select trailer options, select change trailer setting and then select the change sticker option. Your saved measurements show. Do not change them, but continue to confirm measurements. Once you confirm the measurements, the system then prompts you to perform the calibration procedure.
Note:
The system is designed to be used with the same trailer connection every time the trailer is chosen from the selection menu. Using a different drawbar or a different pin hole, on drawbars with more than one pin hole, when connecting the drawbar to your vehicle affects the trailer measurements. Take the measurements again and update if required.
Thank You For Your Feedback