
This view of the Owner's Manual contains the very latest information, which may vary slightly from the printed Owner's Manual originally provided with your vehicle. It may also describe content that is not on or operates differently on your vehicle. Please consider the Owner's Manual originally provided with your vehicle as the primary source of information for your vehicle.

The information contained in this publication was correct at the time of release.In the interest of continuous development, we reserve the right to change specifications, design or equipment at any time without notice or obligation.No part of this publication may be reproduced, transmitted, stored in a retrieval system or translated into any language in any form by any means without our written permission.Errors and omissions excepted.
Copyright © 2025 Ford Motor Company
Changing a Road Wheel


 WARNING:
If the tire pressure monitor sensor becomes damaged it may not function.
WARNING:
If the tire pressure monitor sensor becomes damaged it may not function. |
Note:
You should only use tire sealants in roadside emergencies as they may cause damage to the tire pressure monitoring system sensor.
Note:
The tire pressure monitoring system indicator light illuminates when the spare tire is in use. To restore the full function of the monitoring system, all road wheels equipped with tire pressure monitoring sensors must be mounted on the vehicle.
If you get a flat tire when driving, do not apply the brake heavily. Instead, gradually decrease your speed. Hold the steering wheel firmly and slowly move to a safe place on the side of the road.
Have a flat serviced by an authorized dealer in order to prevent damage to the tire pressure monitoring system sensors. See
Tire Pressure Monitoring System.
Replace the spare tire with a road tire as soon as possible. During repairing or replacing of the flat tire, have an authorized dealer inspect the tire pressure monitoring system sensor for damage.
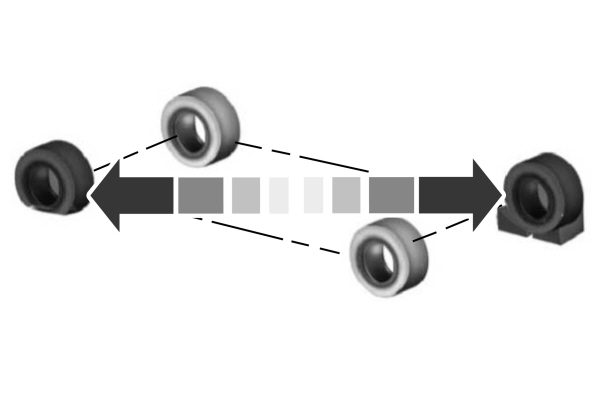
Dissimilar Spare Wheel and Tire Assembly Information
|
WARNING:
Failure to follow these guidelines could result in an increased risk of loss of vehicle control, injury or death. |
If you have a dissimilar spare wheel and tire, then it is intended for temporary use only. This means that if you need to use it, you should replace it as soon as possible with a road wheel and tire assembly that is the same size and type as the road tires and wheels that were originally provided. If the dissimilar spare tire or wheel is damaged, it should be replaced rather than repaired.
A dissimilar spare wheel and tire assembly is defined as a spare wheel and tire assembly that is different in brand, size or appearance from the road tires and wheels and can be one of three types:
1. T-type mini-spare: This spare tire begins with the letter T for tire size and may have Temporary Use Only molded in the sidewall.
- Do not exceed the maximum speed labeled on the tire and wheel assembly. This maximum speed can be either on a label affixed to the wheel or molded into the tire.
2. Full-size dissimilar spare with label on wheel: This spare tire has a label on the wheel that states: THIS WHEEL AND TIRE ASSEMBLY FOR TEMPORARY USE ONLY.
When driving with one of the dissimilar spare tires listed above, do not:
- Exceed 50 mph (80 km/h).
- Load the vehicle beyond maximum vehicle load rating listed on the Safety Compliance Label.
- Tow a trailer.
- Use snow chains on the end of the vehicle with the dissimilar spare tire.
- Use more than one dissimilar spare tire at a time.
- Use commercial car washing equipment.
- Try to repair the dissimilar spare tire.
- Handling, stability and braking performance.
- Comfort and noise.
- Ground clearance and parking at curbs.
- Winter weather driving capability.
- Wet weather driving capability.
- All-wheel driving capability, if applicable.
3. Full-size dissimilar spare without label on wheel
When driving with the full-size dissimilar spare wheel and tire assembly, do not: - Exceed 70 mph (113 km/h).
- Use more than one dissimilar spare wheel and tire assembly at a time.
- Use commercial car washing equipment.
- Use snow chains on the end of the vehicle with the dissimilar spare wheel and tire assembly.
- Handling, stability and braking performance.
- Comfort and noise.
- Ground clearance and parking at curbs.
- Winter weather driving capability.
- Wet weather driving capability.
- All-wheel driving capability.
- Towing a trailer.
- Driving vehicles equipped with a camper body.
- Driving vehicles with a load on the cargo rack.
Drive cautiously when using a full-size dissimilar spare wheel and tire assembly and seek service as soon as possible.
Tire Change Procedure (If Equipped)
|
WARNING:
The jack supplied with this vehicle is only intended for changing wheels. Do not use the vehicle jack other than when you are changing a wheel in an emergency.
WARNING:
The jack should be used on level firm ground wherever possible.
WARNING:
Check that the vehicle jack is not damaged or deformed and the thread is lubricated and clean.
WARNING:
Never place anything between the vehicle jack and the ground.
WARNING:
Never place anything between the vehicle jack and your vehicle.
WARNING:
Use only the specified jacking points. If you use other positions, you may damage the body, steering, suspension, engine, braking system or the fuel lines.
WARNING:
To help prevent your vehicle from moving when changing a wheel, shift the transmission into park (P), set the parking brake and use an appropriate block or wheel chock to secure the wheel diagonally opposite to the wheel being changed. For example, when changing the front left wheel, place an appropriate block or wheel chock on the right rear wheel.
WARNING:
When one of the front wheels is off the ground, the transmission alone will not prevent the vehicle from moving or slipping off the jack, even if the transmission is in park (P).
WARNING:
Do not get under a vehicle that is only supported by a vehicle jack.
WARNING:
Always use the jack provided as original equipment with your vehicle. If using a jack other than the one provided, make sure the jack capacity is adequate for the vehicle weight, including any vehicle cargo or modifications. If you are unsure if the jack capacity is adequate, contact the authorized dealer. |
Note:
The jack does not require maintenance or additional lubrication over the service life of your vehicle.
Note:
Passengers should not remain in your vehicle when the vehicle is being jacked.
- Park on a level firm surface, shift the transmission into park (P), set the parking brake and switch the ignition off. Activate the hazard flashers and set up the warning triangle.
- Block both the front and rear of the wheel diagonally opposite the flat tire. For example, if the left front tire is flat, block the right rear wheel.
- Lift the carpeted load floor panel and secure in the up position with the hanger clip.
Note:
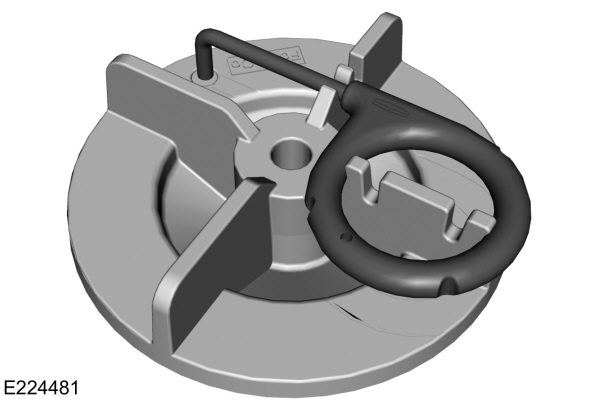
The wheel trim tool in the following illustration is optional.
- Remove the steel winged washer nut securing the spare tire by turning it counterclockwise.
- Remove the spare tire from the spare tire compartment.
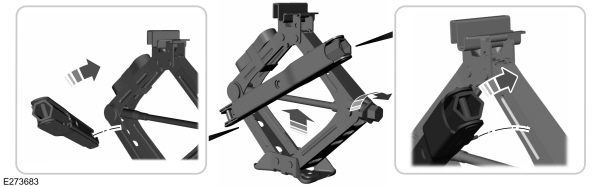
- Remove plastic wing nut and jack and lug wrench assembly. Remove the strap from the jack. Turn the jack hex nut drive screw counterclockwise and detach lug wrench from the jack.
- If your vehicle has a wheel trim, use the tool supplied to remove it and access the lug nuts.
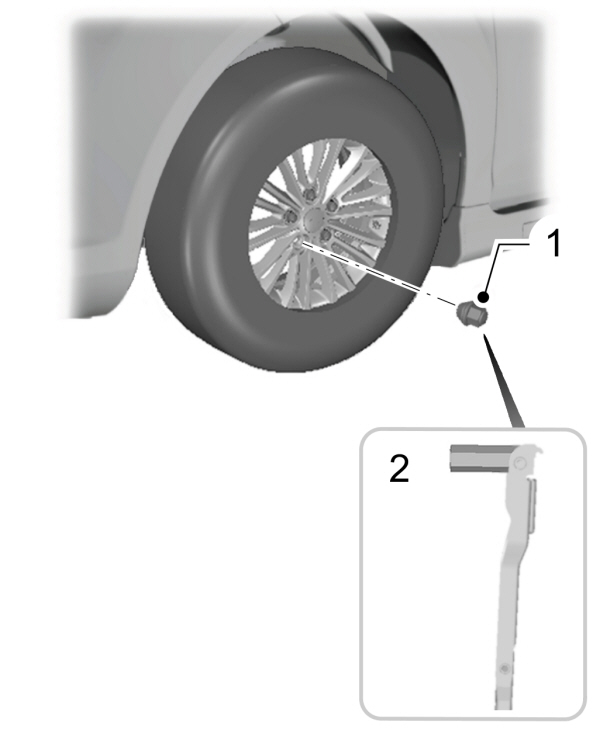
- Loosen each wheel lug nut one-half turn counterclockwise, but do not remove them until the wheel is raised off the ground.
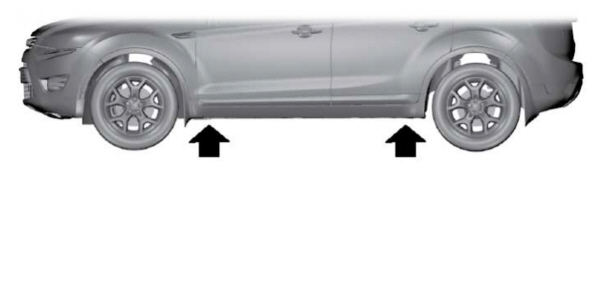
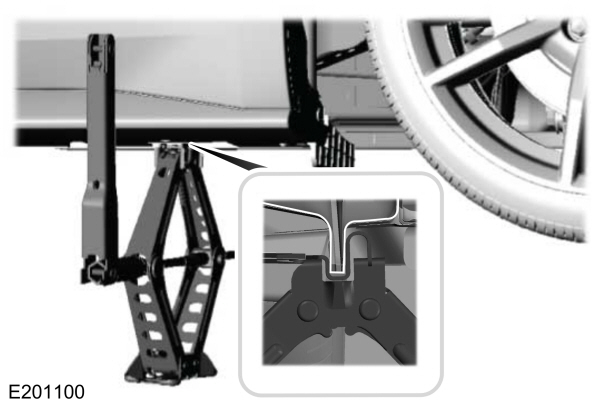
- The vehicle jacking points are shown above, and are depicted on the yellow warning label on the jack.
|
WARNING:
Do not attempt to change a tire on the side of the vehicle close to moving traffic. Pull far enough off the road to avoid the danger of being hit when operating the jack or changing the wheel. |
- Position the jack so that the vehicle downward flange rests in the jack saddle. Use the lug wrench and turn the jack nut clockwise. When the flat tire is off the ground, remove the lug nuts with the lug wrench.
- Replace the flat tire with the spare tire, making sure the valve stem is facing outward. Reinstall the lug nuts until the wheel is snug against the hub. Do not fully tighten the lug nuts until the wheel has been lowered.
- Lower the wheel by turning the jack handle counterclockwise.
- Remove the jack and fully tighten the lug nuts in the order shown. See Technical Specifications.
- Fold up the wrench and re-attach to the jack. Re-attach the strap on the jack. Re-position the jack and wrench assembly into the original vehicle position and secure with the plastic wing nut. Securely fasten the jack before you drive.
- Unblock the wheel and pick up the warning triangle.
Stowing the flat tire
You cannot store the full-sized road wheel in the temporary spare tire well.
- Find the flat tire retainer strap tucked inside the jack channel. Lower the carpeted load floor.
- Stow the flat tire in the cargo area on the load floor with the wheel facing up. Secure the flat tire with the retainer strap by following the next steps.
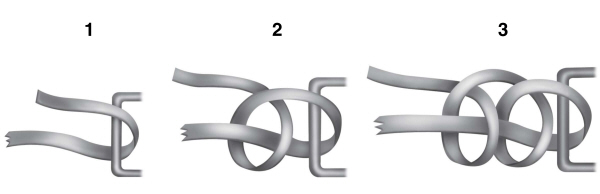
- Locate the rear left side and right side cargo tie-down rings. Push the loop end of the retainer strap through one cargo tie-down ring. Thread the non-loop end through the loop.
- Weave the retainer strap through the wheel openings.
- Locate the cargo tie-down in the opposite rear corner of the cargo area. Thread the retainer strap though the tie-down and pull tight.
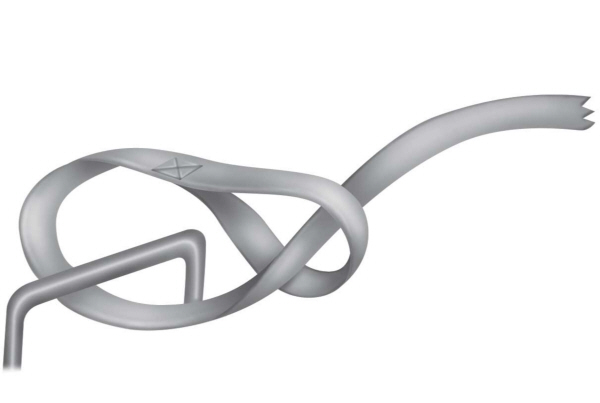
- Secure the flat tire by tying a 2-half hitch knot.
- Please note that Ford will not respond to individual feedback.
- Please only provide detailed feedback regarding any inaccuracies in the content or any missing content in the Owner's Manual.
- Your feedback will be investigated, and any necessary changes will be updated in the online Owner's Manual.
- Please do not submit any vehicle related feedback. To submit feedback related to your vehicle, please click the link to find the correct contact information for your market.
Your input is valuable in helping us improve our Owner's Manual. Thank you for taking the time to provide your feedback.
North America
| Country | Phone | |
|---|---|---|
| United States | 1-800-392-3673 (FORD) | |
| Canada | 1-800-565-3673 (FORD) | |
| Mexico | 1-800-719-8466 | |
| Guam | 1-800-392-3673 (FORD) | |
| North Mariana Islands | apemcrc@ford.com | |
| Puerto Rico | (800) 841-3673 | prcac@ford.com |
| US Virgin Islands | (800) 841-3673 | prcac@ford.com |
IMG
| Country | Phone | |
|---|---|---|
| Algeria | nafcrc@ford.com | |
| Angola | ssacrc@ford.com | |
| Benin | ssacrc@ford.com | |
| Botswana | ssacrc@ford.com | |
| Burkina FASO | ssacrc@ford.com | |
| Burundi | ssacrc@ford.com | |
| Cameroon | ssacrc@ford.com | |
| Cape Verde | ssacrc@ford.com | |
| Central African Republic | ssacrc@ford.com | |
| Chad | ssacrc@ford.com | |
| Comoros | ssacrc@ford.com | |
| Dem Republic of Congo | ssacrc@ford.com | |
| Djibuti | ssacrc@ford.com | |
| Egypt | nafcrc@ford.com | |
| Equitorial Guinea | ssacrc@ford.com | |
| Eritrea | ssacrc@ford.com | |
| Ethiopia | ssacrc@ford.com | |
| Gabon | ssacrc@ford.com | |
| Gambia | ssacrc@ford.com | |
| Ghana | ssacrc@ford.com | |
| Guinea | ssacrc@ford.com | |
| Guinea-Bissau | ssacrc@ford.com | |
| Ivory Coast | ssacrc@ford.com | |
| Kenya | ssacrc@ford.com | |
| Liberia | ssacrc@ford.com | |
| Libya | nafcrc@ford.com | |
| Madagascar | ssacrc@ford.com | |
| Malawi | ssacrc@ford.com | |
| Mauritania | ssacrc@ford.com | |
| Mauritius | ssacrc@ford.com | |
| Morocco | nafcrc@ford.com | |
| Mozambique | ssacrc@ford.com | |
| Namibia | ssacrc@ford.com | |
| Niger | ssacrc@ford.com | |
| Nigeria | ssacrc@ford.com | |
| Republic of Congo | ssacrc@ford.com | |
| Rwanda | ssacrc@ford.com | |
| Sao Tome and Principe | ssacrc@ford.com | |
| Senegal | ssacrc@ford.com | |
| Sychelles | ssacrc@ford.com | |
| Sierra Leone | ssacrc@ford.com | |
| South Africa | 860011022 | fordcrc2@ford.com |
| South Sudan | ssacrc@ford.com | |
| Swaziland | ssacrc@ford.com | |
| Tanzania | ssacrc@ford.com | |
| Togo | ssacrc@ford.com | |
| Tunisia | nafcrc@ford.com | |
| Uganda | ssacrc@ford.com | |
| Zambia | ssacrc@ford.com | |
| Zimbabwe | ssacrc@ford.com | |
| American Somoa | apemcrc@ford.com | |
| Australia | (13 FORD) 13 3673 | foacust1@ford.com |
| Bangladesh | apemcrc@ford.com | |
| Bhutan | apemcrc@ford.com | |
| Brunei | apemcrc@ford.com | |
| Cambodia | apemcrc@ford.com | |
| Fiji | apemcrc@ford.com | |
| French Polynesia | apemcrc@ford.com | |
| India | apemcrc@ford.com | |
| Indonesia | apemcrc@ford.com | |
| Japan | apemcrc@ford.com | |
| Laos | apemcrc@ford.com | |
| Macao | apemcrc@ford.com | |
| Malaysia | apemcrc@ford.com | |
| Marshall Islands | apemcrc@ford.com | |
| Mongolia | apemcrc@ford.com | |
| Myanmar | apemcrc@ford.com | |
| Nepal | apemcrc@ford.com | |
| New Caledonia | apemcrc@ford.com | |
| New Zealand | 0800 367 369 (FORDNZ) | fnzcust@ford.com |
| Pakistan | apemcrc@ford.com | |
| Palau | apemcrc@ford.com | |
| Papua New Guinea | apemcrc@ford.com | |
| Philippines | 02-88669408 | emailus@ford.com |
| Singapore | apemcrc@ford.com | |
| South Korea | 82-2-1600-6003 | infokr1@ford.com |
| Sri Lanka | apemcrc@ford.com | |
| Tahiti | apemcrc@ford.com | |
| Thailand | 1383 | fordthai@ford.com |
| Timor Leste | apemcrc@ford.com | |
| Vanuatu | apemcrc@ford.com | |
| Vietnam | 1800588888 | fordvn@ford.com |
| Wallis and Futuna | apemcrc@ford.com | |
| Western Somoa | apemcrc@ford.com | |
| Afghanistan | menacac@ford.com | |
| Bahrain | menacac@ford.com | |
| Iraq | menacac@ford.com | |
| Israel | 08-9139995 | service1@kelekmotors.co.il |
| Jordan | menacac@ford.com | |
| Kuwait | 965 1 898900 | menacac@ford.com |
| Lebanon | menacac@ford.com | |
| Oman | menacac@ford.com | |
| Qatar | menacac@ford.com | |
| Saudi Arabia | 8008443673 | menacac@ford.com |
| Syria | menacac@ford.com | |
| United Arab Emirates | 80004441066 | menacac@ford.com |
| Yemen | menacac@ford.com |
Greater China
| Country | Phone | |
|---|---|---|
| China-Imported Vehicles | 400-690-1886 | |
| China-CAF | 951995 | |
| China-JMC | 400-003-1111 | |
| China-Lincoln | 400-988-6789 | |
| Taiwan | 0800-032100 | |
| Hong Kong | (852) 3768-4898 |
South America
| Country | Phone | |
|---|---|---|
| Argentina | 0800-888-3673 | |
| Bolivia | Contact Your Local Ford Distributor | |
| Brazil | 0800-703-3673 | central@ford.com |
| Chile | Contact Your Local Ford Distributor | |
| Colombia | Contact Your Local Ford Distributor | |
| Ecuador | Contact Your Local Ford Distributor | |
| French Guiana | Contact Your Local Ford Distributor | |
| Guyana | Contact Your Local Ford Distributor | |
| Paraguay | Contact Your Local Ford Distributor | |
| Peru | Contact Your Local Ford Distributor | |
| Suriname | Contact Your Local Ford Distributor | |
| Uruguay | Contact Your Local Ford Distributor | |
| Venezuela | Contact Your Local Ford Distributor |
Europe
| Country | Phone | |
|---|---|---|
| Albania | Contact Your Local Ford Distributor | |
| Andorra | Contact Your Local Ford Distributor | |
| Armenia | Contact Your Local Ford Distributor | |
| Austria | 01 20 609 2424 | kundenz@ford.com |
| Azerbaijan | Contact Your Local Ford Distributor | |
| Belarus | Contact Your Local Ford Distributor | |
| Belgium | 32 2 700 67 76 | custfobe@ford.com |
| Bosnia | Contact Your Local Ford Distributor | |
| Bulgaria | Contact Your Local Ford Distributor | |
| Croatia | Contact Your Local Ford Distributor | |
| Cyprus | Contact Your Local Ford Distributor | |
| Czech Republic | 800 3673 29 | zakaznik@ford.com |
| Denmark | 43 68 2000 | crcdk@ford.com |
| Estonia | 372 6710 060 | ford@infoauto.ee |
| Falkland Islands | Contact Your Local Ford Distributor | |
| Finland | 09 725 22022 | palvelut@ford.com |
| France | 0800 005 005 | crcfr@ford.com |
| Georgia | Contact Your Local Ford Distributor | |
| Germany | 0221 9999 2 999 | kunden@ford.com |
| Girbraltar | Contact Your Local Ford Distributor | |
| Greece | 216 900 88 99 | info11@ford.com |
| Hungary | +36 1 7777 555 | Contact Your Local Ford Distributor |
| Iceland | Contact Your Local Ford Distributor | |
| Ireland | 1800 771 199 | crcirela@ford.com |
| Italy | 800 22 44 33 | tu@ford.com |
| Kazakhstan | Contact Your Local Ford Distributor | |
| Latvia | +371 67303020 | |
| Liechtenstein | Contact Your Local Ford Distributor | |
| Lithuania | 370 5216 8226 | forduzklausos@inchcape.lt |
| Luxembourg | +352 248 71 800 | custfobe@ford.com |
| Macedonia | Contact Your Local Ford Distributor | |
| Malta | Contact Your Local Ford Distributor | |
| Moldova | Contact Your Local Ford Distributor | |
| Monaco | Contact Your Local Ford Distributor | |
| Montenegro | Contact Your Local Ford Distributor | |
| Netherlands | 70 7703 777 | klanten@ford.com |
| Norway | 47 66819739 | infonor@ford.com |
| Poland | 48 22 522 27 27 | kontakty@ford.com |
| Portugal | 800 210 373 | clientes@ford.com |
| Romania | 40 312298798 | crcro@ford.com |
| Russia | Contact Your Local Ford Distributor | |
| San Marino | Contact Your Local Ford Distributor | |
| Serbia | Contact Your Local Ford Distributor | |
| Serbia and Montenegro | Contact Your Local Ford Distributor | |
| Slovakia | Contact Your Local Ford Distributor | |
| Slovenia | Contact Your Local Ford Distributor | |
| South Georgia | Contact Your Local Ford Distributor | |
| Spain | 900 80 70 90 | crcspain@ford.com |
| Sweden | 08-593 66 333 | fordkund@ford.com |
| Switzerland | 044 511 14 45 | assistch@ford.com |
| Turkey | Contact Your Local Ford Distributor | |
| Ukraine | Contact Your Local Ford Distributor | |
| United Kingdom | 020 3564 4444 | UKCRC1@ford.com |
Caribbean and Central America
| Country | Phone | |
|---|---|---|
| Anguilla | (313) 594-4857 | expcac@ford.com |
| Antigua | (313) 594-4857 | expcac@ford.com |
| Aruba | (313) 594-4857 | expcac@ford.com |
| Bahamas | (313) 594-4857 | expcac@ford.com |
| Barbados | (313) 594-4857 | expcac@ford.com |
| Bermuda | (313) 594-4857 | expcac@ford.com |
| Bonaire and St. Eustatius | (313) 594-4857 | expcac@ford.com |
| Cayman Islands | (313) 594-4857 | expcac@ford.com |
| Curacao | (313) 594-4857 | expcac@ford.com |
| Dominica | (313) 594-4857 | expcac@ford.com |
| Dominican Republic | (313) 594-4857 | expcac@ford.com |
| Grenada | (313) 594-4857 | expcac@ford.com |
| Haiti | (313) 594-4857 | expcac@ford.com |
| Jamaica | (313) 594-4857 | expcac@ford.com |
| Martinique | (313) 594-4857 | expcac@ford.com |
| Montserrat | (313) 594-4857 | expcac@ford.com |
| St. Kitts and Nevis | (313) 594-4857 | expcac@ford.com |
| St. Lucia | (313) 594-4857 | expcac@ford.com |
| St. Martin | (313) 594-4857 | expcac@ford.com |
| St. Vincent and the Grenadines | (313) 594-4857 | expcac@ford.com |
| Trinidad and Tobago | (313) 594-4857 | expcac@ford.com |
| Turks and Caicos | (313) 594-4857 | expcac@ford.com |
| British Virgin Islands | (313) 594-4857 | expcac@ford.com |
| Netherlands Antilles | (313) 594-4857 | expcac@ford.com |
| Belize | (313) 594-4857 | expcac@ford.com |
| Costa Rica | (313) 594-4857 | expcac@ford.com |
| El Salvador | (313) 594-4857 | expcac@ford.com |
| Guatemala | (313) 594-4857 | expcac@ford.com |
| Honduras | (313) 594-4857 | expcac@ford.com |
| Nicaragua | (313) 594-4857 | expcac@ford.com |
| Panama | (313) 594-4857 | expcac@ford.com |