
This view of the Owner's Manual contains the very latest information, which may vary slightly from the printed Owner's Manual originally provided with your vehicle. It may also describe content that is not on or operates differently on your vehicle. Please consider the Owner's Manual originally provided with your vehicle as the primary source of information for your vehicle.

The information contained in this publication was correct at the time of release.In the interest of continuous development, we reserve the right to change specifications, design or equipment at any time without notice or obligation.No part of this publication may be reproduced, transmitted, stored in a retrieval system or translated into any language in any form by any means without our written permission.Errors and omissions excepted.
Copyright © 2024 Ford Motor Company
Audio Unit - Vehicles With: AM/FM/CD/Bluetooth/SYNC
 WARNING:
Driving while distracted can result in loss of vehicle control, crash and injury. We strongly recommend that you use extreme caution when using any device that may take your focus off the road. Your primary responsibility is the safe operation of your vehicle. We recommend against the use of any hand-held device while driving and encourage the use of voice-operated systems when possible. Make sure you are aware of all applicable local laws that may affect the use of electronic devices while driving.
WARNING:
Driving while distracted can result in loss of vehicle control, crash and injury. We strongly recommend that you use extreme caution when using any device that may take your focus off the road. Your primary responsibility is the safe operation of your vehicle. We recommend against the use of any hand-held device while driving and encourage the use of voice-operated systems when possible. Make sure you are aware of all applicable local laws that may affect the use of electronic devices while driving. |
Note:
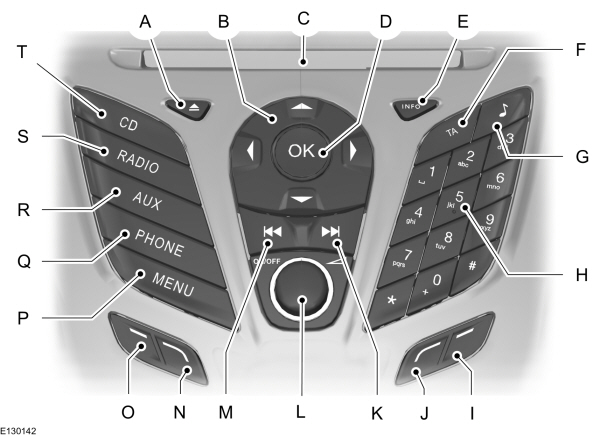
An integrated multi function display is situated above the unit. This shows important information regarding control of your system. Additionally, there are various icons placed around the display screen which light up when a function is active (for example CD, Radio or Aux.)
| A B C D E F G H I J K L M N O P Q R S T |
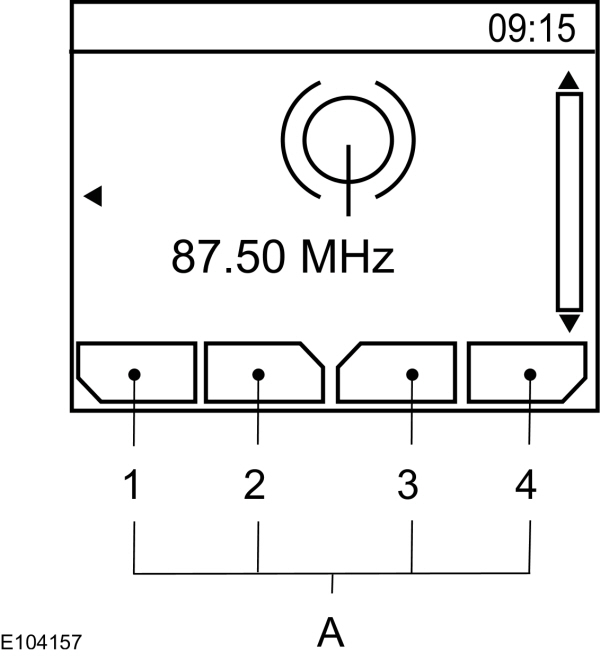
| A |
Function buttons 1 to 4 are context dependent, and change according to the current unit mode. The description for the current function displays in the screen.
Sound Button
This will allow you to adjust the sound settings (for example bass, middle and treble).
- Press the sound button.
- Use the up and down arrow buttons to select the required setting.
- Use the left and right arrow buttons to make the necessary adjustment. The display indicates the level selected.
- Press the OK button to confirm the new settings.
Waveband Button
Press the RADIO button to select from the wavebands available.
You can use the selector to return to radio reception when you have been listening to another source.
Alternatively, press the left arrow button to display the available wavebands. Scroll to the required waveband and press OK.
Station Tuning Control
DAB Service Linking
Note:
The system does not automatically turn on every time you switch the ignition on.
Note:
Service linking allows cross-referencing to other corresponding frequencies of the same station, for example FM and other DAB ensembles.
Note:
The system will automatically change to another corresponding station if the current one becomes unavailable, for example when leaving the coverage area.
Switching DAB service linking on and off. See
General Information.
Seek Tuning
Select a waveband and briefly press one of the seek buttons. The unit will stop at the first station it finds in the direction you have chosen.
Manual Tuning
- Press function button 2.
- Use the left and right arrow buttons to tune down or up the waveband in small increments or press and hold to increment quickly, until you find a station you want to listen to.
- Press OK to continue listening to a station.
Scan Tuning
Scan allows you to listen to a few seconds of each station detected.
- Press function button 3.
- Use the seek buttons to scan up or down the selected waveband.
- Press function button 3 again or OK to continue listening to a station.
Station Preset Buttons
This feature allows you to store your favorite stations, they can be recalled by selecting the appropriate waveband and pressing one of the preset buttons.
- Select a waveband.
- Tune to the station required.
- Press and hold one of the preset buttons. A progress bar and message will appear. When the progress bar completes the station has been stored. The audio unit will also mute momentarily as confirmation.
You can repeat this on each waveband and for each preset button.
Note:
When you drive to another part of the country, stations that broadcast on alternative frequencies, and are stored on preset buttons, may be updated with the correct frequency and station name for that area.
Autostore Control
Note:
This will store up to a maximum of the 10 strongest signals available, either from the AM or the FM waveband, and overwrite the previously stored stations. You can also store stations manually in the same way as other wavebands.
- Press and hold the RADIO button.
- When the search is complete, sound is restored and the strongest signals are stored on the autostore presets.
Traffic Information Control
Many stations that broadcast on the FM waveband have a TP code to signify that they carry traffic program information.
Turning Traffic Announcements On and Off
Before you can receive traffic announcements, you must press either the TA or TRAFFIC button. A TA display will appear to show the feature is switched on.
If you are already tuned to a station that broadcasts traffic information, TP will also be displayed. Otherwise the unit will search for a traffic program.
When traffic information is broadcast, it will automatically interrupt normal radio or CD playback and Traffic announcement will appear in the display.
If a non-traffic station is selected or recalled using a preset button, the audio unit will remain on that station unless TA or TRAFFIC is turned off, then on again.
Note:
If traffic announcement is on and you select a preset or manual tune to a non traffic announcement station no traffic announcement will be heard.
Note:
When you are listening to a non traffic announcement station and turn traffic announcement off and on again a TP seek will occur.
Traffic Announcement Volume
Traffic announcements interrupt normal broadcasts at a preset minimum level that is usually louder than normal listening volumes.
To adjust the preset volume:
- Use the volume control to make the necessary adjustment during an incoming traffic announcement broadcast. The display will show the level selected.
Ending Traffic Announcements
The audio unit will return to normal operation at the end of each traffic announcement. To end the announcement prematurely, press TA or TRAFFIC during the announcement.
Note:
If you press TA or TRAFFIC at any other time it will switch all announcements off.
Automatic Volume Control
When available, automatic volume control adjusts the volume level to compensate for engine noise and road speed noise.
- Press the MENU button and select AUDIO or AUDIO SETTINGS.
- Select AVC LEVEL or ADAPTIVE VOL.
- Use the left or right arrow button to adjust the setting.
- Press the OK button to confirm your selection.
- Press the MENU button to return.
News Broadcasts
Your audio unit may interrupt normal reception to broadcast news bulletins from stations on the FM waveband, radio data system or other enhanced network linked stations.
The display will indicate there is an incoming announcement, during news broadcasts. When the audio unit interrupts for a news broadcast the preset volume level will be the same as traffic announcements.
- Press the MENU button.
- Select AUDIO or AUDIO SETTINGS.
- Scroll to NEWS and turn on or off with the OK button.
- Press the MENU button to return.
Alternative Frequencies
The majority of programs that broadcast on the FM waveband have a program identification code, it can be recognized by audio units.
When your vehicle moves from one transmission area to another with the alternative frequencies tuning switched on, this function will search for the strongest station signal.
Under certain conditions, alternative frequencies tuning may temporarily disrupt normal reception.
When selected, the unit continually evaluates signal strength and, if a better signal becomes available, the unit will switch to that alternative. It mutes while it checks a list of alternative frequencies and if necessary, it will search once across the selected waveband for a genuine alternative frequency.
It will restore radio reception when it finds one or if one is not found, the unit will return to the original stored frequency.
When selected, AF will be shown in the display.
- Press the MENU button.
- Select AUDIO or AUDIO SETTINGS.
- Scroll to ALTERNAT FREQ. or ALTERNATIVE FREQ. and turn on or off with the OK button.
- Press the MENU button to return.
Regional Mode
Regional mode controls the behavior of alternative frequencies switching between regionally related networks of a parent broadcaster. A broadcaster may run a fairly large network across a large part of the country. At various times of the day this large network may be broken down into a number of smaller regional networks, typically centered on major towns or cities. When the network is not split into regional variants, the whole network caries the same programming.
Regional mode ON: This prevents random alternative frequency switches when neighboring regional networks are not carrying the same programming.
Regional mode OFF: This allows a larger coverage area if neighboring regional networks are carrying the same programming, but can cause random alternative frequency switches if they are not.
- Press the MENU button.
- Select AUDIO or AUDIO SETTINGS.
- Scroll to RDS REGIONAL and turn on or off with the OK button.
- Press the MENU button to return.
- Please note that Ford will not respond to individual feedback.
- Please provide detailed feedback regarding any inaccuracies in the content or any missing content in the Owner's Manual.
- Your feedback will be investigated and any necessary changes will be updated in the online Owner's Manual.
Your input is valuable in helping us improve our Owner's Manual. Thank you for taking the time to provide your feedback.