
This view of the Owner's Manual contains the very latest information, which may vary slightly from the printed Owner's Manual originally provided with your vehicle. It may also describe content that is not on or operates differently on your vehicle. Please consider the Owner's Manual originally provided with your vehicle as the primary source of information for your vehicle.

The information contained in this publication was correct at the time of release.In the interest of continuous development, we reserve the right to change specifications, design or equipment at any time without notice or obligation.No part of this publication may be reproduced, transmitted, stored in a retrieval system or translated into any language in any form by any means without our written permission.Errors and omissions excepted.
Copyright © 2024 Ford Motor Company
Changing a Road Wheel - Vehicles Built From: 19-05-2016


Lug Nuts
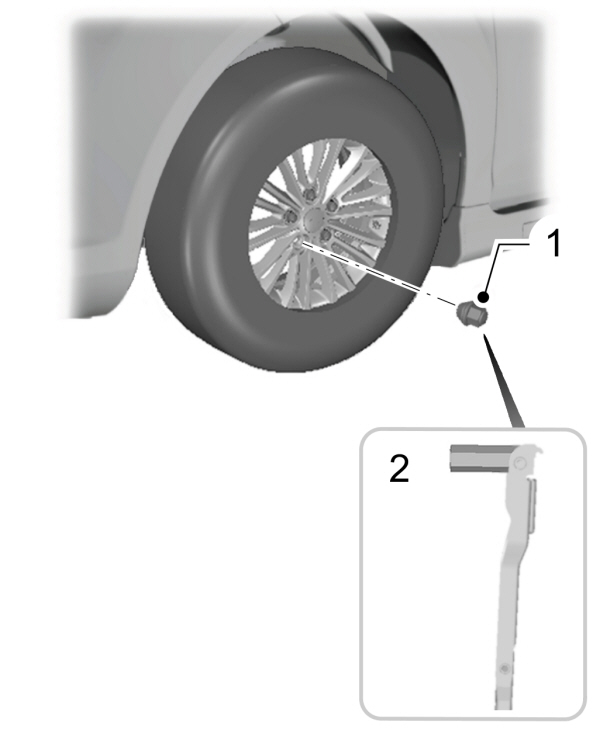
You can obtain replacement locking lug nuts or a locking lug nut key using the reference number certificate.
Vehicles With a Spare Wheel
 WARNING:
Do not fit more than one spare wheel on your vehicle at any one time.
WARNING:
Do not carry out any tire repairs on a spare wheel.
WARNING:
If you are not sure what type of spare wheel your vehicle has, do not exceed
80 km/h (50 mph).
WARNING:
Only fit snow chains to specified tires.
WARNING:
Do not fit more than one spare wheel on your vehicle at any one time.
WARNING:
Do not carry out any tire repairs on a spare wheel.
WARNING:
If you are not sure what type of spare wheel your vehicle has, do not exceed
80 km/h (50 mph).
WARNING:
Only fit snow chains to specified tires. |
If the spare wheel is the same type and size as your vehicle road wheel, you can fit the spare wheel and continue to drive in the normal manner.
If the spare wheel is not the same type and size as your vehicle road wheel, it has a label showing the maximum driving speed limit.
Refer to the following information before changing the road wheel.
Note:
Your vehicle may exhibit some different driving characteristics if you fit the spare wheel.
Note:
The ground clearance of your vehicle may be reduced when the spare wheel is fitted.Take care when parking next to a curb.
Note:
The spare wheel is located under the floor cover in the luggage compartment.
Note:
If the spare wheel is fitted to your vehicle, do not drive through an automatic car wash.
Note:
If the spare wheel is fitted to your vehicle, drive the shortest distance possible.
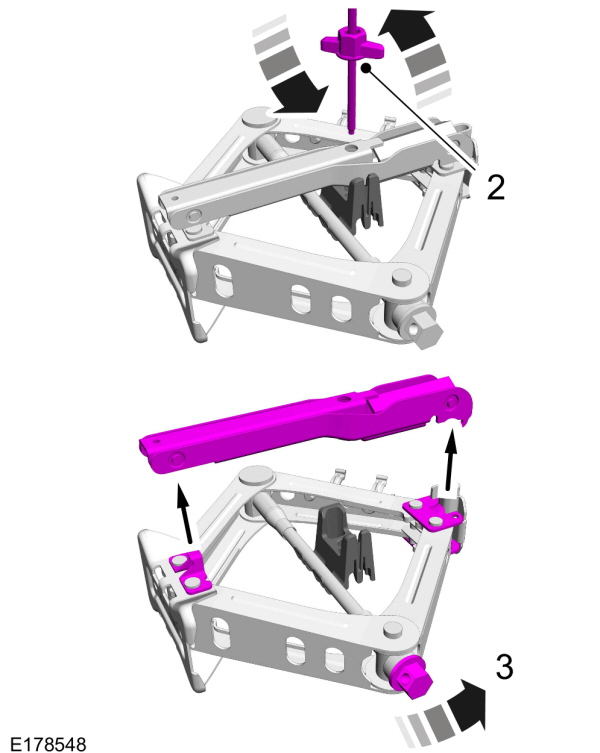
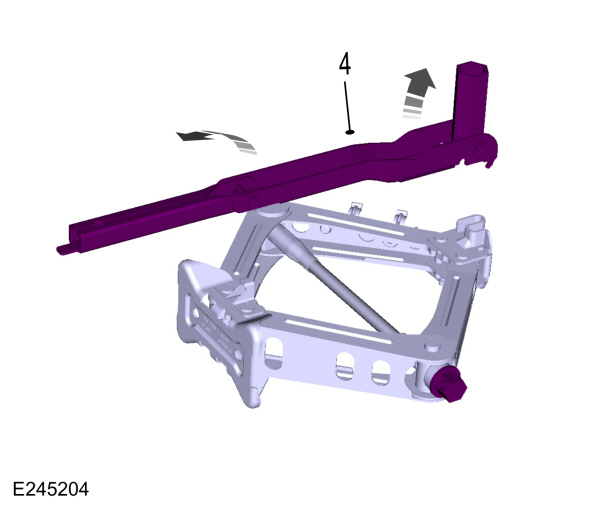
- Turn the spare wheel securing nut counterclockwise and remove it. Remove the wheel from the spare wheel well.
- Turn the vehicle jack securing bolt counterclockwise and remove it.
- Turn the vehicle jack screw counterclockwise to remove the vehicle jack handle and lug nut tool from the vehicle jack.
- Unfold the vehicle jack handle and the hexagonal end into the correct position prior to use. Use the hexagonal end to operate the vehicle jack screw and to remove the lug nuts.
Note:
Use the hook at the hexagonal end to remove the wheel trim.
Vehicles Without a Spare Wheel
Vehicles without a spare wheel are fitted with a temporary mobility kit. See
Tire Sealant and Inflator Kit.
Note:
Vehicles with a temporary mobility kit do not have a spare wheel, vehicle jack or wheel brace.
Vehicle Jack
|
WARNING:
Do not use the vehicle jack other than when you are changing a wheel in an emergency.
WARNING:
Check that the vehicle jack is not damaged or deformed and the thread is lubricated and clean.
WARNING:
Never place anything between the vehicle jack and the ground.
WARNING:
Never place anything between the vehicle jack and your vehicle. |
When changing between summer and winter tires, use a hydraulic floor jack.
Note:
Use a jack with a minimum lifting capacity of 1.5 tonnes and a lifting plate with a minimum diameter of
80 mm (3.1 in).
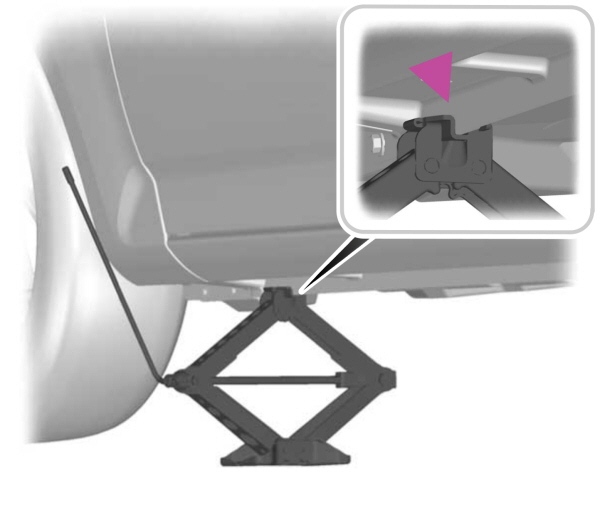
Jacking and Lifting Points
|
WARNING:
You must use the specified jacking points. |
| A B |
Indentations in the sills show the location of the jacking points.
Vehicles with Side Skirts
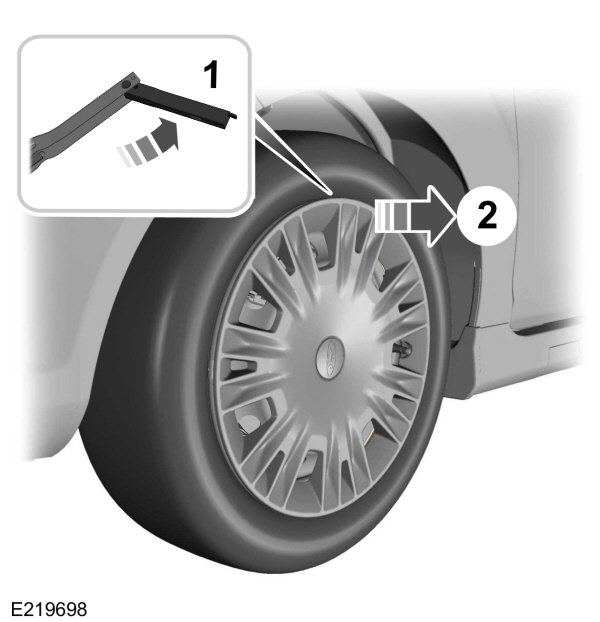
Removing the Wheel Trim
- Unfold the lug nut wrench.
- Use the tongue on the lug nut wrench to remove the wheel trim.
Removing a Road Wheel
|
WARNING:
Park your vehicle so that you do not obstruct the flow of traffic or place yourself in any danger and set up a warning triangle.
WARNING:
Make sure that your vehicle is on firm and level ground with the front wheels pointing straight ahead.
WARNING:
Switch the ignition off and apply the parking brake.
WARNING:
If your vehicle has a manual transmission, shift into first or reverse gear. If your vehicle has an automatic transmission, shift into park (P).
WARNING:
Make sure all passengers are out of your vehicle.
WARNING:
Chock the diagonally opposite wheel to the punctured tire with an appropriate wheel block or wheel chock.
WARNING:
Do not work on your vehicle when the jack is the only support. If the vehicle slips off the jack, you or someone else could be seriously injured. |
|
WARNING:
Make sure that the vehicle jack is vertical to the jacking point and the base is flat on the ground. |
- Install the locking lug nut key.
- Loosen the lug nuts.
- Raise your vehicle until the tire is clear of the ground.
- Remove the lug nuts and the road wheel.
Note:
Do not lay alloy wheels face down on the ground, this will damage the paint.
Installing a Road Wheel
|
WARNING:
Make sure that the arrows on directional tires point in the direction of rotation when your vehicle is moving forward. If you have to fit a spare tire with the arrows pointing in the opposite direction have the tire refitted as soon as possible.
WARNING:
Use only approved wheel and tire sizes. Using other sizes could damage your vehicle and will make the National Type Approval invalid.
WARNING:
Make sure there is no grease or oil on the threads or the surface between the wheel lugs and nuts. This can cause the lug nuts to loosen while driving.
WARNING:
Do not fit run flat tires on vehicles that were not originally fitted with them. Contact an authorized dealer for more details about compatibility. |
|
WARNING:
Do not install alloy wheels using lug nuts designed for use with steel wheels.
WARNING:
Have the lug nuts checked for tightness and the tire pressure checked as soon as possible.
WARNING:
Only use the specific lug nuts and wheels supplied with your vehicle. If in doubt, contact an authorized dealer. |
Note:
The lug nuts of alloy wheels and spoked steel wheels can also be used for the steel spare wheel for a short time (maximum two weeks).
Note:
Make sure that the cones on the lug nuts are against the wheel.
- Install the wheel.
- Install the lug nuts finger tight.
- Install the locking lug nut key.
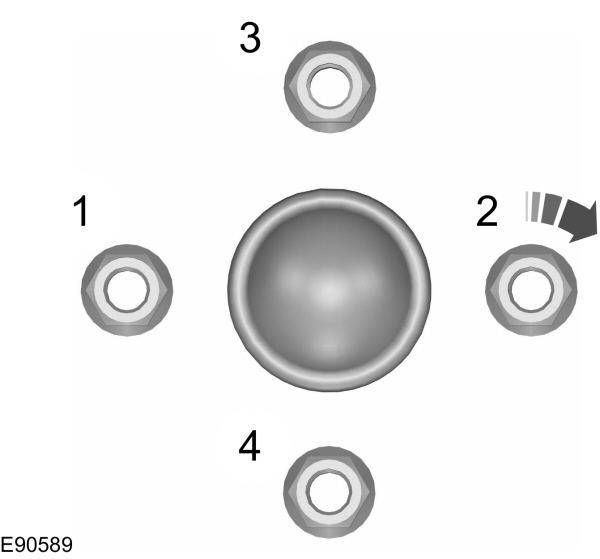
- Install all of the lug nuts and partially tighten them in the sequence shown.
- Lower your vehicle and remove the vehicle jack.
- Fully tighten all of the lug nuts in the sequence shown. See Capacities and Specifications.
- Install the wheel trim.
- Please note that Ford will not respond to individual feedback.
- Please provide detailed feedback regarding any inaccuracies in the content or any missing content in the Owner's Manual.
- Your feedback will be investigated and any necessary changes will be updated in the online Owner's Manual.
Your input is valuable in helping us improve our Owner's Manual. Thank you for taking the time to provide your feedback.