
This view of the Owner's Manual contains the very latest information, which may vary slightly from the printed Owner's Manual originally provided with your vehicle. It may also describe content that is not on or operates differently on your vehicle. Please consider the Owner's Manual originally provided with your vehicle as the primary source of information for your vehicle.

The information contained in this publication was correct at the time of release.In the interest of continuous development, we reserve the right to change specifications, design or equipment at any time without notice or obligation.No part of this publication may be reproduced, transmitted, stored in a retrieval system or translated into any language in any form by any means without our written permission.Errors and omissions excepted.
Copyright © 2024 Ford Motor Company
Tow Ball - Vehicles With: Detachable Tow Ball


 WARNING:
Do not exceed the lowest rating capacity for your vehicle or trailer hitch. Overloading your vehicle or trailer hitch can impair your vehicle stability and handling. Failure to follow this instruction could result in the loss of control of your vehicle, personal injury or death.
WARNING:
Do not cut, drill, weld or modify the trailer hitch. Modifying the trailer hitch could reduce the hitch rating.
WARNING:
Do not exceed the lowest rating capacity for your vehicle or trailer hitch. Overloading your vehicle or trailer hitch can impair your vehicle stability and handling. Failure to follow this instruction could result in the loss of control of your vehicle, personal injury or death.
WARNING:
Do not cut, drill, weld or modify the trailer hitch. Modifying the trailer hitch could reduce the hitch rating. |
| A B C D E F |
Do not disassemble or repair the tow ball arm.
Detaching the Tow Ball Arm
|
WARNING:
Always place the tow ball arm in a secure location in your vehicle so it does not become a projectile in a crash. Failure to follow this instruction could result in personal injury or death. |
You must detach the tow ball arm when not in use. Securely stow the tow ball arm in the luggage compartment.
Never unlock or detach the tow ball arm with a trailer attached.
Do not use any tools to detach the tow ball arm.
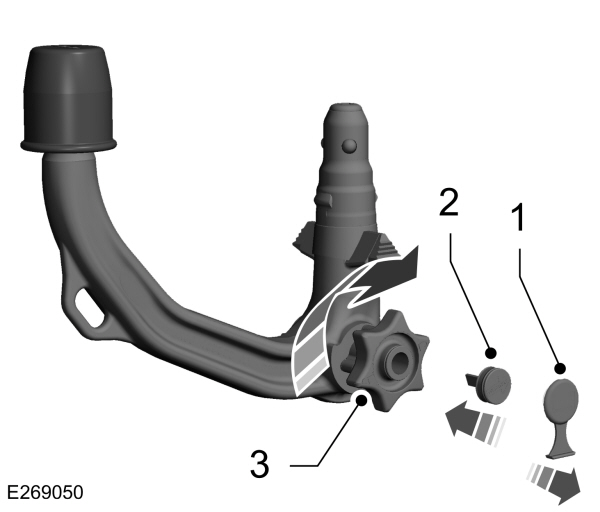
- Remove the protective cap.
- Insert the key and turn it clockwise to unlock the handwheel.
- Hold the tow ball arm. Pull the handwheel outward and turn it fully clockwise until it clicks.
Note:
The red mark on the handwheel must be within the green line on the tow ball arm.
- Release the handwheel.
- Pull the tow ball arm downward to remove it.
- Turn the trailer wiring connection socket upward through 90 degrees until it engages in the end position.
- Insert the blanking plug.
Attaching the Tow Ball Arm
Do not use any tools to attach the tow ball arm.
Note:
You can only attach the tow ball arm if it is unlocked.
- Remove the blanking plug.
- Fully insert the tow ball arm until it engages. Do not hold the handwheel.
Note:
The green mark on the handwheel must be within the green line on the tow ball arm.
- Insert the key and turn it counterclockwise to lock the handwheel.
- Fit the protective cap. Fully push it back over the lock.
- Turn the trailer wiring connection socket downward through 90 degrees until it engages in the end position.
Tow Ball Arm Safety Checks
After you attach the tow ball arm, check the following:
- The green mark on the handwheel is within the green line on the tow ball arm.
- You have locked the handwheel.
- You have removed the key.
Do not use the tow ball arm if any of these cannot be met. Have your vehicle checked as soon as possible.
Tow Ball Arm Guidelines
- Replacement keys are available. We recommend that you record the key number on the lock cylinder.
- Keep the system clean. Periodically lubricate bearings, sliding surfaces and locking balls with resin-free grease or oil. Lubricate the lock with graphite.
- Remove the trailer wiring plug from the trailer wiring connection socket when not in use. Failure to do so may result in corrosion of the trailer wiring connection socket. Regularly clean the trailer wiring connection socket and make sure the socket cover is fully closed.
- If you use a high pressure water jet to clean your vehicle, disconnect the trailer wiring plug. Do not aim the water jet directly at the trailer wiring connection socket. We recommend that you detach the tow ball arm before washing your vehicle.
- Please note that Ford will not respond to individual feedback.
- Please provide detailed feedback regarding any inaccuracies in the content or any missing content in the Owner's Manual.
- Your feedback will be investigated and any necessary changes will be updated in the online Owner's Manual.
Your input is valuable in helping us improve our Owner's Manual. Thank you for taking the time to provide your feedback.