
This view of the Owner's Manual contains the very latest information, which may vary slightly from the printed Owner's Manual originally provided with your vehicle. It may also describe content that is not on or operates differently on your vehicle. Please consider the Owner's Manual originally provided with your vehicle as the primary source of information for your vehicle.

The information contained in this publication was correct at the time of release.In the interest of continuous development, we reserve the right to change specifications, design or equipment at any time without notice or obligation.No part of this publication may be reproduced, transmitted, stored in a retrieval system or translated into any language in any form by any means without our written permission.Errors and omissions excepted.
Copyright © 2024 Ford Motor Company
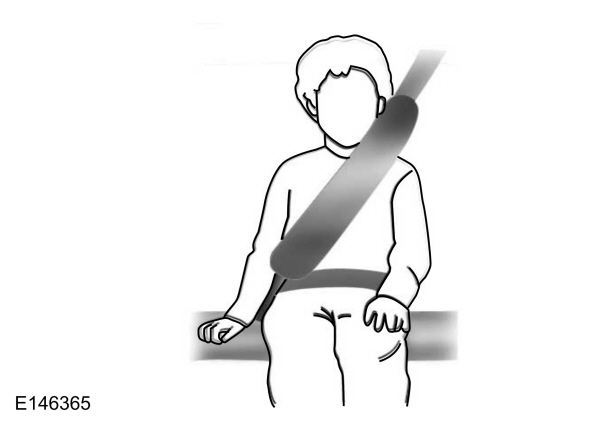
Fastening the Seatbelts
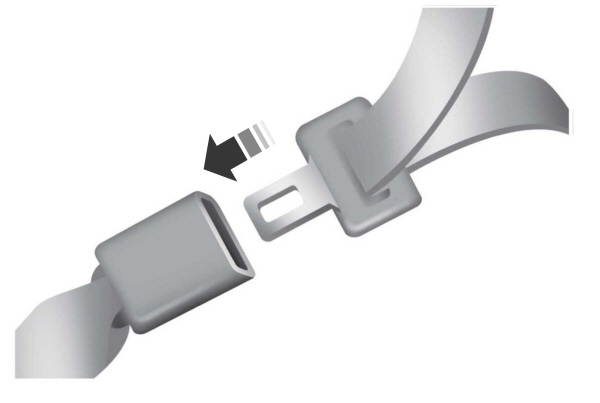
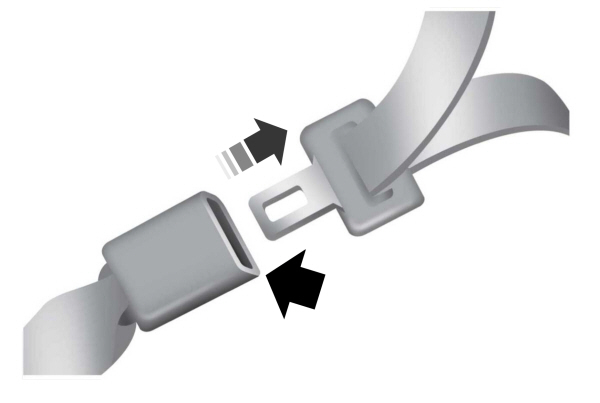


Standard belts shown, inflatable belts similar
The front outboard and rear safety restraints in the vehicle are combination lap and shoulder belts.
- Insert the belt tongue into the proper buckle (the buckle closest to the direction the tongue is coming from) until you hear a snap and feel it latch. Make sure you securely fasten the tongue in the buckle.
- To unfasten, press the release button and remove the tongue from the buckle.
Using the Seatbelt with Cinch Tongue (Front Center Seat on Super Cab and Crew Cab)
The cinch tongue slides up and down the belt webbing when you stow the belt or while putting seatbelts on. When you buckle the lap and shoulder seatbelt, the cinch tongue allows you to shorten the lap portion, but pinches the webbing to keep the lap portion from getting longer. The cinch tongue is designed to slip during a crash, so always wear the shoulder belt properly and do not allow any slack in either the lap or shoulder portions.
Before you can reach and latch a lap and shoulder belt having a cinch tongue into the buckle, you may have to lengthen the lap belt portion of it.
- To lengthen the lap belt, pull some webbing out of the shoulder belt retractor.
- While holding the webbing below the tongue, grasp the tip (metal portion) of the tongue so that it is parallel to the webbing and slide the tongue upward.
- Provide enough lap belt length so that the tongue can reach the buckle.
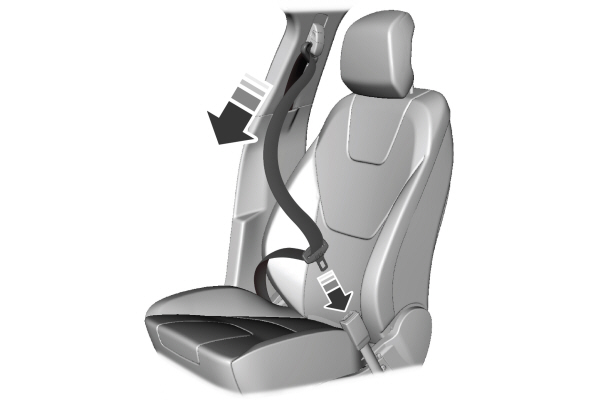
Fastening the Cinch Tongue
 WARNING:
Always drive and ride with your seatback upright and the lap belt snug and low across the hips.
WARNING:
Always drive and ride with your seatback upright and the lap belt snug and low across the hips. |
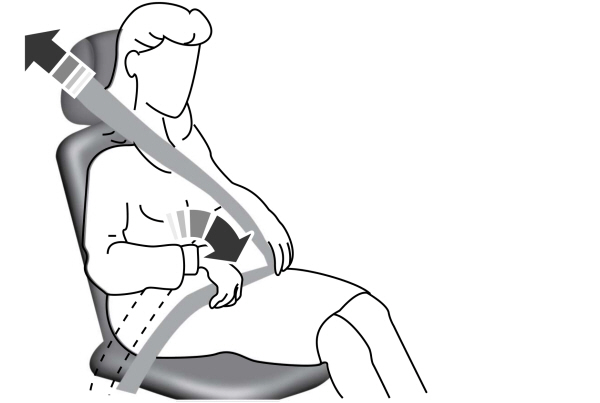
- Pull the lap and shoulder belt from the retractor so that the shoulder belt portion of the seatbelt crosses your shoulder and chest.
- Be sure the belt is not twisted. If the belt is twisted, remove the twist.
- Insert the belt tongue into the proper buckle for your seating position until you hear a snap and feel it latch.
- Make sure you securely fasten the tongue to the buckle by pulling on the tongue.
While you are fastened in the seatbelt, the lap and shoulder belt with a cinch tongue adjusts to your movement. However, if you brake hard, turn hard, or if your vehicle receives an impact of
5 mph (8 km/h) or more, the seatbelt will become locked and help reduce your forward movement.
Using Seatbelts During Pregnancy
|
WARNING:
Always ride and drive with your seatback upright and properly fasten your seatbelt. Fit the lap portion of the seatbelt snugly and low across the hips. Position the shoulder portion of the seatbelt across your chest. Pregnant women must follow this practice. See the following figure. |
Pregnant women should always wear their seatbelt. Position the lap belt portion of a combination lap and shoulder belt low across the hips below the belly and worn as tight as comfort allows. Position the shoulder belt to cross the middle of the shoulder and the center of the chest.
Seatbelt Locking Modes
|
WARNING:
If your vehicle is involved in a crash, have the seatbelts and associated components inspected as soon as possible. Failure to follow this instruction could result in personal injury or death. |
All safety restraints in the vehicle are combination lap and shoulder belts. The driver seatbelt has the first type of locking mode, and the front outboard passenger and rear seat seatbelts have both types of locking modes described as follows:
Vehicle Sensitive Mode
This is the normal retractor mode, which allows free shoulder belt length adjustment to your movements and locking in response to vehicle movement. For example, if the driver brakes suddenly, turns a corner sharply, or the vehicle receives an impact of about
5 mph (8 km/h) or more, the combination seatbelts lock to help reduce forward movement of the driver and passengers.
In addition, the retractor is designed to lock if you pull the webbing out too quickly. If the seatbelt retractor locks, slowly lower the height adjuster to allow the seatbelt to retract. If the retractor does not unlock, pull the seatbelt out slowly then feed a small length of webbing back toward the stowed position. For rear seatbelts, recline the rear seat backrest or push the seat backrest cushion away from the seatbelt. Feed a small length of webbing back toward the stowed position.
Automatic Locking Mode
In this mode, the shoulder belt automatically pre-locks. The belt still retracts to remove any slack in the shoulder belt. The automatic locking mode is not available on the driver seatbelt.
When to Use the Automatic Locking Mode
Use this mode any time you install a child safety seat in a front outboard passenger seating position in a Regular Cab, SuperCab, SuperCrew or any rear seating position of a SuperCab or SuperCrew. The optional front seat's center seatbelt has a cinch mechanism. Properly restrain children 12 years old and under in a rear seat whenever possible. See
Child Safety.
How to Use the Automatic Locking Mode
Non-inflatable seatbelts
- Buckle the combination lap and shoulder belt.
- Grasp the shoulder portion and pull downward until you pull the entire belt out.
- Allow the belt to retract. As the belt retracts, you will hear a clicking sound. This indicates the seatbelt is now in the automatic locking mode.
Rear outboard inflatable seatbelts (second row only– if equipped)
- Buckle the combination lap and shoulder belt.
- Grasp the lap portion of the belt and pull upward until you pull the entire belt out.
- Allow the belt to retract. As the belt retracts, you will hear a clicking sound. This indicates the seatbelt is now in the automatic locking mode.
How to Disengage the Automatic Locking Mode
Unbuckle the combination lap and shoulder belt and allow it to retract completely to disengage the automatic locking mode and activate the vehicle sensitive (emergency) locking mode.
Rear Inflatable Seatbelt (If Equipped)
|
WARNING:
Do not attempt to service, repair, or modify the supplementary restraint system or associated components. Failure to follow this instruction could result in personal injury or death. |
The rear inflatable seatbelts are in the shoulder portion of the seatbelts of the second-row outboard seating positions.
Note:
The rear inflatable seatbelts are compatible with most infant and child safety car seats and belt positioning booster seats when properly installed. This is because they are designed to fill with a cooled gas at a lower pressure and at a slower rate than traditional airbags. After inflation, the shoulder portion of the seatbelt remains cool to the touch.
The rear inflatable seatbelt consists of the following:- An inflatable bag in the shoulder seatbelt webbing.
- Lap seatbelt webbing with automatic locking mode.
- The same warning light, electronic control and diagnostic unit as used for the front seatbelts.
- Impact sensors in various parts of the vehicle.
How does the rear inflatable seatbelt system work?
|
WARNING:
If a supplementary restraint system component has deployed, it will not function again. Have the system and associated components inspected as soon as possible. Failure to follow this instruction could result in personal injury or death. |
The rear inflatable seatbelts function like standard restraints in everyday usage.
During a crash of sufficient force, the inflatable belt inflates from inside the webbing.
The fully inflated belt's increased diameter more effectively holds the occupant in the appropriate seating position, and spreads crash forces over more area of the body than regular seatbelts. This helps reduce pressure on the chest and helps control head and neck motion for passengers.
The rear inflatable seatbelts are designed to inflate in frontal or near-frontal crashes, rollovers and some side impact crashes. The fact that the rear inflatable seatbelt did not inflate in a crash does not mean that something is wrong with the system. Rather, it means the forces were not of the type sufficient to cause activation.
Thank You For Your Feedback