
This view of the Owner's Manual contains the very latest information, which may vary slightly from the printed Owner's Manual originally provided with your vehicle. It may also describe content that is not on or operates differently on your vehicle. Please consider the Owner's Manual originally provided with your vehicle as the primary source of information for your vehicle.

The information contained in this publication was correct at the time of release.In the interest of continuous development, we reserve the right to change specifications, design or equipment at any time without notice or obligation.No part of this publication may be reproduced, transmitted, stored in a retrieval system or translated into any language in any form by any means without our written permission.Errors and omissions excepted.
Copyright © 2024 Ford Motor Company
Changing a Road Wheel


 WARNING:
If the tire pressure monitor sensor becomes damaged it may not function.
WARNING:
If the tire pressure monitor sensor becomes damaged it may not function. |
Note:
If your vehicle is equipped with the tire pressure monitoring system, the indicator light illuminates when the spare tire is in use. To restore the full function of the monitoring system, all road wheels equipped with tire pressure monitoring sensors must be mounted on the vehicle.
Note:
You should only use tire sealants in roadside emergencies as they may cause damage to the tire pressure monitoring system sensor.
If you get a flat tire when driving, do not apply the brake heavily. Instead, gradually decrease your speed. Hold the steering wheel firmly and slowly move to a safe place on the side of the road.
If your vehicle is equipped with the tire pressure monitoring system, have a flat serviced by an authorized dealer in order to prevent damage to the system sensors. See
Tire Pressure Monitoring System.
Replace the spare tire with a road tire as soon as possible. During repairing or replacing of the flat tire, have the authorized dealer inspect the system sensor for damage.
Dissimilar Spare Wheel and Tire Assembly Information
|
WARNING:
Failure to follow these guidelines could result in an increased risk of loss of vehicle control, injury or death. |
If you have a dissimilar spare wheel and tire, then it is intended for temporary use only. This means that if you need to use it, you should replace it as soon as possible with a road wheel and tire assembly that is the same size and type as the road tires and wheels that were originally provided by Ford. If the dissimilar spare tire or wheel is damaged, it should be replaced rather than repaired.
A dissimilar spare wheel and tire assembly is defined as a spare wheel and tire assembly that is different in brand, size or appearance from the road tires and wheels.
Full-size dissimilar spare
When driving with the full-size dissimilar spare wheel and tire assembly, do not: - Exceed 70 mph (113 km/h).
- Use more than one dissimilar spare wheel and tire assembly at a time.
- Use snow chains on the end of the vehicle with the dissimilar spare wheel and tire assembly.
- Exceed 50 mph (80 km/h) in 4WD.
- Engage 4WD unless the vehicle is stationary.
- Use 4WD on dry pavement.
- Handling, stability and braking performance.
- Comfort and noise.
- Ground clearance and parking at curbs.
- Winter weather driving capability.
- Wet weather driving capability.
- Four-wheel drive capability.
- Towing a trailer.
- Driving vehicles equipped with a camper body.
- Driving vehicles with a load on the cargo rack.
Drive cautiously when using a full-size dissimilar spare wheel and tire assembly and seek service as soon as possible.
Location of the Spare Tire and Tools
If your vehicle is equipped with a spare tire, jack and associated tools, see the following table for their locations:
| Tool | Location |
|---|---|
| Spare tire - pick-up trucks only | Under the vehicle, just forward of the rear bumper. |
| Jack | Fastened to the floor pan behind the rearmost seat on the passenger side. |
| Jack handle, lug wrench, lug wrench extension - only available on dual rear wheel vehicles and wheel chock - only available on single rear wheel vehicles equipped with a diesel engine. | Regular Cab: Fastened to floor behind the driver seat. Super Cab and Crew Cab: Fastened to the floor under the rear seat on the driver's side. |
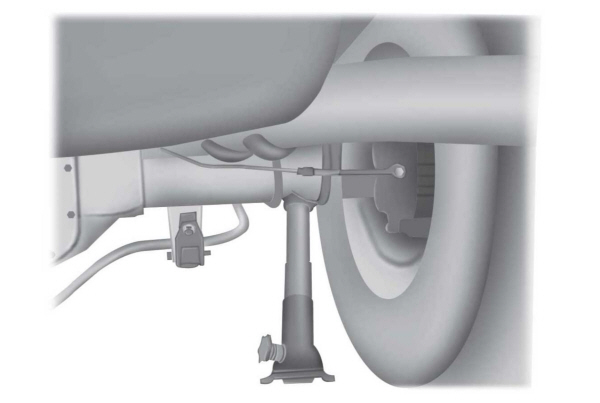
Removing the Spare Tire (With Spare Tire Carrier Only)
The following tools are required to remove the spare tire:
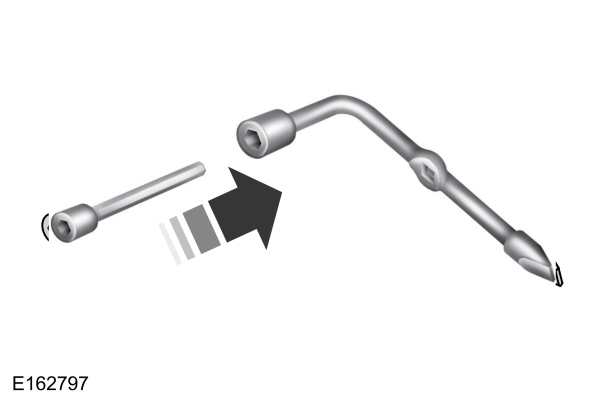
One or more handle extensions are used to operate the spare tire carrier. To assemble, align the button with the hole and slide the parts together.
To disconnect, press the button and pull apart.
The lug wrench is used to turn the handle extensions and the jack handle, slide the square end of the handle extension into the square hole of the lug wrench until it clicks in place.
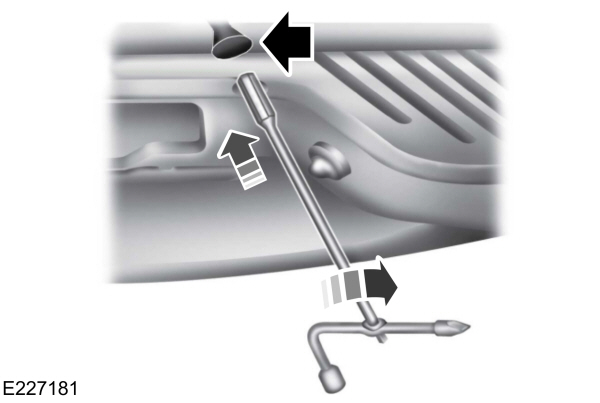
- Use the ignition key to open the lock at the rear bumper.
- Fully insert the jack handle, with one extension, through the bumper hole and into the guide tube. Additional extensions will be needed if the tailgate is in the lowered position and cannot be raised.
- Turn the handle counterclockwise and lower the spare tire until you can slide the tire rearward and the cable is slack. You will feel some resistance when you turn the jack handle assembly.
- Remove the retainer through the center of the wheel.
- If not placing the spare or flat tire in the underbody storage area, raise the wheel retainer up into the installed position.
Tire Change Procedure
|
WARNING:
When one of the front wheels is off the ground, the transmission alone will not prevent the vehicle from moving or slipping off the jack, even if the transmission is in park (P).
WARNING:
To help prevent your vehicle from moving when changing a wheel, shift the transmission into park (P), set the parking brake and use an appropriate block or wheel chock to secure the wheel diagonally opposite to the wheel being changed. For example, when changing the front left wheel, place an appropriate block or wheel chock on the right rear wheel.
WARNING:
Do not get under a vehicle that is only supported by a vehicle jack.
WARNING:
Do not attempt to change a tire on the side of the vehicle close to moving traffic. Pull far enough off the road to avoid the danger of being hit when operating the jack or changing the wheel.
WARNING:
Always use the jack provided as original equipment with your vehicle. If using a jack other than the one provided, make sure the jack capacity is adequate for the vehicle weight, including any vehicle cargo or modifications. If you are unsure if the jack capacity is adequate, contact the authorized dealer.
WARNING:
Only use the spare wheel carrier to stow the wheel provided with your vehicle. Other wheel sizes could cause the spare wheel carrier to fail if it does not fit securely or is too heavy. |
Note:
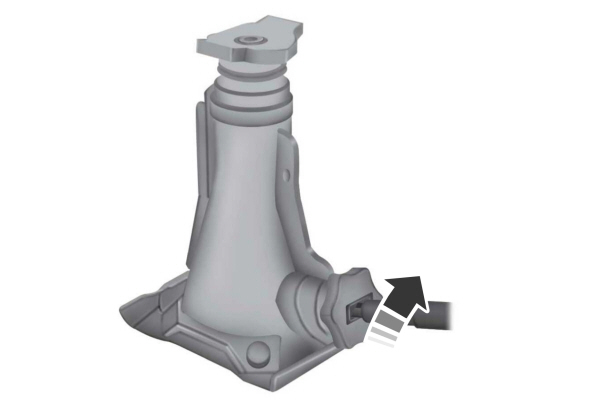
Do not use impact tools or power tools operating at over 200 RPM on the spare wheel carrier winch, which may cause it to malfunction and prevent a secure fit. Override the winch at least three times (there is an audible click each time) to make sure the wheel and tire fit securely.
Note:
Passengers should not remain in the vehicle when the vehicle is being jacked.
Park on a level surface, set the parking brake and activate the hazard flashers.
- Turn the engine off and block the wheel that is diagonally opposite of the flat tire using the wheel chock.
Note:
Lock the manual hub on the wheel if the vehicle is a 4x4.
- Remove the jack, jack handle, lug wrench and spare tire from the stowage locations.
- Use the tip of the lug wrench to remove any wheel trim.
- Loosen each wheel lug nut ½ turn counterclockwise, but do not remove them until the wheel is raised off the ground.
Note:
For vehicles with dual rear wheels, insert the lug wrench extension into the lug wrench to reach the lug nuts.
F-250 and F-350 Single Rear Wheel Vehicles
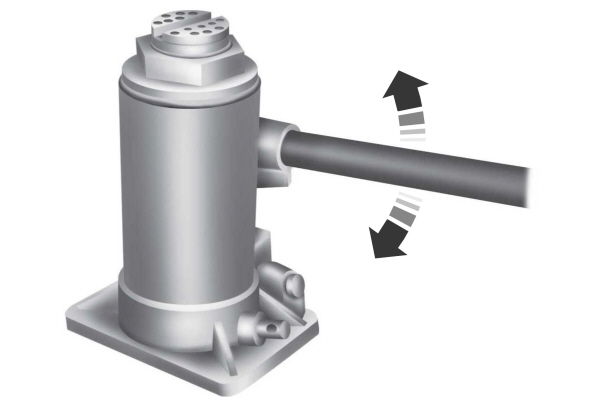
- Insert the hooked end of the jack handle into the jack and turn the handle clockwise until the wheel is completely off the ground and high enough to install the spare tire.
- Position the jack according to the following guides:
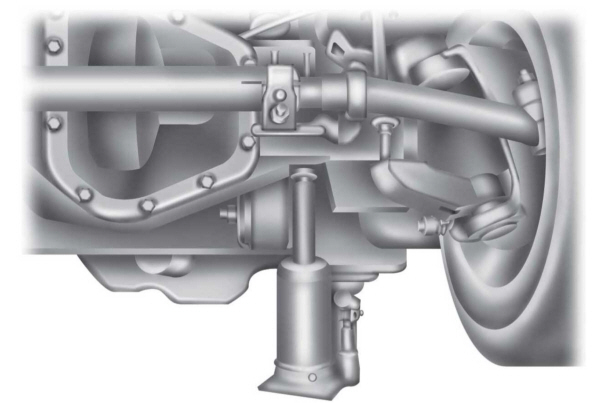
Front (4x2)
Front driver side (4x4)
Note:
Make sure the jack fits onto the flat area on the outboard side of the differential.
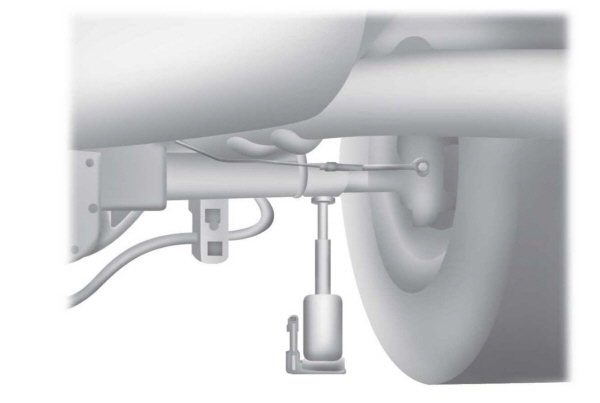
Front passenger side (4x4)
Note:
View shown from the rear of the vehicle to clearly identify the jack point. Place the jack directly under the axle.
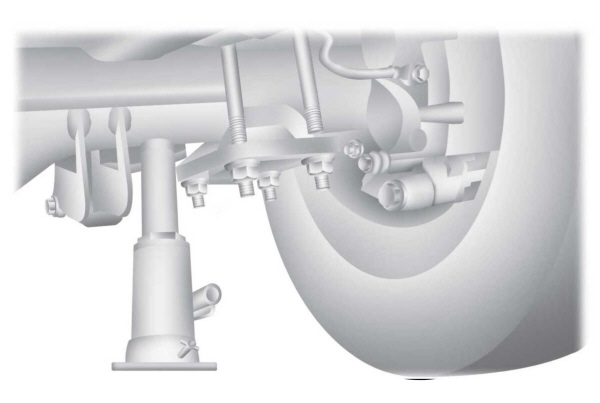
Rear
Note:
Jack at the specified locations to avoid damage to the vehicle.
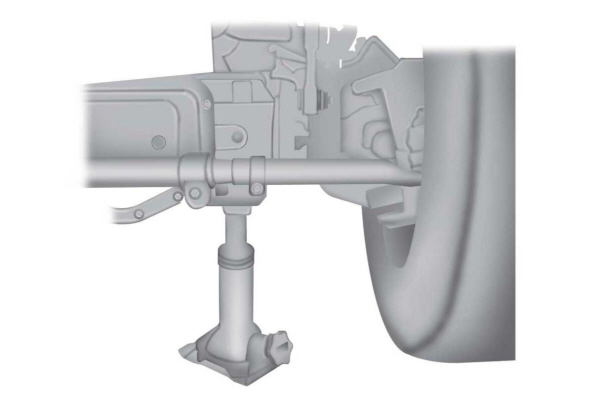
Jacking the Vehicle
- Insert the hooked end of the jack handle into the jack and turn the handle clockwise until the wheel is completely off the ground and high enough to install the spare tire.
- Remove the lug nuts with the lug wrench.
- Replace the flat tire with the spare, making sure the valve stem of the spare is facing outward when replacing a front wheel. For the rear wheel position on vehicles with single rear wheel fitments, install the spare with the valve stem facing outward. For vehicles with dual rear wheels, the valve stem of the spare must face outward when replacing an inner wheel, but must face inward when replacing an outboard wheel.
- Reinstall the lug nuts until the wheel is snug against the hub. Do not fully tighten the lug nuts until the vehicle has been lowered.
- Lower the wheel by turning the jack handle counterclockwise.
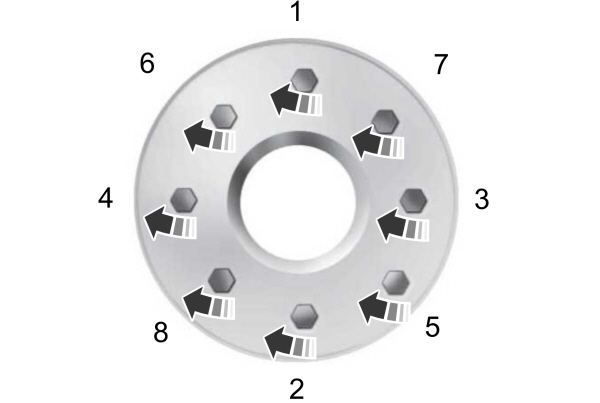
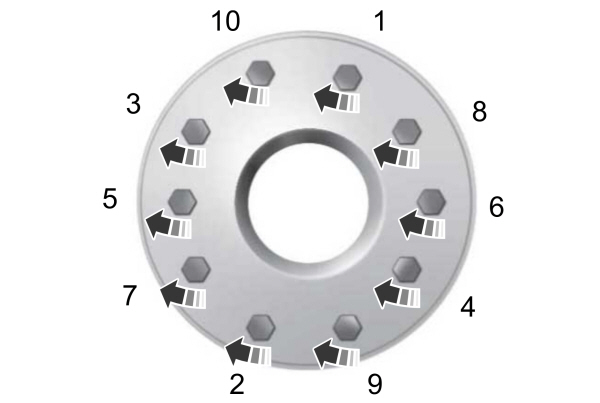
- Remove the jack and fully tighten the lug nuts in the order shown. See Technical Specifications.
- Safely stow the flat tire. See Stowing the flat or spare tire if the vehicle is equipped with a spare tire carrier.
- Stow the jack, jack handle and lug wrench. Make sure the jack is securely fastened so it does not rattle when driving.
- Unblock the wheels.
8-lug nut torque sequence
10-lug nut torque sequence
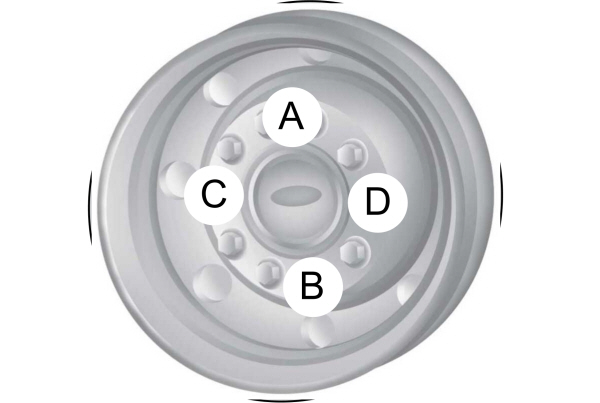
When installing the wheel center ornaments, make sure that the ornament retention towers on the back side of the ornament are aligned with the studs or lug nuts. The retention towers are designed to be installed over the studs or nuts and retain to the flange on the lug nut.
If the ornament retention towers are aligned between the studs or lug nuts, the ornament is improperly installed. This improper installation may appear and sound correct, but does not keep the ornament on the vehicle. If the ornament retention towers are aligned between the studs or lug nuts, the ornament is improperly installed. This improper installation could appear and sound correct, but will not keep the ornament on the vehicle. Ornaments improperly installed in this manner could fall off or become loose due to driving conditions.
F-350 Dual Rear Wheel, F-450 and F-550 Vehicles
- Slide the notched end of the jack handle over the release valve and use the handle to slide the jack under the vehicle. Make sure the valve is closed by turning it clockwise.
- Position the jack according to the following guides:
Front (4x2): F-350 dual rear wheel
Note:
Place the jack directly under the I-beam.
Front driver side (4x4): F-350 dual rear wheel
Note:
Make sure the jack fits onto the flat area on the outboard side of the differential housing.
Front passenger side (4x4): F-350 dual rear wheel
Note:
View shown from the rear of the vehicle to clearly identify the jack point.
Note:
Place the jack directly under the axle and inboard of the radius arm so that the jack clears the radius arm.
Front: F-450 and F-550
Rear: F-350 dual rear wheel
Rear: F-450 and F-550
Jacking the Vehicle
- Insert the jack handle into the pump linkage.
- Use an up-and-down motion with the jack handle to raise the wheel completely off the ground.
Note:
Hydraulic jacks are equipped with a pressure relief valve that prevents lifting loads which exceed the jack's rated capacity.
- Remove the lug nuts with the lug wrench.
- Replace the flat tire with the spare, making sure the valve stem of the spare is facing outward when replacing a front wheel. For the rear wheel positions, the valve stem of the spare must face outward when replacing an inner wheel, but must face inward when replacing an outboard wheel.
- Reinstall the lug nuts until the wheel is snug against the hub. Do not fully tighten the lug nuts until the vehicle has been lowered.
- Lower the wheel by slowly turning the release valve counterclockwise. Opening the release valve slowly provides a more controlled rate of descent.
- Remove the jack and fully tighten the lug nuts in the order shown. See Technical Specifications.
- Stow the flat tire. See Stowing the flat or spare tire if the vehicle is equipped with a spare tire carrier.
- Stow the jack, jack handle and lug wrench. Make sure the jack is securely fastened so it does not rattle when driving.
- Unblock the wheels.
8-lug nut torque sequence
10-lug nut torque sequence
Installing Dual Rear Wheel Ornaments
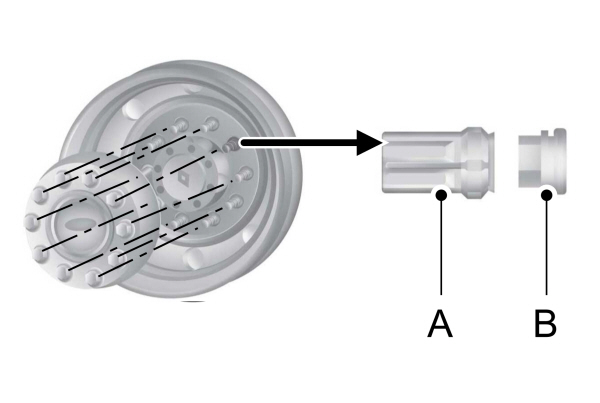
- Align the ornament with the lug nuts. A is the clip and B is the flange.
- Hold the ornament so that all of the retention clips are sitting on the flange of the lug nuts.
- Use your hand or rubber mallet to tap the ornament in a star pattern. There should be an even gap between the ornament and the wheel.
- Be sure to install all the clips on the nuts over the flanges so that there is an even gap all around and the retention clips are fully seated.
Stowing the Flat or Spare Tire
Note:
Failure to follow spare tire stowage instructions may result in failure of cable or loss of spare tire.
- Place the tire on end with the valve stem facing toward the front of the vehicle.
- Lay the tire on the ground with the valve stem facing up.
- Slide the wheel partially under the vehicle and install the retainer through the wheel center. Pull on the cable to align the components at the end of the cable.
- Turn the jack handle clockwise until the tire is raised to its stowed position underneath the vehicle. The effort to turn the jack handle increases significantly and the spare tire carrier ratchets or slips when the tire is raised to the maximum tightness. Tighten to the best of your ability, to the point where the ratchet/slip occurs, if possible. The spare tire carrier does not allow you to overtighten. If the spare tire carrier ratchets or slips with little effort, take the vehicle to your authorized dealer for assistance at your earliest convenience.
- Check that the tire lies flat against the frame and is properly tightened. Try to push or pull, then turn the tire to be sure it does not move. Loosen and retighten, if necessary. Failure to properly stow the spare tire may result in failure of the winch cable and loss of the tire.
- Repeat this tightness check procedure when servicing the spare tire pressure, every six months, per scheduled maintenance information, or at any time that the spare tire is disturbed through service of other components.
Thank You For Your Feedback