
This view of the Owner's Manual contains the very latest information, which may vary slightly from the printed Owner's Manual originally provided with your vehicle. It may also describe content that is not on or operates differently on your vehicle. Please consider the Owner's Manual originally provided with your vehicle as the primary source of information for your vehicle.

The information contained in this publication was correct at the time of release.In the interest of continuous development, we reserve the right to change specifications, design or equipment at any time without notice or obligation.No part of this publication may be reproduced, transmitted, stored in a retrieval system or translated into any language in any form by any means without our written permission.Errors and omissions excepted.
Copyright © 2024 Ford Motor Company
Rear View Camera

 WARNING:
The rear view camera system is a reverse aid supplement device that still requires the driver to use it in conjunction with the interior and exterior mirrors for maximum coverage.
WARNING:
Objects that are close to either corner of the bumper or under the bumper, might not be seen on the screen due to the limited coverage of the camera system.
WARNING:
Reverse your vehicle slowly. Failure to follow this instruction could result in the loss of control of your vehicle, personal injury or death.
WARNING:
Use caution when the liftgate is ajar. If the liftgate is ajar, the camera will be out of position and the video image may be incorrect. All guidelines disappear when the liftgate is ajar. Failure to follow this instruction could result in personal injury.
WARNING:
Do not switch the camera features on or off when your vehicle is moving.
WARNING:
To help avoid personal injury always use caution when in reverse (R) and when using the rear view camera.
WARNING:
The rear view camera system is a reverse aid supplement device that still requires the driver to use it in conjunction with the interior and exterior mirrors for maximum coverage.
WARNING:
Objects that are close to either corner of the bumper or under the bumper, might not be seen on the screen due to the limited coverage of the camera system.
WARNING:
Reverse your vehicle slowly. Failure to follow this instruction could result in the loss of control of your vehicle, personal injury or death.
WARNING:
Use caution when the liftgate is ajar. If the liftgate is ajar, the camera will be out of position and the video image may be incorrect. All guidelines disappear when the liftgate is ajar. Failure to follow this instruction could result in personal injury.
WARNING:
Do not switch the camera features on or off when your vehicle is moving.
WARNING:
To help avoid personal injury always use caution when in reverse (R) and when using the rear view camera. |
The rear view camera provides an image of the area behind your vehicle. During operation, lines appear in the display that represents the path of your vehicle and proximity to objects behind it.
The camera is on the liftgate.
Using the Rear View Camera
The rear view camera system displays what is behind your vehicle when you shift the transmission into reverse (R).
Note:
When towing, the camera only sees what you are towing.In some vehicles, the guidelines may disappear when you connect the trailer tow connector.
The system may not correctly operate in any of the following conditions:- Nighttime or dark areas if the reverse lamps are not operating.
- If the camera is obstructed.Clean the lens with a soft, lint-free cloth and non-abrasive cleaner.
- The camera is misaligned due to damage to the rear of your vehicle.
Rear View Camera Guidelines
|
WARNING:
Objects above the camera may not be visible. Check the area behind your vehicle when necessary. |
If the vehicle battery is disconnected, the guidelines are not fully functional directly after the battery is reconnected. The guidelines become fully functional after you drive your vehicle as straight as possible for five minutes at a minimum speed of
50 km/h (31 mph).
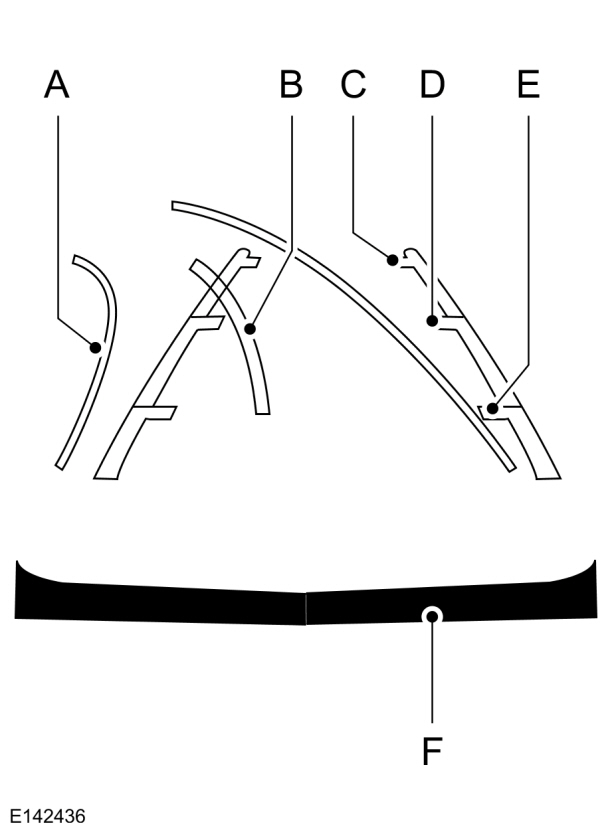
The system uses three types of guidelines to help you see what is behind your vehicle:
| A B C D E F |
Active guidelines are only available with fixed guidelines. To use active guidelines, turn the steering wheel to point the guidelines toward an intended path.If you change the steering wheel position when reversing, your vehicle might deviate from the original intended path.
Note:
Guidelines do not display if the liftgate is open.
The fixed and active guidelines fade in and out depending on the steering wheel position.When the steering wheel position is straight the active guidelines do not display. Objects in the red zone are closest to your vehicle and objects in the green zone are further from your vehicle.
Manual Zoom
|
WARNING:
When manual zoom is on, the full area behind your vehicle may not show. Be aware of your surroundings when using the manual zoom feature. |
Press the zoom in or zoom out symbol to change the view.
Note:
Manual zoom is only available when you shift into reverse (R).
Note:
The rear bumper remains in the image as a reference point.
Note:
Only the centerline shows when you switch on manual zoom.
System Settings
You can adjust the camera settings using the touchscreen.See
Settings.
Rear View Camera Delay
You can switch this feature on or off using the touchscreen. The default setting is off.See
Settings.
If you switch this feature on, the image continues to display when you shift from reverse (R) until:- You shift to a forward gear and the vehicle speed sufficiently increases.
- You shift in to park (P).
Enhanced Parking Aids or Park Pilot (If Equipped)
You can switch this feature on or off using the touchscreen.See
Settings.
When the reverse sensing system detects an object, it displays red, yellow and green indicators at the top of the image.
180 Degree View (If Equipped)
When you use the 180 degree view, objects behind your vehicle are shown extremely stretched and do not appear as actual ratio.
When you shift to reverse (R) and the rear view camera image appears, press the button in the upper left corner of the touch screen to switch the 180 degree view on. Press the button again to switch it off.
Note:
Guidelines do not appear when you switch the 180 degree view on.
When you switch the 180 degree view on, the view splits into three images. You can use the right and left outer images when reversing to check for cross traffic and pedestrians.
The 180 degree view turns off when you shift into park (P) or into any forward gear and the vehicle speed sufficiently increases.
Note:
Whenever you shift to reverse (R) the standard rear view camera image with guidelines is the default view.
Thank You For Your Feedback