
This view of the Owner's Manual contains the very latest information, which may vary slightly from the printed Owner's Manual originally provided with your vehicle. It may also describe content that is not on or operates differently on your vehicle. Please consider the Owner's Manual originally provided with your vehicle as the primary source of information for your vehicle.

The information contained in this publication was correct at the time of release.In the interest of continuous development, we reserve the right to change specifications, design or equipment at any time without notice or obligation.No part of this publication may be reproduced, transmitted, stored in a retrieval system or translated into any language in any form by any means without our written permission.Errors and omissions excepted.
Copyright © 2024 Ford Motor Company
Changing a Road Wheel
If a tire deflates when your vehicle is moving, do the following:


 WARNING:
Do not fit more than one spare wheel on your vehicle at any one time.
WARNING:
Do not carry out any tire repairs on a spare wheel.
WARNING:
Do not switch off stability control or select sport mode, when using a temporary spare wheel or after inflating a tire using the temporary mobility kit.
WARNING:
Do not fit more than one spare wheel on your vehicle at any one time.
WARNING:
Do not carry out any tire repairs on a spare wheel.
WARNING:
Do not switch off stability control or select sport mode, when using a temporary spare wheel or after inflating a tire using the temporary mobility kit. |
If a tire deflates when your vehicle is moving, do the following:
- Firmly hold the steering wheel.
- Avoid heavy braking.
- Gradually reduce the vehicle speed and stop your vehicle as soon as it is safe to do so.
- Fully apply the parking brake.
- Switch the ignition off.
The spare wheel, vehicle jack, towing eye, lug nut tool and wheel trim remover are in the luggage compartment under the floor covering or in the side panel.
If the spare wheel is exactly the same type and size as the other fitted road wheels, you can replace the existing road wheel with the spare wheel and continue to drive in the normal manner. We recommend that you have the damaged road wheel and tire repaired or replaced as soon as possible.
Dissimilar Spare Wheel and Tire Assembly Information
|
WARNING:
Failure to follow these guidelines could result in an increased risk of loss of vehicle control, injury or death.
WARNING:
If you are not sure what type of spare wheel your vehicle has, do not exceed
80 km/h (50 mph). |
If the spare wheel is different to the other fitted road wheels, it may have a warning label with the appropriate maximum speed limit. Drive cautiously when using a dissimilar spare wheel and tire assembly.
A dissimilar spare wheel and tire is for temporary use only. Drive the shortest distance possible and have the damaged road wheel and tire repaired or replaced as soon as possible. If the dissimilar spare wheel or tire is damaged, it must be replaced.
If you use a dissimilar spare wheel and tire assembly, this can lead to impairment of the following:- Handling, stability and braking performance.
- Comfort and noise.
- Ground clearance and parking at curbs.
- Winter weather driving capability.
- Wet weather driving capability.
- All-wheel driving capability.
A dissimilar spare wheel and tire assembly is different in size and appearance from the road wheels and tires and can be one of three types:
T-type Mini-spare Wheel
The spare tire has the letter T preceding the tire size, for example T125/80R15 and may have Temporary Use Only molded in the sidewall.
When driving with this type of a dissimilar spare wheel:- Do not exceed the maximum speed shown on the label.
- Do not load your vehicle beyond maximum vehicle load rating listed on the safety compliance label.
- Do not tow a trailer.
- Do not use snow chains on the end of your vehicle with the dissimilar spare tire.
- Do not use more than one dissimilar spare tire at a time.
- Do not use commercial car washing equipment.
Full-size Dissimilar Spare Wheel With a Label on the Wheel
The label on the wheel states: THIS WHEEL AND TIRE ASSEMBLY FOR TEMPORARY USE ONLY.
When driving with this type of a dissimilar spare wheel:- Do not exceed the maximum speed shown on the label.
- Do not load your vehicle beyond maximum vehicle load rating listed on the safety compliance label.
- Do not tow a trailer.
- Do not use snow chains on the end of your vehicle with the dissimilar spare tire.
- Do not use more than one dissimilar spare tire at a time.
- Do not use commercial car washing equipment.
Full-size Dissimilar Spare Wheel Without a Label on the Wheel
If the spare wheel is exactly the same type and size as the other fitted road wheels, you can replace the existing road wheel with the spare wheel and continue to drive in the normal manner.
Removing the Spare Wheel, Vehicle Jack and Lug Nut Tool
- Turn the securing nut counterclockwise and remove it. Remove the wheel from the spare wheel well.
- Turn the vehicle jack securing bolt counterclockwise and remove it.
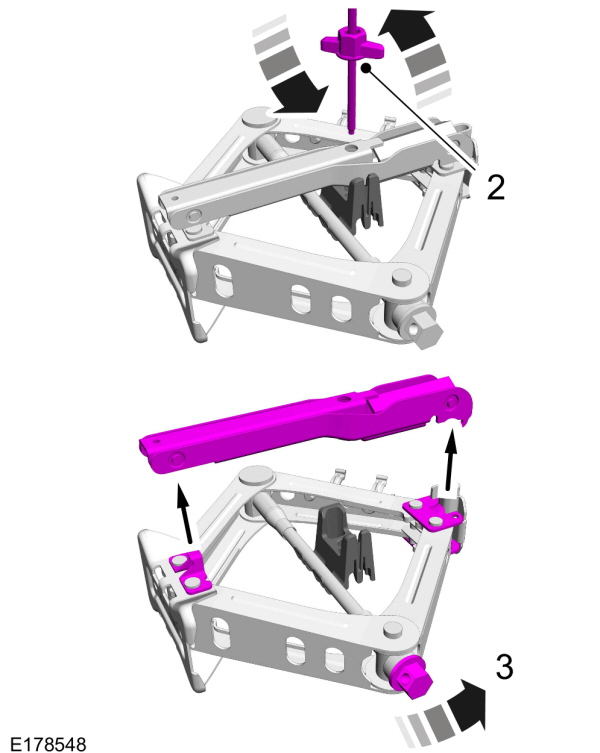
- Turn the vehicle jack screw counterclockwise to remove the vehicle jack handle and lug nut tool from the vehicle jack.
- Unfold the vehicle jack handle and the hexagonal end into the correct position prior to use. Use the hexagonal end to operate the vehicle jack screw and to remove the lug nuts.
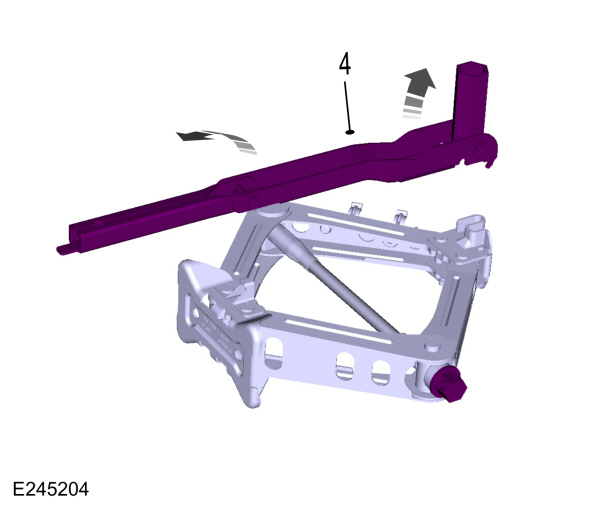
Assembling the Lug Nut Tool
Fully unfold the vehicle jack handle and lug nut tool.
Vehicles Without a Spare Wheel
Vehicles without a spare wheel have a temporary mobility kit. See
Tire Sealant and Inflator Kit.
Removing the Wheel Trim (If Equipped)
Use the hook on the vehicle jack handle and lug nut tool to remove the wheel trim.
Note:
Make sure that you pull the wheel trim remover at right angles to the trim.
Vehicle Jack
|
WARNING:
Check that the vehicle jack is not damaged or deformed and the thread is lubricated and clean.
WARNING:
Never place anything between the vehicle jack and the ground.
WARNING:
Never place anything between the vehicle jack and your vehicle.
WARNING:
Use a jack with a minimum lifting capacity of
1,500 kg (3,307 lb) and a lifting plate with a minimum diameter of
80 mm (3.1 in).
WARNING:
The jack supplied with this vehicle is only intended for changing wheels. Do not use the vehicle jack other than when you are changing a wheel in an emergency.
WARNING:
Do not work on your vehicle when the jack is the only support as your vehicle could slip off the jack. Failure to follow this instruction could result in personal injury or death.
WARNING:
No person should place any portion of their body under a vehicle that is supported by a jack.
WARNING:
Do not get under a vehicle that is only supported by a vehicle jack. |
Workshop Type Hydraulic Trolley Jack
|
WARNING:
Use a jack with a minimum lifting capacity of
1,500 kg (3,307 lb) and a lifting plate with a minimum diameter of
80 mm (3.1 in). |
We recommend you use a workshop type hydraulic trolley jack for changing between summer and winter tires.
Refer to vehicle jack manufacturer's instructions.
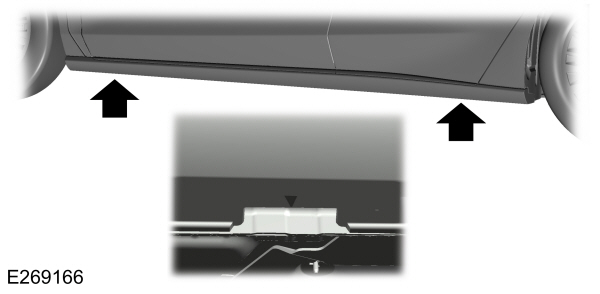
Vehicle Jacking Points
|
WARNING:
Use only the specified jacking points. If you use other positions, you may damage the body, steering, suspension, engine, braking system or the fuel lines. |
- Locate the vehicle jacking points. Small arrow-shaped marks indicate the locations.
- Carefully position the vehicle jack onto the vehicle jacking point.
- Place the hexagonal end of the vehicle jack handle and lug tool onto the vehicle jack.
- Turn the vehicle jack handle clockwise to raise the vehicle.
Removing a Road Wheel
|
WARNING:
Park your vehicle in such a position that neither the traffic nor you are hindered or endangered.
WARNING:
Park your vehicle so that you do not obstruct the flow of traffic or place yourself in any danger and set up a warning triangle.
WARNING:
Make sure that your vehicle is on firm and level ground with the front wheels pointing straight ahead.
WARNING:
Switch the ignition off and apply the parking brake.
WARNING:
If your vehicle has a manual transmission, shift into first or reverse gear. If your vehicle has an automatic transmission, shift into park (P).
WARNING:
Make sure all passengers are out of your vehicle.
WARNING:
Make sure that the vehicle jack is vertical to the jacking point and the base is flat on the ground.
WARNING:
Secure the diagonally opposite wheel with an appropriate block or wheel chock. |
- If your vehicle has locking lug nuts, install the locking lug nut tool and loosen the locking lug nut first.
- Loosen the lug nuts.
- Raise your vehicle until the tire is clear of the ground.
- Remove the lug nuts and the wheel.
Note:
Do not lay alloy wheels face down on the ground. This may damage the paint.
Installing a Road Wheel
|
WARNING:
When you install a wheel, always remove any corrosion, dirt or foreign materials present on the mounting surfaces of the wheel or the surface of the wheel hub, brake drum or brake disc that contacts the wheel. Make sure to secure any fasteners that attach the rotor to the hub so they do not interfere with the mounting surfaces of the wheel. Installing wheels without correct metal-to-metal contact at the wheel mounting surfaces can cause the wheel nuts to loosen and the wheel to come off while your vehicle is in motion, resulting in loss of vehicle control, personal injury or death.
WARNING:
Make sure there is no grease or oil on the threads or the surface between the wheel lugs and nuts. This can cause the lug nuts to loosen while driving.
WARNING:
Use only approved wheel and tire sizes. Using other sizes could damage your vehicle and will make the National Type Approval invalid.
WARNING:
Do not fit run flat tires on vehicles that were not originally fitted with them. Contact an authorized dealer for more details about compatibility.
WARNING:
Do not install alloy wheels using lug nuts designed for use with steel wheels.
WARNING:
Have the lug nuts checked for tightness and the tire pressure checked as soon as possible. |
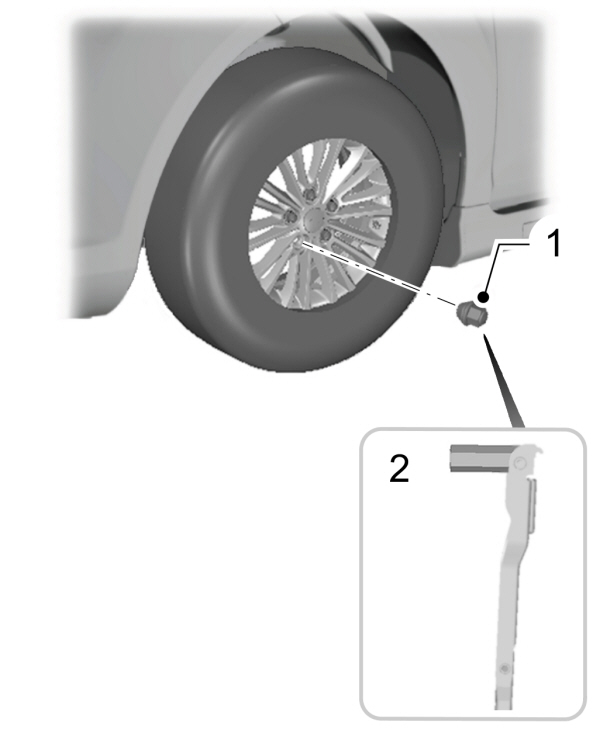
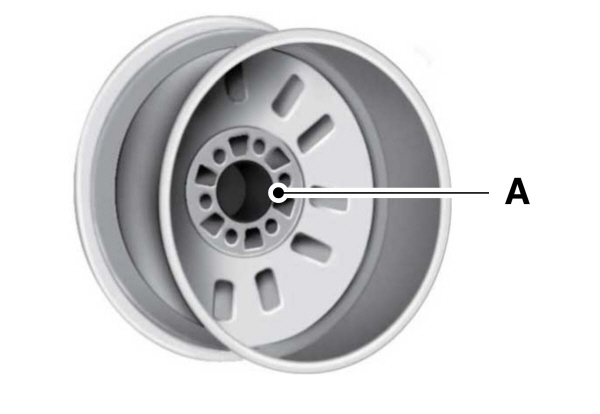
- Inspect the wheel pilot bore (A) and mounting surface prior to installation. Remove any visible corrosion or loose particles.
- Install the wheel.
- Install the lug nuts finger tight.
Note:
Make sure that the cones on the lug nuts are against the wheel.
- Partially tighten the lug nuts in the sequence shown.
- Lower your vehicle and remove the vehicle jack.
- Fully tighten the lug nuts in the sequence shown. See Lug Nuts.
- Carefully install the wheel trim.
Thank You For Your Feedback