Contacting Us
Introduction
Symbols Glossary
Data Privacy
Visual Search
- Steering Wheel - Vehicles With: Cruise Control, Vehicles Without: Lane Keeping Aid
- Steering Wheel - Vehicles With: Adaptive Cruise Control
- Steering Wheel - Vehicles With: Cruise Control/Lane Keeping Aid
- Instrument Panel
- Center Console - Manual Transmission
- Center Console - Automatic Transmission
- Vehicle Interior - 4-Door
- Vehicle Interior - 2-Door
- Front Exterior - 4-Door, Vehicles With: Hard Top
- Front Exterior - 4-Door, Vehicles With: Soft Top
- Front Exterior - 2-Door
- Rear Exterior - 4-Door, Vehicles With: Hard Top
- Rear Exterior - 4-Door, Vehicles With: Soft Top
- Rear Exterior - 2-Door
Child Safety
- Child Safety Precautions
- Booster Seats
- Child Safety Locks (If Equipped)
Child Restraint Anchor Points
Child Restraints
Installing Child Restraints
Seatbelts
- Seatbelt Precautions
- Fastening and Unfastening the Seatbelts
- Adjusting the Seatbelts During Pregnancy
- Checking the Seatbelts
- Seatbelt Extensions
Sensitive Locking Mode
Automatic Locking Mode
Seatbelt Reminder
Personal Safety System™
Airbags
Keys and Remote Controls
MyKey™
- What Is MyKey
- Creating a MyKey
- Programming a MyKey
- Clearing All MyKeys
- Checking MyKey System Status
- Using MyKey With Remote Start Systems
MyKey Settings
MyKey – Troubleshooting
Doors and Locks
Operating the Doors From Outside Your Vehicle
Operating the Doors From Inside Your Vehicle
Autolock
Doors and Locks – Troubleshooting
Keyless Entry
- Keyless Entry Limitations
- Keyless Entry Settings
- Using Keyless Entry
Keyless Entry – Troubleshooting
Tailgate
- Locking and Unlocking the Tailgate
Opening the Tailgate
Closing the Tailgate
Tailgate – Troubleshooting
Security
Passive Anti-Theft System
Security – Troubleshooting
Steering Wheel
Wipers and Washers
- Switching the Rear Window Wiper On and Off
- Checking the Wiper Blades
- Replacing the Front Wiper Blades
- Replacing the Rear Wiper Blades
- Wipers and Washers Videos
Reverse Wipe
Washers
Wipers and Washers – Troubleshooting
Exterior Lighting
- Exterior Lighting Control
- Using the Turn Signal Lamps
- Switching the Daytime Running Lamps On and Off - Vehicles With: Configurable Daytime Running Lamps
- Switching the Daytime Running Lamps On and Off - Vehicles With: Daytime Running Lamps (DRL)
- Using the Front Fog Lamps (If Equipped)
- Switching the Spot Lamps On and Off (If Equipped)
- Exterior Lamp Indicators
- Exterior Lamps On Audible Warning
- Exterior Lighting Videos
Headlamps
Headlamps – Troubleshooting
Autolamps
Exterior Lamps
Exterior Zone Lighting (If Equipped)
Automatic High Beam Control
Automatic High Beam Control – Troubleshooting
Interior Lighting
- Switching All of the Interior Lamps On and Off
- Switching the Front Interior Lamps On and Off
- Switching the Rear Interior Lamps On and Off
- Adjusting the Instrument Panel Lighting Brightness
Interior Lamp Function
Ambient Lighting (If Equipped)
Interior Lighting – Troubleshooting
Windows
Interior Mirror
- Interior Mirror Precautions
- Manually Dimming the Interior Mirror
Auto-Dimming Interior Mirror (If Equipped)
Exterior Mirrors
Instrument Cluster
- Instrument Cluster Overview
- Tachometer
- Speedometer
- Engine Coolant Temperature Gauge
- Transmission Fluid Temperature Gauge
- Turbo Boost Gauge - 2.3L EcoBoost™
- What Is the Information Bar
- What Are the Instrument Cluster Warning Lamps
- Instrument Cluster Warning Lamps
- What Are the Instrument Cluster Indicators
- Instrument Cluster Indicators
Fuel Gauge
Instrument Cluster Display
Remote Start (If Equipped)
Climate Control - Vehicles With: Automatic Temperature Control
- Identifying the Climate Control Unit
- Switching Climate Control On and Off
- Switching Recirculated Air On and Off
- Switching Air Conditioning On and Off
- Switching Maximum Defrost On and Off
- Switching Maximum Cooling On and Off
- Switching the Heated Rear Window On and Off (If Equipped)
- Setting the Blower Motor Speed
- Switching the Heated Mirrors On and Off
- Setting the Temperature
- Directing the Flow of Air
- Climate Control Hints
Climate Control - Vehicles With: Manual Temperature Control
- Identifying the Climate Control Unit
- Switching Climate Control On and Off
- Switching Recirculated Air On and Off
- Switching Air Conditioning On and Off
- Switching Maximum Defrost On and Off
- Switching Maximum Cooling On and Off
- Switching the Heated Rear Window On and Off
- Setting the Blower Motor Speed
- Switching the Heated Mirrors On and Off
- Setting the Temperature
- Directing the Flow of Air
- Climate Control Hints
Interior Air Quality
Front Seats
- Front Seat Precautions
- Sitting in the Correct Position
Manual Seats
Power Seats
Heated Seats (If Equipped)
Rear Seats
Rear Occupant Alert System (If Equipped)
Garage Door Opener (If Equipped)
Power Outlet - Vehicles With: 120V Power Outlet
Power Outlet - Vehicles With: 12V Power Outlet
Wireless Accessory Charger (If Equipped)
- What Is the Wireless Accessory Charger
- Wireless Accessory Charger Precautions
- Locating the Wireless Accessory Charger
- Charging a Wireless Device
Wireless Accessory Charger – Troubleshooting
Storage
Glove Compartment
Center Console
Under Floor Storage
Glasses Holder
Map Pocket
Starting and Stopping the Engine
- Starting and Stopping the Engine – Precautions
- Push Button Ignition Switch
- Accessing the Passive Key Backup Position
Starting the Engine
Engine Block Heater (If Equipped)
Stopping the Engine
Automatic Engine Stop
Starting and Stopping the Engine – Troubleshooting
Start in Gear - Manual Transmission
Auto-Start-Stop
- What Is Auto-Start-Stop
- Auto-Start-Stop Precautions - Manual Transmission
- Auto-Start-Stop Precautions - Automatic Transmission
- Switching Auto-Start-Stop On and Off
- Stopping the Engine - Manual Transmission
- Stopping the Engine - Automatic Transmission
- Restarting the Engine - Manual Transmission
- Restarting the Engine - Automatic Transmission
- Auto-Start-Stop Indicators
- Auto-Start-Stop Videos
Auto-Start-Stop – Troubleshooting
Fuel and Refueling
- Fuel and Refueling Precautions
- Locating the Fuel Filler Funnel
- Fuel Tank Capacity
- Fuel and Refueling Videos
Fuel Quality
Running Out of Fuel
Fuel and Refueling – Troubleshooting
Catalytic Converter
- What Is the Catalytic Converter
- Catalytic Converter Precautions
Catalytic Converter – Troubleshooting
Manual Transmission
Automatic Transmission
- Automatic Transmission Precautions
- Shifting Your Vehicle Into Gear
- Automatic Transmission Position Indicators
- Automatic Transmission Audible Warnings
Automatic Transmission Positions
Manually Shifting Gears
Brake Shift Interlock
Four-Wheel Drive
- How Does Four-Wheel Drive Work - 4x4 with Part Time Engagement
- How Does Four-Wheel Drive Work - Advanced 4x4 with 4A Mode (If Equipped)
- Four-Wheel Drive Precautions
- Four-Wheel Drive Limitations
- Switching Four-Wheel Drive On and Off
- Selecting a Four-Wheel Drive Mode - 4x4 with Part Time Engagement
- Selecting a Four-Wheel Drive Mode - Advanced 4x4 with 4A Mode
- Four-Wheel Drive Indicators
- Transfer Case Fluid Capacity and Specification
- Four-Wheel Drive Videos
Four-Wheel Drive Modes
Four-Wheel Drive – Troubleshooting
Electronic Locking Differential (If Equipped)
Brakes
- Brake Precautions
- Brake Over Accelerator
- Locating the Brake Fluid Reservoir - 2.3L EcoBoost™
- Locating the Brake Fluid Reservoir - 2.7L EcoBoost™
- Checking the Brake Fluid
- Brake Fluid Specification
Anti-Lock Braking System
Brakes – Troubleshooting
Electric Parking Brake
- What Is the Electric Parking Brake
- Applying the Electric Parking Brake
- Applying the Electric Parking Brake in an Emergency
- Manually Releasing the Electric Parking Brake
- Automatically Releasing the Electric Parking Brake
- Electric Parking Brake Audible Warning
- Releasing the Electric Parking Brake if the Vehicle Battery Has Run Out of Charge
- Electric Parking Brake Videos
Electric Parking Brake – Troubleshooting
Hill Start Assist
Traction Control
- What Is Traction Control
- How Does Traction Control Work
- Switching Traction Control On and Off
- Traction Control Indicator
Traction Control – Troubleshooting
Stability Control
Trail Control (If Equipped)
- What Is Trail Control
- Trail Control Limitations
- Switching Trail Control On and Off
- Setting the Trail Control Speed
- Canceling the Set Speed
- Trail Control Indicators
Trail One Pedal Drive (If Equipped)
Trail One Pedal Drive – Troubleshooting (If Equipped)
Trail Control – Troubleshooting
Trail Turn Assist (If Equipped)
Stabilizer Bar Disconnect (If Equipped)
- What Is the Stabilizer Bar Disconnect
- Stabilizer Bar Disconnect Precautions
- Switching the Stabilizer Bar Disconnect On and Off
- Stabilizer Bar Disconnect Indicators
Stabilizer Bar Disconnect – Troubleshooting
Hill Descent Control - Manual Transmission
Steering
Electric Power Steering
Steering – Troubleshooting
Parking Aids (If Equipped)
- Parking Aid Precautions
- Switching Parking Aid On and Off
- Parking Aid Indicators
Rear Parking Aid
Front Parking Aid
Parking Aids – Troubleshooting
Rear View Camera
360 Degree Camera (If Equipped)
Cruise Control (If Equipped)
Adaptive Cruise Control (If Equipped)
- How Does Adaptive Cruise Control Work
- Adaptive Cruise Control Precautions
- Adaptive Cruise Control Limitations
- Switching Adaptive Cruise Control On and Off
- Setting the Adaptive Cruise Control Speed
- Setting the Adaptive Cruise Control Gap
- Canceling the Set Speed
- Resuming the Set Speed
- Overriding the Set Speed
- Adaptive Cruise Control Indicators
- Switching From Adaptive Cruise Control to Cruise Control
Adaptive Cruise Control – Troubleshooting
G.O.A.T. Mode Control
- What Is G.O.A.T. Mode Control
- How Does G.O.A.T. Mode Control Work
- Selecting a G.O.A.T. Mode
- G.O.A.T. Mode Control Videos
G.O.A.T. Modes
G.O.A.T. Mode Control – Troubleshooting
Lane Keeping System (If Equipped)
- What Is the Lane Keeping System
- How Does the Lane Keeping System Work
- Lane Keeping System Precautions
- Lane Keeping System Limitations
- Switching the Lane Keeping System On and Off
- Switching the Lane Keeping System Mode
- Lane Keeping System Indicators
Alert Mode
Aid Mode
Alert and Aid Mode
Lane Keeping System – Troubleshooting
Blind Spot Information System (If Equipped)
- What Is Blind Spot Information System
- How Does Blind Spot Information System Work
- Blind Spot Information System Precautions
- Blind Spot Information System Limitations
- Blind Spot Information System Requirements - Manual Transmission
- Blind Spot Information System Requirements - Automatic Transmission
- Switching Blind Spot Information System On and Off
- Locating the Blind Spot Information System Sensors
- Blind Spot Information System Indicators
Blind Spot Information System – Troubleshooting
Cross Traffic Alert (If Equipped)
Pre-Collision Assist
- What Is Pre-Collision Assist
- How Does Pre-Collision Assist Work
- Pre-Collision Assist Precautions
- Pre-Collision Assist Limitations
- Switching Pre-Collision Assist On and Off
- Locating the Pre-Collision Assist Sensors
Distance Indication
Automatic Emergency Braking
Evasive Steering Assist
Pre-Collision Assist – Troubleshooting
Driver Alert (If Equipped)
Load Carrying
- Load Carrying Precautions
- Locating the Safety Compliance Certification Labels
- What Is the Gross Axle Weight Rating
- What Is the Gross Vehicle Weight Rating
- What Is the Maximum Loaded Trailer Weight
- What Is the Gross Combined Weight Rating
- Calculating Payload
- Calculating the Load Limit
Roof Rack (If Equipped)
Fender Anchor Points
Rear Cargo Area
Rear Cargo Area Anchor Points
Connecting a Trailer
- Connecting a Trailer Precautions
- Connecting a Trailer
Connecting a Trailer – Troubleshooting
Towing a Trailer
- Towing a Trailer Precautions
- Trailer Brake Precautions
- Towing a Trailer Limitations
- Loading Your Trailer
- Trailer Towing Hints
- Launching or Retrieving a Boat or Personal Watercraft
Towing Weights and Dimensions
Towing a Trailer – Troubleshooting
Trailer Sway Control
Driving Hints
- Cold Weather Precautions
- Breaking-In
- Driving Economically
- Floor Mats
Off-Road Driving
Crash and Breakdown Information
- Roadside Assistance
- Switching the Hazard Flashers On and Off
- Post-Collision Braking
- Transporting the Vehicle
Jump Starting the Vehicle
Post-Crash Alert System
Automatic Crash Shutoff
Recovery Towing
Towing Your Vehicle
Fuses
- Fuse Precautions
- Identifying Fuse Types
Under Hood Fuse Box
Body Control Module Fuse Box
Fuses – Troubleshooting
Maintenance
- Maintenance Precautions
- Opening and Closing the Hood
- Under Hood Overview - 2.3L EcoBoost™
- Under Hood Overview - 2.7L EcoBoost™
- Checking the Coolant
- Changing the Engine Air Filter
- Changing the Fuel Filter
- Changing the 12V Battery
- Adjusting the Headlamps
- Drive Belt Routing - 2.3L EcoBoost™
- Drive Belt Routing - 2.7L EcoBoost™
Engine Oil
Exterior Bulbs
Interior Bulbs
Removable Vehicle Components
- Storing the Doors and the Roof Panels - 4-Door (If Equipped)
- Storing the Roof Panels - 2-Door (If Equipped)
- Removable Vehicle Components Videos
Removable Windows (If Equipped)
Removable Doors
Removable Roof Panels (If Equipped)
Removable Hard Top (If Equipped)
Removable Soft Top (If Equipped)
Removable Fenders
Vehicle Care
- Cleaning Products
- Cleaning the Exterior Precautions
- Cleaning Headlamps and Rear Lamps
- Cleaning Windows and Wiper Blades
- Cleaning Chrome, Aluminium or Stainless Steel
- Cleaning Wheels
- Cleaning the Engine Compartment
- Cleaning the Convertible Top
- Cleaning Stripes or Graphics
- Cleaning Camera Lenses and Sensors
- Cleaning the Hard Top
- Cleaning the Underbody
- Repairing Minor Paint Damage
- Waxing Your Vehicle
Cleaning the Exterior
Cleaning the Interior
Storing Your Vehicle
Wheel and Tire Information
Tire Care
Tire Pressure Monitoring System
Changing a Road Wheel
Capacities and Specifications
- Engine Specifications - 2.3L EcoBoost™
- Engine Specifications - 2.7L EcoBoost™
- Motorcraft Parts - 2.3L EcoBoost™
- Motorcraft Parts - 2.7L EcoBoost™
- Engine Oil Capacity and Specification - 2.3L EcoBoost™
- Engine Oil Capacity and Specification - 2.7L EcoBoost™
- Cooling System Capacity and Specification - 2.3L EcoBoost™
- Cooling System Capacity and Specification - 2.7L EcoBoost™
- Fuel Tank Capacity
- Air Conditioning System Capacity and Specification
- Washer Fluid Specification
- Manual Transmission Fluid Capacity and Specification
- Clutch Fluid Capacity and Specification
- Automatic Transmission Fluid Capacity and Specification
- Brake Fluid Specification
- Transfer Case Fluid Capacity and Specification
- Front Axle Fluid Capacity and Specification
- Rear Axle Fluid Capacity and Specification
Vehicle Identification
Vehicle Identification Number
Connected Vehicle
Vehicle Wi-Fi Hotspot
Audio System
- Audio System Precautions
- Identifying the Audio Unit
- Switching the Audio Unit On and Off
- Selecting the Audio Source
- Playing or Pausing the Audio Source
- Adjusting the Volume
- Switching Shuffle Mode On and Off
- Switching Repeat Mode On and Off
- Setting a Memory Preset
- Muting the Audio
- Adjusting the Sound Settings
- Setting the Clock and Date
- Switching the Display On and Off
AM/FM Radio
Digital Radio (If Equipped)
Satellite Radio (If Equipped)
Audio System – Troubleshooting
Center Display Overview
Voice Interaction
Alexa Built-In (If Equipped)
Phone
Apps
Navigation
- Connected Navigation (If Equipped)
- Accessing Navigation
- Navigation Map Updates
Adjusting the Map
Live Traffic
Setting a Destination
Waypoints
Vehicle Software Updates
Vehicle System Reset
Accessories
Auxiliary Switches (If Equipped)
Ford Protect
Scheduled Maintenance
Customer Information
- Rollover Warning
- Our Sustainability Report
- The Better Business Bureau Auto Line Program - United States of America
- The Mediation and Arbitration Program - Canada
- Ordering a Canadian French Owner's Manual
- Reporting Safety Defects in the United States
- Reporting Safety Defects in Canada
- Blind Spot Information System Sensors
- Body Control Module
- Garage Door Opener
- Keys and Remote Controls
- Radio Transceiver Module
- SYNC
- Telematics Control Unit
- Tire Pressure Monitoring System Sensors - Vehicles With: 315 MHz Sensors
- Tire Pressure Monitoring System Sensors - Vehicles With: 433 MHz Sensors
- Wireless Accessory Charging Module
- Perchlorate
- Replacement Parts Recommendation
- Mobile Communications Equipment
- End User License Agreement
- Emission Law
- Export Unique Options
Radio Frequency Certification Labels
Appendices

This view of the Owner's Manual contains the very latest information, which may vary slightly from the printed Owner's Manual originally provided with your vehicle. It may also describe content that is not on or operates differently on your vehicle. Please consider the Owner's Manual originally provided with your vehicle as the primary source of information for your vehicle.

The information contained in this publication was correct at the time of release.In the interest of continuous development, we reserve the right to change specifications, design or equipment at any time without notice or obligation.No part of this publication may be reproduced, transmitted, stored in a retrieval system or translated into any language in any form by any means without our written permission.Errors and omissions excepted.
Copyright © 2024 Ford Motor Company
Jump Starting the Vehicle

Connecting the Jumper Cables
 WARNING:
Do not connect the negative jumper cable to any other part of your vehicle. Use the ground point.
WARNING:
Do not connect the negative jumper cable to any other part of your vehicle. Use the ground point. |
Note:
If you are using a jump pack or booster box, follow the manufacturer's instructions.
- Pull the red plastic boot backward. Connect the positive (+) jumper cable to the positive (+) terminal of the discharged battery.
- Connect the other end of the positive (+) jumper cable to the positive (+) terminal of the booster vehicle battery.
- Connect the negative (-) jumper cable to the negative (-) terminal of the booster vehicle battery.
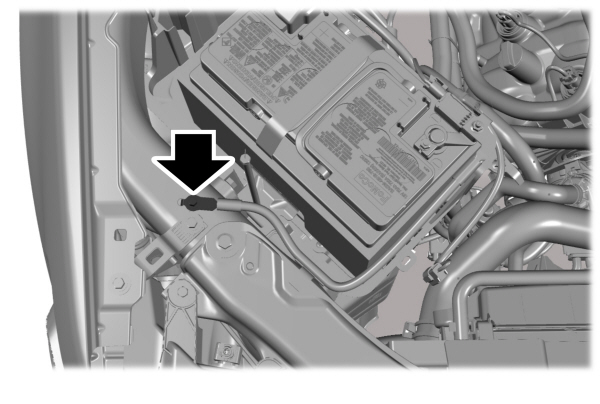
- Make the final connection of the negative (-) jumper cable to an exposed metal part of the disabled vehicle's engine, as shown in the following illustration, away from the battery and fuel injection system, or connect the negative (-) jumper cable to a ground connection point if available.
Starting the Engine
- Start the engine of the booster vehicle and moderately rev the engine, or gently press the accelerator to keep the engine speed between 2000 and 3000 RPM, as shown in your tachometer.
- Start the engine of the disabled vehicle.
- Once you start the disabled vehicle, run both vehicle engines for an additional three minutes before disconnecting the jumper cables.
Removing the Jumper Cables
Remove the jumper cables in the reverse order that they were connected.
Note:
Do not switch the headlamps on when disconnecting the cables. The peak voltage could blow the bulbs.
- Please note that Ford will not respond to individual feedback.
- Please provide detailed feedback regarding any inaccuracies in the content or any missing content in the Owner's Manual.
- Your feedback will be investigated, and any necessary changes will be updated in the online Owner's Manual.
Your input is valuable in helping us improve our Owner's Manual. Thank you for taking the time to provide your feedback.