

The information contained in this publication was correct at the time of release.In the interest of continuous development, we reserve the right to change specifications, design or equipment at any time without notice or obligation.No part of this publication may be reproduced, transmitted, stored in a retrieval system or translated into any language in any form by any means without our written permission.Errors and omissions excepted.
Copyright © 2025 Ford Motor Company
Changing a Road Wheel


Lug Nuts
You can obtain replacement locking lug nuts or a locking lug nut key using the from your authorised Ford dealer, using the reference number certificate.
Vehicle Jack
 WARNING:
Do not use the vehicle jack other than when you are changing a wheel in an emergency.
WARNING:
Check that the vehicle jack is not damaged or deformed and the thread is lubricated and clean.
WARNING:
Never place anything between the vehicle jack and the ground.
WARNING:
Do not use the vehicle jack other than when you are changing a wheel in an emergency.
WARNING:
Check that the vehicle jack is not damaged or deformed and the thread is lubricated and clean.
WARNING:
Never place anything between the vehicle jack and the ground. |
Note:
Use a workshop type hydraulic jack for changing between summer and winter tires.
Note:
If you are not using the factory installed scissor jack, you can use a hydraulic jack with a minimum lifting capacity of
2,000 kg and a lifting plate with a minimum diameter of
80 mm.
| A B C |
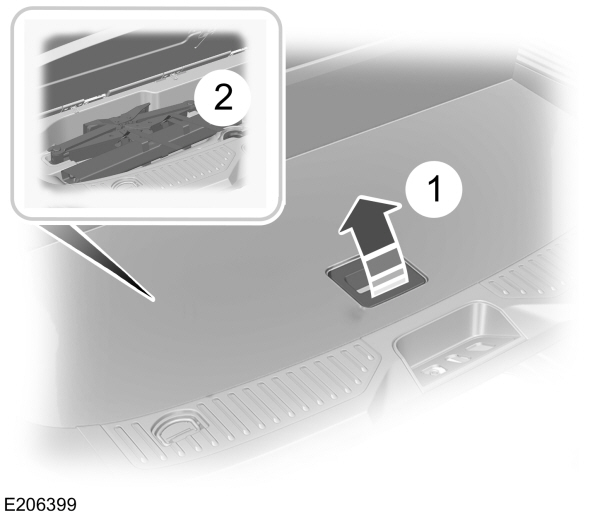
The jack, wheel brace, and winch extension tool are in the stowage compartment under the rear floor.
- Lift the stowage bin lid (1).
- Remove the locking strap and remove the tools (2).
- Rotate the retaining nut and remove the jack (2).
Spare Wheel
Note:
If the spare wheel is not the same type and size as your vehicle road wheel, drive the shortest distance possible.
Note:
Do not fit more than one spare wheel on your vehicle at any one time.
Note:
The spare wheel has a label showing the maximum driving speed. Drive with caution and at no more than the permitted maximum speed.
Note:
The usage of a dissimilar spare wheel or tire at any one wheel location can lead to impairment of the handling, stability and braking performance, comfort and noise.
Note:
When driving with a spare tire, do not switch on four-wheel drive mode unless you need to get your vehicle unstuck.
Note:
The spare wheel is underneath the rear of the vehicle.
- Assemble the wheel brace and the winch extension tool.
- Lower the third row seat-back to assist spare wheel winch operation. See Rear Seats.
- In the rear storage compartment, lift rubber cover (2) to expose wheel winch.
- Insert the assembled wheel brace and winch extension tool into the guide hole (3) and make sure it correctly locates. Turn the wheel brace counterclockwise until the spare wheel lowers from underneath the vehicle and rests on the ground, and there is slack in the cable.
- Pass the bracket and cable through the wheel opening.
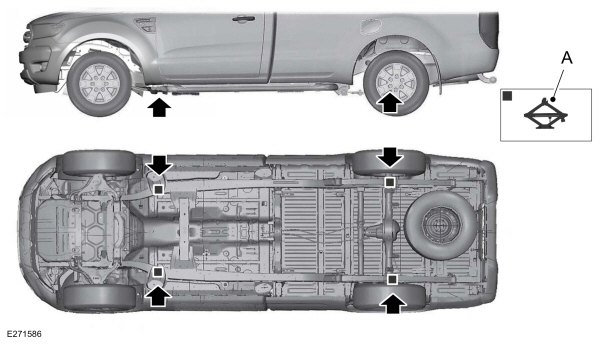
Jacking and Lifting Points
|
WARNING:
You must use the specified jacking points. |
| A |
Removing a Road Wheel
|
WARNING:
Park your vehicle so that you do not obstruct the flow of traffic or place yourself in any danger and set up a warning triangle.
WARNING:
Make sure that your vehicle is on firm and level ground with the front wheels pointing straight ahead.
WARNING:
Switch the ignition off and apply the parking brake.
WARNING:
If your vehicle has a manual transmission, shift into first or reverse gear. If your vehicle has an automatic transmission, shift into park (P).
WARNING:
Make sure all passengers are out of your vehicle.
WARNING:
To help prevent your vehicle from moving when changing a wheel, shift the transmission into park (P), set the parking brake and use an appropriate block or wheel chock to secure the wheel diagonally opposite to the wheel being changed. For example, when changing the front left wheel, place an appropriate block or wheel chock on the right rear wheel.
WARNING:
Do not work on your vehicle when the jack is the only support as your vehicle could slip off the jack. Failure to follow this instruction could result in personal injury or death.
WARNING:
Make sure that the vehicle jack is vertical to the jacking point and the base is flat on the ground. |
Note:
Do not lay alloy road wheels face down on the ground.
- Assemble the wheel brace and winch extension tool.
- Insert the assembled wheel brace and winch extension tool into the vehicle jack and raise your vehicle until the tire is clear of the ground.
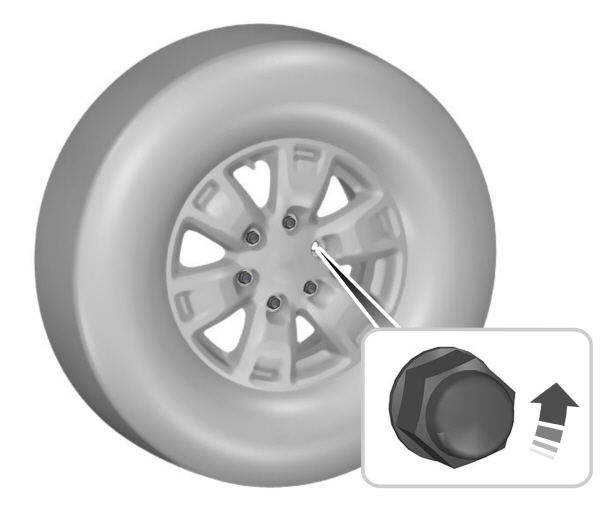
- Using the wheel brace, remove the lug nuts and the road wheel.
Installing a Road Wheel
|
WARNING:
Use only approved wheel and tire sizes. Using other sizes could damage your vehicle.
WARNING:
Make sure there is no grease or oil on the threads or the surface between the wheel lugs and nuts. This can cause the lug nuts to loosen while driving.
WARNING:
Have the lug nuts checked for tightness and the tire pressure checked as soon as possible. |
Note:
Make sure the wheel and hub contact surfaces are free from foreign matter.
Note:
Make sure that the cones on the lug nuts are against the wheel.
- Install the wheel.
- Install the lug nuts and finger tight.
- Install the locking lug nut key.
- Install all of the lug nuts and partially tighten them in the sequence shown.
- Lower your vehicle and remove the vehicle jack.
- Fully tighten all of the lug nuts in the sequence shown using the wheel brace. See Lug Nuts.
- Position the projection of the cap and the projection of the hub correctly.
|
WARNING:
Have the lug nuts checked for tightness and the tire pressure checked as soon as possible. |
Note:
If the spare wheel is different in size or construction to the road wheels, have this corrected as soon as possible.
Stowing the Flat Tire
Note:
Do not raise the spare wheel carrier without the wheel attached. Damage can occur to the winch mechanism if raised without a wheel attached.
- Place the wheel flat on the ground, with the outer face of the wheel facing up.
- Tilt the bracket, and pass it through the center of the wheel.
- Insert the winch extension tool into the winch and turn clockwise.
- Stow the wheel brace, vehicle jack and winch extension tool away.
- Please note that Ford will not respond to individual feedback.
- Please only provide detailed feedback regarding any inaccuracies in the content or any missing content in the Owner's Manual.
- Your feedback will be investigated, and any necessary changes will be updated in the online Owner's Manual.
- Please do not submit any vehicle related feedback. To submit feedback related to your vehicle, please click the link to find the correct contact information for your market.
Your input is valuable in helping us improve our Owner's Manual. Thank you for taking the time to provide your feedback.
North America
| Country | Phone | |
|---|---|---|
| United States | 1-800-392-3673 (FORD) | |
| Canada | 1-800-565-3673 (FORD) | |
| Mexico | 1-800-719-8466 | |
| Guam | 1-800-392-3673 (FORD) | |
| North Mariana Islands | apemcrc@ford.com | |
| Puerto Rico | (800) 841-3673 | prcac@ford.com |
| US Virgin Islands | (800) 841-3673 | prcac@ford.com |
IMG
| Country | Phone | |
|---|---|---|
| Algeria | nafcrc@ford.com | |
| Angola | ssacrc@ford.com | |
| Benin | ssacrc@ford.com | |
| Botswana | ssacrc@ford.com | |
| Burkina FASO | ssacrc@ford.com | |
| Burundi | ssacrc@ford.com | |
| Cameroon | ssacrc@ford.com | |
| Cape Verde | ssacrc@ford.com | |
| Central African Republic | ssacrc@ford.com | |
| Chad | ssacrc@ford.com | |
| Comoros | ssacrc@ford.com | |
| Dem Republic of Congo | ssacrc@ford.com | |
| Djibuti | ssacrc@ford.com | |
| Egypt | nafcrc@ford.com | |
| Equitorial Guinea | ssacrc@ford.com | |
| Eritrea | ssacrc@ford.com | |
| Ethiopia | ssacrc@ford.com | |
| Gabon | ssacrc@ford.com | |
| Gambia | ssacrc@ford.com | |
| Ghana | ssacrc@ford.com | |
| Guinea | ssacrc@ford.com | |
| Guinea-Bissau | ssacrc@ford.com | |
| Ivory Coast | ssacrc@ford.com | |
| Kenya | ssacrc@ford.com | |
| Liberia | ssacrc@ford.com | |
| Libya | nafcrc@ford.com | |
| Madagascar | ssacrc@ford.com | |
| Malawi | ssacrc@ford.com | |
| Mauritania | ssacrc@ford.com | |
| Mauritius | ssacrc@ford.com | |
| Morocco | nafcrc@ford.com | |
| Mozambique | ssacrc@ford.com | |
| Namibia | ssacrc@ford.com | |
| Niger | ssacrc@ford.com | |
| Nigeria | ssacrc@ford.com | |
| Republic of Congo | ssacrc@ford.com | |
| Rwanda | ssacrc@ford.com | |
| Sao Tome and Principe | ssacrc@ford.com | |
| Senegal | ssacrc@ford.com | |
| Sychelles | ssacrc@ford.com | |
| Sierra Leone | ssacrc@ford.com | |
| South Africa | 860011022 | fordcrc2@ford.com |
| South Sudan | ssacrc@ford.com | |
| Swaziland | ssacrc@ford.com | |
| Tanzania | ssacrc@ford.com | |
| Togo | ssacrc@ford.com | |
| Tunisia | nafcrc@ford.com | |
| Uganda | ssacrc@ford.com | |
| Zambia | ssacrc@ford.com | |
| Zimbabwe | ssacrc@ford.com | |
| American Somoa | apemcrc@ford.com | |
| Australia | (13 FORD) 13 3673 | foacust1@ford.com |
| Bangladesh | apemcrc@ford.com | |
| Bhutan | apemcrc@ford.com | |
| Brunei | apemcrc@ford.com | |
| Cambodia | apemcrc@ford.com | |
| Fiji | apemcrc@ford.com | |
| French Polynesia | apemcrc@ford.com | |
| India | apemcrc@ford.com | |
| Indonesia | apemcrc@ford.com | |
| Japan | apemcrc@ford.com | |
| Laos | apemcrc@ford.com | |
| Macao | apemcrc@ford.com | |
| Malaysia | apemcrc@ford.com | |
| Marshall Islands | apemcrc@ford.com | |
| Mongolia | apemcrc@ford.com | |
| Myanmar | apemcrc@ford.com | |
| Nepal | apemcrc@ford.com | |
| New Caledonia | apemcrc@ford.com | |
| New Zealand | 0800 367 369 (FORDNZ) | fnzcust@ford.com |
| Pakistan | apemcrc@ford.com | |
| Palau | apemcrc@ford.com | |
| Papua New Guinea | apemcrc@ford.com | |
| Philippines | 02-88669408 | emailus@ford.com |
| Singapore | apemcrc@ford.com | |
| South Korea | 82-2-1600-6003 | infokr1@ford.com |
| Sri Lanka | apemcrc@ford.com | |
| Tahiti | apemcrc@ford.com | |
| Thailand | 1383 | fordthai@ford.com |
| Timor Leste | apemcrc@ford.com | |
| Vanuatu | apemcrc@ford.com | |
| Vietnam | 1800588888 | fordvn@ford.com |
| Wallis and Futuna | apemcrc@ford.com | |
| Western Somoa | apemcrc@ford.com | |
| Afghanistan | menacac@ford.com | |
| Bahrain | menacac@ford.com | |
| Iraq | menacac@ford.com | |
| Israel | 08-9139995 | service1@kelekmotors.co.il |
| Jordan | menacac@ford.com | |
| Kuwait | 965 1 898900 | menacac@ford.com |
| Lebanon | menacac@ford.com | |
| Oman | menacac@ford.com | |
| Qatar | menacac@ford.com | |
| Saudi Arabia | 8008443673 | menacac@ford.com |
| Syria | menacac@ford.com | |
| United Arab Emirates | 80004441066 | menacac@ford.com |
| Yemen | menacac@ford.com |
Greater China
| Country | Phone | |
|---|---|---|
| China-Imported Vehicles | 400-690-1886 | |
| China-CAF | 951995 | |
| China-JMC | 400-003-1111 | |
| China-Lincoln | 400-988-6789 | |
| Taiwan | 0800-032100 | |
| Hong Kong | (852) 3768-4898 |
South America
| Country | Phone | |
|---|---|---|
| Argentina | 0800-888-3673 | |
| Bolivia | Contact Your Local Ford Distributor | |
| Brazil | 0800-703-3673 | central@ford.com |
| Chile | Contact Your Local Ford Distributor | |
| Colombia | Contact Your Local Ford Distributor | |
| Ecuador | Contact Your Local Ford Distributor | |
| French Guiana | Contact Your Local Ford Distributor | |
| Guyana | Contact Your Local Ford Distributor | |
| Paraguay | Contact Your Local Ford Distributor | |
| Peru | Contact Your Local Ford Distributor | |
| Suriname | Contact Your Local Ford Distributor | |
| Uruguay | Contact Your Local Ford Distributor | |
| Venezuela | Contact Your Local Ford Distributor |
Europe
| Country | Phone | |
|---|---|---|
| Albania | Contact Your Local Ford Distributor | |
| Andorra | Contact Your Local Ford Distributor | |
| Armenia | Contact Your Local Ford Distributor | |
| Austria | 01 20 609 2424 | kundenz@ford.com |
| Azerbaijan | Contact Your Local Ford Distributor | |
| Belarus | Contact Your Local Ford Distributor | |
| Belgium | 32 2 700 67 76 | custfobe@ford.com |
| Bosnia | Contact Your Local Ford Distributor | |
| Bulgaria | Contact Your Local Ford Distributor | |
| Croatia | Contact Your Local Ford Distributor | |
| Cyprus | Contact Your Local Ford Distributor | |
| Czech Republic | 800 3673 29 | zakaznik@ford.com |
| Denmark | 43 68 2000 | crcdk@ford.com |
| Estonia | 372 6710 060 | ford@infoauto.ee |
| Falkland Islands | Contact Your Local Ford Distributor | |
| Finland | 09 725 22022 | palvelut@ford.com |
| France | 0800 005 005 | crcfr@ford.com |
| Georgia | Contact Your Local Ford Distributor | |
| Germany | 0221 9999 2 999 | kunden@ford.com |
| Girbraltar | Contact Your Local Ford Distributor | |
| Greece | 216 900 88 99 | info11@ford.com |
| Hungary | +36 1 7777 555 | Contact Your Local Ford Distributor |
| Iceland | Contact Your Local Ford Distributor | |
| Ireland | 1800 771 199 | crcirela@ford.com |
| Italy | 800 22 44 33 | tu@ford.com |
| Kazakhstan | Contact Your Local Ford Distributor | |
| Latvia | +371 67303020 | |
| Liechtenstein | Contact Your Local Ford Distributor | |
| Lithuania | 370 5216 8226 | forduzklausos@inchcape.lt |
| Luxembourg | +352 248 71 800 | custfobe@ford.com |
| Macedonia | Contact Your Local Ford Distributor | |
| Malta | Contact Your Local Ford Distributor | |
| Moldova | Contact Your Local Ford Distributor | |
| Monaco | Contact Your Local Ford Distributor | |
| Montenegro | Contact Your Local Ford Distributor | |
| Netherlands | 70 7703 777 | klanten@ford.com |
| Norway | 47 66819739 | infonor@ford.com |
| Poland | 48 22 522 27 27 | kontakty@ford.com |
| Portugal | 800 210 373 | clientes@ford.com |
| Romania | 40 312298798 | crcro@ford.com |
| Russia | Contact Your Local Ford Distributor | |
| San Marino | Contact Your Local Ford Distributor | |
| Serbia | Contact Your Local Ford Distributor | |
| Serbia and Montenegro | Contact Your Local Ford Distributor | |
| Slovakia | Contact Your Local Ford Distributor | |
| Slovenia | Contact Your Local Ford Distributor | |
| South Georgia | Contact Your Local Ford Distributor | |
| Spain | 900 80 70 90 | crcspain@ford.com |
| Sweden | 08-593 66 333 | fordkund@ford.com |
| Switzerland | 044 511 14 45 | assistch@ford.com |
| Turkey | Contact Your Local Ford Distributor | |
| Ukraine | Contact Your Local Ford Distributor | |
| United Kingdom | 020 3564 4444 | UKCRC1@ford.com |
Caribbean and Central America
| Country | Phone | |
|---|---|---|
| Anguilla | (313) 594-4857 | expcac@ford.com |
| Antigua | (313) 594-4857 | expcac@ford.com |
| Aruba | (313) 594-4857 | expcac@ford.com |
| Bahamas | (313) 594-4857 | expcac@ford.com |
| Barbados | (313) 594-4857 | expcac@ford.com |
| Bermuda | (313) 594-4857 | expcac@ford.com |
| Bonaire and St. Eustatius | (313) 594-4857 | expcac@ford.com |
| Cayman Islands | (313) 594-4857 | expcac@ford.com |
| Curacao | (313) 594-4857 | expcac@ford.com |
| Dominica | (313) 594-4857 | expcac@ford.com |
| Dominican Republic | (313) 594-4857 | expcac@ford.com |
| Grenada | (313) 594-4857 | expcac@ford.com |
| Haiti | (313) 594-4857 | expcac@ford.com |
| Jamaica | (313) 594-4857 | expcac@ford.com |
| Martinique | (313) 594-4857 | expcac@ford.com |
| Montserrat | (313) 594-4857 | expcac@ford.com |
| St. Kitts and Nevis | (313) 594-4857 | expcac@ford.com |
| St. Lucia | (313) 594-4857 | expcac@ford.com |
| St. Martin | (313) 594-4857 | expcac@ford.com |
| St. Vincent and the Grenadines | (313) 594-4857 | expcac@ford.com |
| Trinidad and Tobago | (313) 594-4857 | expcac@ford.com |
| Turks and Caicos | (313) 594-4857 | expcac@ford.com |
| British Virgin Islands | (313) 594-4857 | expcac@ford.com |
| Netherlands Antilles | (313) 594-4857 | expcac@ford.com |
| Belize | (313) 594-4857 | expcac@ford.com |
| Costa Rica | (313) 594-4857 | expcac@ford.com |
| El Salvador | (313) 594-4857 | expcac@ford.com |
| Guatemala | (313) 594-4857 | expcac@ford.com |
| Honduras | (313) 594-4857 | expcac@ford.com |
| Nicaragua | (313) 594-4857 | expcac@ford.com |
| Panama | (313) 594-4857 | expcac@ford.com |