Contacting Us
Introduction
Symbols Glossary
Data Privacy
Visual Search
Child Safety
- Child Safety Precautions
- Booster Seats
- Child Safety Locks
Child Restraint Anchor Points
Child Restraints
Installing Child Restraints
Seatbelts
- Seatbelt Precautions
- Fastening and Unfastening the Seatbelts
- Adjusting the Seatbelts During Pregnancy
- Adjusting the Seatbelt Height
- Checking the Seatbelts
- Seatbelt Extensions
Sensitive Locking Mode
Automatic Locking Mode
Seatbelt Reminder
Personal Safety System™
Airbags
- How Do the Front Airbags Work
- How Do the Side Airbags Work
- How Do the Knee Airbags Work
- How Does the Safety Canopy™ Work
- Airbag Precautions
- Properly Adjusting the Driver and Front Passenger Seats
- Children and Airbags
- Crash Sensors and Airbag Indicator
- Disposing of Airbags
Front Passenger Sensing System
Pedestrian Alert System
911 Assist
Keys and Remote Controls
Phone as a Key
MyKey™
- What Is MyKey
- Creating a MyKey
- Programming a MyKey
- Clearing All MyKeys
- Checking MyKey System Status
- Using MyKey With Remote Start Systems
MyKey Settings
MyKey – Troubleshooting
Doors and Locks
- Doors and Locks Audible Warnings
- Doors and Locks Videos
Operating the Doors From Outside Your Vehicle
Operating the Doors From Inside Your Vehicle
Autounlock
Autolock
Doors and Locks – Troubleshooting
Keyless Entry
- Keyless Entry Limitations
- Keyless Entry Settings
- Using Keyless Entry
Keyless Entry – Troubleshooting
Keyless Entry Keypad
Walk Away Lock
Easy Entry and Exit
Liftgate - Vehicles With: Power Liftgate
- Liftgate Precautions
- Setting the Liftgate Opening Height
- Stopping the Liftgate Movement
- Liftgate Obstacle Detection
Opening the Liftgate
Closing the Liftgate
Liftgate – Troubleshooting
Liftgate - Vehicles With: Manual Liftgate
Opening the Liftgate
Closing the Liftgate
Security
Passive Anti-Theft System
Anti-Theft Alarm System
Anti-Theft Alarm System Settings
Security – Troubleshooting
Wipers and Washers
- Switching the Rear Window Wiper On and Off
- Checking the Wiper Blades
- Replacing the Front Wiper Blades
- Replacing the Rear Wiper Blades
Reverse Wipe
Washers
Wipers and Washers – Troubleshooting
Exterior Lighting
- Exterior Lighting Control
Headlamps
Headlamps – Troubleshooting
Autolamps
Exterior Lamps
Automatic High Beam Control
Automatic High Beam Control – Troubleshooting
Interior Lighting
- Switching All of the Interior Lamps On and Off
- Switching the Front Interior Lamps On and Off
- Switching the Rear Interior Lamps On and Off
- Adjusting the Instrument Panel Lighting Brightness
Interior Lamp Function
Ambient Lighting (If Equipped)
Interior Lighting – Troubleshooting
Windows
- Opening and Closing the Windows
- Locking the Rear Window Controls
Global Opening and Closing
Window Bounce-Back
Interior Mirror
- Interior Mirror Precautions
Auto-Dimming Interior Mirror
Exterior Mirrors
Instrument Cluster
- Instrument Cluster Overview - Excluding: GT
- Instrument Cluster Overview - GT
- Power Gauge - GT
- Speedometer
- Vehicle Range Display
- High Voltage Battery Gauge
- What Are the Instrument Cluster Warning Lamps
- Instrument Cluster Warning Lamps
- What Are the Instrument Cluster Indicators
- Instrument Cluster Indicators
Instrument Cluster Display
Trip Computer
Remote Start
Climate Control
- Identifying the Climate Control Unit
- Switching Climate Control On and Off
- Switching Recirculated Air On and Off
- Switching Air Conditioning On and Off
- Switching Defrost On and Off
- Switching Maximum Defrost On and Off
- Switching Maximum Cooling On and Off
- Switching the Heated Wiper Park On and Off
- Switching the Heated Rear Window On and Off
- Setting the Blower Motor Speed
- Switching the Heated Mirrors On and Off
- Setting the Temperature
- Directing the Flow of Air
- Climate Control Hints
Interior Air Quality
Front Seats
- Front Seat Precautions
- Sitting in the Correct Position
- Head Restraint Components
- Adjusting the Head Restraint - GT, Vehicles With: Front Fixed Head Restraints
- Adjusting the Head Restraint - Vehicles With: Front Adjustable Head Restraints
- Removing the Head Restraint
- Installing the Head Restraint
- Moving the Seat Backward and Forward
- Adjusting the Seat Backrest
- Adjusting the Seat Height
- Adjusting the Lumbar Support
Manual Seats
Power Seats
Heated Seats (If Equipped)
Rear Seats
Rear Occupant Alert System (If Equipped)
Memory Function (If Equipped)
Garage Door Opener
Wireless Accessory Charger
Storage
Cup Holders
Glove Compartment
Glasses Holder
Starting and Powering Off
High Voltage Battery
Charging Your Vehicle
- What is AC Charging
- What is DC Charging
- Charging Your Vehicle Precautions
- Charging Equipment
- Locating the Charge Port
- Charge Port Indicators
- Setting the Charging Schedule and Preferences
- Using FordPass and Charging
- Charging Your Vehicle Hints
- Charging Your Vehicle Videos
AC Charging
DC Charging
Charging Your Vehicle – Troubleshooting
Automatic Transmission
- Automatic Transmission Precautions
- Shifting Your Vehicle Into Gear
Automatic Transmission Positions
Temporary Neutral Mode
Automatic Return to Park (P)
All-Wheel Drive (If Equipped)
- How Does All-Wheel Drive Work
- All-Wheel Drive Precautions
- All-Wheel Drive Limitations
All-Wheel Drive – Troubleshooting
Brakes
- Brake Precautions
- Brake Over Accelerator
- Locating the Brake Fluid Reservoir
- Checking the Brake Fluid
- Brake Fluid Specification
Anti-Lock Braking System
Brakes – Troubleshooting
Electric Parking Brake
- What Is the Electric Parking Brake
- Applying the Electric Parking Brake
- Applying the Electric Parking Brake in an Emergency
- Manually Releasing the Electric Parking Brake
- Automatically Releasing the Electric Parking Brake
- Electric Parking Brake Audible Warning
- Releasing the Electric Parking Brake if the Vehicle Battery Has Run Out of Charge
Electric Parking Brake – Troubleshooting
Reverse Brake Assist
Hill Start Assist
Auto Hold
Traction Control
Stability Control
Steering
Electric Power Steering
Steering – Troubleshooting
Parking Aids
- Parking Aid Precautions
- Switching Parking Aid On and Off
- Parking Aid Indicators
- Parking Aids Videos
Rear Parking Aid
Front Parking Aid
Side Parking Aid
Parking Aids – Troubleshooting
Rear View Camera
360 Degree Camera
Active Park Assist (If Equipped)
Adaptive Cruise Control
- How Does Adaptive Cruise Control With Stop and Go Work
- Adaptive Cruise Control Precautions
- Adaptive Cruise Control Limitations
- Switching Adaptive Cruise Control On and Off
- Adaptive Cruise Control Automatic Cancellation
- Setting the Adaptive Cruise Control Speed
- Setting the Adaptive Cruise Control Gap
- Canceling the Set Speed
- Resuming the Set Speed
- Overriding the Set Speed
- Adaptive Cruise Control Indicators
- Switching From Adaptive Cruise Control to Cruise Control
Lane Centering
Predictive Speed Assist
Predictive Speed Assist – Troubleshooting
Adaptive Cruise Control – Troubleshooting
BlueCruise - Vehicles With: Hands Free Driving
- What Is BlueCruise
- How Does BlueCruise Work
- BlueCruise Precautions
- BlueCruise Requirements
- BlueCruise Limitations
- BlueCruise Settings
- Switching BlueCruise On and Off
- BlueCruise Alerts
- BlueCruise Automatic Cancellation
- BlueCruise Indicators
Lane Change Assist
Lane Change Assist – Troubleshooting
In-Lane Repositioning
BlueCruise – Troubleshooting
Drive Mode Control
One Pedal Drive
Lane Keeping System
- What Is the Lane Keeping System
- How Does the Lane Keeping System Work
- Lane Keeping System Precautions
- Lane Keeping System Limitations
- Switching the Lane Keeping System On and Off
- Switching the Lane Keeping System Mode
- Lane Keeping System Settings
- Lane Keeping System Indicators
Alert Mode
Aid Mode
Alert and Aid Mode
Blind Spot Assist
Lane Keeping System – Troubleshooting
Blind Spot Information System
- What Is Blind Spot Information System
- How Does Blind Spot Information System Work
- Blind Spot Information System Precautions
- Blind Spot Information System Limitations
- Blind Spot Information System Requirements
- Switching Blind Spot Information System On and Off
- Locating the Blind Spot Information System Sensors
- Blind Spot Information System Indicators
Blind Spot Information System – Troubleshooting
Cross Traffic Alert
Pre-Collision Assist
- What Is Pre-Collision Assist
- How Does Pre-Collision Assist Work
- Pre-Collision Assist Precautions
- Pre-Collision Assist Limitations
- Switching Pre-Collision Assist On and Off
- Locating the Pre-Collision Assist Sensors
Distance Indication
Automatic Emergency Braking
Evasive Steering Assist
Pre-Collision Assist – Troubleshooting
Speed Sign Recognition
- What Is Speed Sign Recognition
- How Does Speed Sign Recognition Work
- Speed Sign Recognition Precautions
- Speed Sign Recognition Limitations
- Speed Sign Recognition Indicators
- Setting the Speed Sign Recognition Speed Warning
- Setting the Speed Sign Recognition Speed Tolerance
Speed Sign Recognition – Troubleshooting
Driver Alert
Load Carrying
Luggage Compartment
Towing a Trailer
Driving Hints
- Cold Weather Precautions
- Driving on Snow and Ice
- Breaking-In
- Performance Vehicle Precautions
- Driving Through Shallow Water
- Floor Mats
Driving in Special Conditions
Electric Vehicle
Crash and Breakdown Information
- Roadside Assistance
- Switching the Hazard Flashers On and Off
- Post-Collision Braking
- Transporting the Vehicle
Jump Starting the Vehicle
Post-Crash Alert System
Automatic Crash Shutoff
Towing Your Vehicle
- Towing Your Vehicle Precautions
- Recreationally Towing Your Vehicle
- Emergency Towing
Towing Your Vehicle – Troubleshooting
Fuses
- Fuse Precautions
- Identifying Fuse Types
Under Hood Fuse Box
Battery Fuse Box
Body Control Module Fuse Box
Fuses – Troubleshooting
Maintenance
- Maintenance Precautions
- Opening and Closing the Hood
- Under Hood Overview
- Checking the Coolant
- Automatic Transmission Fluid Check
- Adjusting the Headlamps
12V Battery
12V Battery – Troubleshooting
Exterior Bulbs
Interior Bulbs
Vehicle Care
- General Information
- Cleaning Products
- Waxing
- Repairing Minor Paint Damage
Cleaning the Exterior
Cleaning the Interior
Body Styling Kits
Storing Your Vehicle
Wheel and Tire Information
Tire Care
Tire Sealant and Inflator Kit
Tire Pressure Monitoring System
- What Is the Tire Pressure Monitoring System
- Tire Pressure Monitoring System Overview
- Tire Pressure Monitoring System Precautions
- Tire Pressure Monitoring System Limitations
- Viewing the Tire Pressures
Tire Pressure Monitoring System – Troubleshooting
Changing a Road Wheel
Capacities and Specifications
Vehicle Identification
- Installing the Vehicle Identification Card
Vehicle Identification Number
Connected Vehicle
- What Is a Connected Vehicle
- Connected Vehicle Requirements
- Connected Vehicle Limitations
- Connecting the Vehicle to a Wi-Fi Network
- Connected Vehicle Settings
Connecting the Vehicle to a Mobile Network
Connected Vehicle – Troubleshooting
Vehicle Wi-Fi Hotspot
Audio System
- Audio System Precautions
- Switching the Audio Unit On and Off
- Selecting the Audio Source
- Playing or Pausing the Audio Source
- Adjusting the Volume
- Switching Shuffle Mode On and Off
- Switching Repeat Mode On and Off
- Setting a Memory Preset
- Muting the Audio
- Adjusting the Sound Settings
- Setting the Clock and Date
AM/FM Radio
Digital Radio
Satellite Radio
Audio System – Troubleshooting
Center Display
Voice Interaction
Alexa Built-In
Phone
Apps
Personal Profiles
Navigation
- Connected Navigation
- Accessing Navigation
- Navigation Map Updates
Adjusting the Map
Live Traffic
Setting a Destination
Waypoints
Vehicle Software Updates
Vehicle System Reset
Accessories
Ford Protect
Scheduled Maintenance
Customer Information
- Rollover Warning
- The Better Business Bureau Auto Line Program
- The Mediation and Arbitration Program
- Ordering a Canadian French Owner's Manual
- Reporting Safety Defects in the United States
- Reporting Safety Defects in Canada
- Declaration of Conformity
- Blind Spot Information System Sensors
- Remote Function Actuator
- Cruise Control Module
- SYNC
- Telematics Control Unit
- Tire Pressure Monitoring System Sensors - Vehicles With: 315 MHz Sensors
- Tire Pressure Monitoring System Sensors - Vehicles With: 433 MHz Sensors
- Wireless Accessory Charging Module - Vehicles Built Up To: 03/2022
- Wireless Accessory Charging Module - Vehicles Built From: 04/2022
- Perchlorate
- Replacement Parts Recommendation
- Mobile Communications Equipment
- Federal Highway Administration Regulation
- End User License Agreement
- Export Unique Options
- Warranty Information
Radio Frequency Certification Labels
Appendices
This view of the Owner's Manual contains the very latest information, which may vary slightly from the printed Owner's Manual originally provided with your vehicle. It may also describe content that is not on or operates differently on your vehicle. Please consider the Owner's Manual originally provided with your vehicle as the primary source of information for your vehicle.

The information contained in this publication was correct at the time of going to print.In the interest of continuous development, we reserve the right to change specifications, design or equipment at any time without notice or obligation.No part of this publication may be reproduced, transmitted, stored in a retrieval system or translated into any language in any form by any means without our written permission.Errors and omissions excepted.
Copyright © 2024 Ford Motor Company
Using Seatbelts
 WARNING:
Depending on where you secure a child restraint, and depending on the child restraint design, you may block access to certain seatbelt buckle assemblies and LATCH lower anchors, rendering those features potentially unusable. To avoid risk of injury, make sure occupants only use seating positions where they are able to be properly restrained.
 |
Note:
Although the child restraint illustrated is a forward-facing child restraint, the steps are the same for installing a rear-facing child restraint.
Perform the following steps when installing a child restraint with seatbelts.
- Position the child restraint in a seat with a seatbelt.

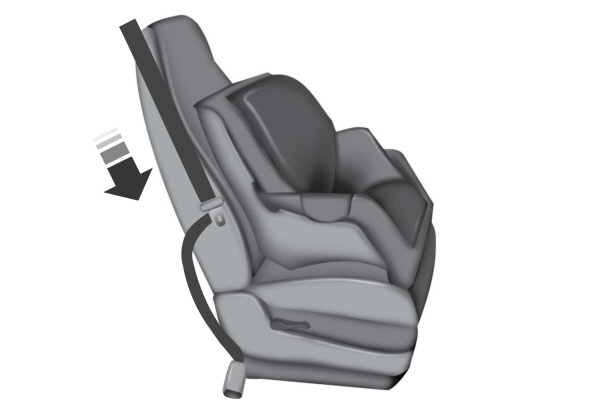
- Pull down on the shoulder belt and then grasp it and the lap belt together.

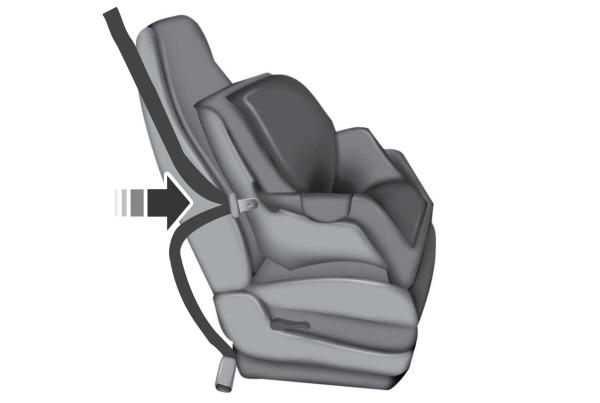
- While holding the shoulder and lap belt portions together, route the tongue through the child restraint according to the child restraint manufacturer's instructions. Make sure you did not twist the belt webbing.

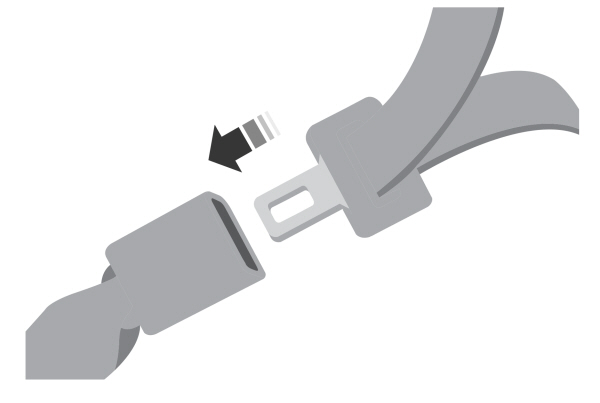
- Insert the belt tongue into the proper buckle for that seating position until the latch engages. Make sure that you securely latch the tongue by pulling on it.

- To put the retractor in the automatic locking mode, grasp the shoulder portion of the belt and pull downward until you pull all of the seatbelt out.
Note:
The automatic locking mode is available on the front passenger and rear seats. This vehicle does not require the use of a locking clip.
- Allow the belt to retract to remove slack. The seatbelt clicks as it retracts to indicate it is in the automatic locking mode.
- Pull the seatbelt out of the retractor to make sure the retractor is in the automatic locking mode. You should not be able to pull more belt out. If the retractor is not locked, unbuckle the belt and repeat Steps 5 and 6.

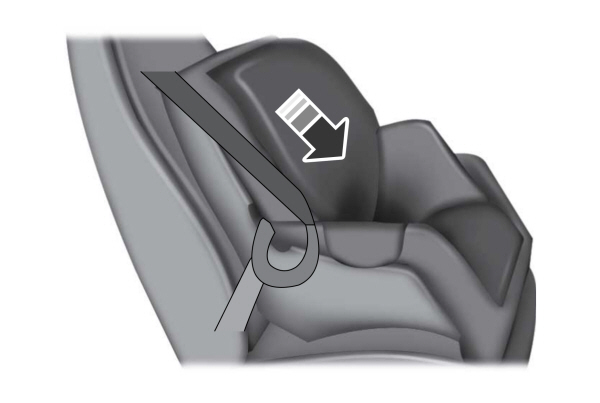
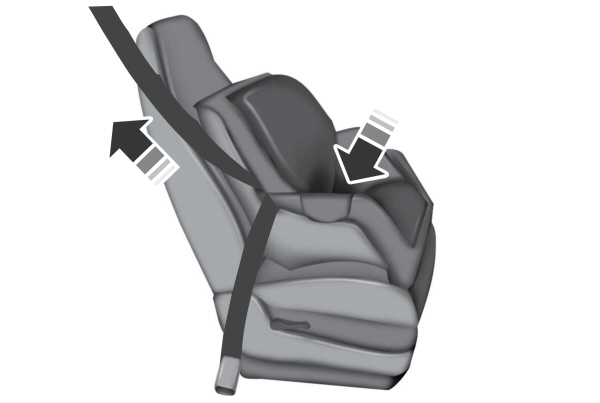
- Remove remaining slack from the belt. Force the seat down with extra weight, for example, by pressing down or kneeling on the child restraint while pulling up on the shoulder belt in order to force slack from the belt. This is necessary to remove the remaining slack that exists once you add the extra weight of the child to the child restraint. It also helps to achieve the proper snugness of the child restraint to your vehicle. Sometimes, a slight lean toward the buckle helps to remove remaining slack from the belt.
- If the child restraint has a tether strap, attach it.

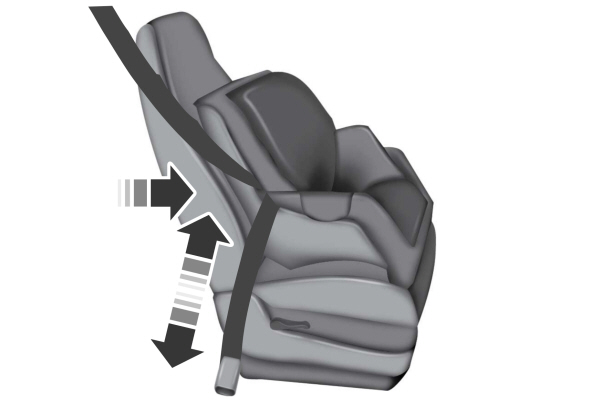
- Before placing the child in the seat, forcibly move the seat forward and back to make sure the seat is securely held in place.
To check this, grab the seat at the belt path and attempt to move it side to side and forward and back. There should be no more than
1 in (2.5 cm) of movement.
We recommend checking with a NHTSA Certified Child Passenger Safety Technician to make certain the child restraint is properly installed. In Canada, check with Transport Canada for referral to a Child Car Seat Clinic.
Thank You For Your Feedback
