Ford 2022-2023 Maverick | Built on 10-Jul-2022 and through 25-Jan-2023 |
Issue:
Some 2022-2023 Maverick Vehicles built on 10-Jul-2022 and through 25-Jan-2023 may exhibit a condition where the headliner is detached with exposed edges at the A-pillar trim panel or gaps between the A-pillar trim panel and the weatherstrip seal. This may be due to a misaligned or out of position pin retainer. To correct this condition, follow the Service Procedure to diagnose and replace the side curtain airbag.
Action:
Follow the Service Procedure to correct the condition on vehicles that meet all the following criteria:
•
2022-2023 Maverick
•
Built on 10-Jul-2022 and through 25-Jan-2023
•
One of the following conditions:
-
Headliner detached with exposed edges at the A-pillar trim panel
-
Gaps between the A-pillar and the weatherstrip seal
-
Side curtain airbags that were previously replaced with NZ6Z-26042D94-B (right) and NZ6Z-26042D95-B (left)
| Service Part Number | Claim Quantity | Package Order Quantity | Number in Package | Description | | NZ6Z- 26042D94-BNZ6Z- 26042D94-B | 1 | 1 | 1 | Air Bag Side Curtain (RH) | | NZ6Z-26042D95-BNZ6Z-26042D95-B | 1 | 1 | 1 | Air Bag Side Curtain(LH) |
| Service Part Number | | Claim Quantity | Package Order Quantity | Number in Package | Description | | NZ6Z-6051916-AANZ6Z-6051916-AA | - | 1 | 1 | 1 | Headliner Roof (Light Grey) - Less Sun roof | | NZ6Z-6051916-MANZ6Z-6051916-MA | - | 1 | 1 | 1 | Headliner Roof (Light Grey) - Slide Sun roof | | W790416-S900W790416-S900 | - | 1 | 1 | 4 | Rear Scuff Plate Trim Panel Clip | | W719675-S451W719675-S451 | - | 4 | 1 | 4 | Front Seat Bolts (M10 x 30mm) | | NZ6Z-2603598-ACNZ6Z-2603598-AC | - | 1 | 1 | 1 | Right A-Pillar Trim Panel | | NZ6Z-2603599-ACNZ6Z-2603599-AC | - | 1 | 1 | 1 | Left A-Pillar Trim Panel | | W715828-S437W715828-S437 | - | 4 | 1 | 4 | Front Seat Bolts (M10 x 14mm) | | - | Obtain Locally | | As Needed | | 3M™ Super-Fast Repair Adhesive 4747 |
Quantity refers to the amount of the service part number required to repair the vehicle. Unit of Issue refers to the number of individual pieces included in a service part number package. Piece Quantity refers to the total number of individual pieces required to repair the vehicle. As Needed indicates the amount of the part may vary and/or is not a whole number. Parts can be billed out as non-whole numbers, including less than 1. If Needed indicates the part is not mandatory. Warranty Status: Eligible under provisions of New Vehicle Limited Warranty (NVLW)/Service Part Warranty (SPW)/Service Part New Vehicle (SPNV)/Extended Service Plan (ESP) coverage. Limits/policies/prior approvals are not altered by a TSB. NVLW/SPW/SPNV/ESP coverage limits are determined by the identified causal part and verified using the OASIS part coverage tool. | Description | Operation No. | Time | | 2022-2023 Maverick: Inspect Headliner, Replace One Side Curtain Air Bag, Inspect Headliner (PASS) (Do Not Use With Any Other Labor Operations) | 232136A | 1.6 Hrs. | | 2022-2023 Maverick: Inspect Headliner, Replace Both Side Curtain Air Bags, Inspect Headliner (PASS) (Do Not Use With Any Other Labor Operations) | 232136B | 1.9 Hrs. | | 2022-2023 Maverick: Inspect Headliner, Replace One Side Curtain Air Bag, Inspect Headliner (FAIL), Replace Headliner (Do Not Use With Any Other Labor Operations) | 232136C | 4.1 Hrs. | | 2022-2023 Maverick: Inspect Headliner, Replace Both Side Curtain Air Bags, Inspect Headliner (FAIL), Replace Headliner (Do Not Use With Any Other Labor Operations) | 232136D | 4.4 Hrs. | | 2022-2023 Maverick: Inspect Headliner, Replace One Side Curtain Air Bag, Inspect Headliner (FAIL), Replace One A-Pillar (Do Not Use With Any Other Labor Operations) | 232136E | 1.7 Hrs. | | 2022-2023 Maverick: Inspect
Headliner, Replace Both Side Curtain Air Bags, Inspect Headliner (FAIL), Replace Both A-Pillars (Do Not Use With Any Other Labor Operations) | 232136F | 2 Hrs. |
| Causal Part: | 26042D94 | | Condition Code: | 07 |
NOTE: Perform the following procedure on vehicles with the Field Service Action (FSA) 22C20 applied or with the updated version of the side curtain airbags NZ6Z-26042D94-B (right) and NZ6Z-26042D95-B (left).
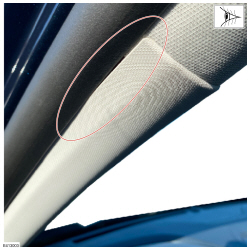
1. Inspect the interior headliner. Are there any exposed edges in the headliner or gaps between the A-pillar and the weatherstrip seal?
Figure 1 – Example of headliner detached with exposed edges
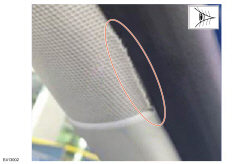
Figure 2 – Example of gaps between the A-pillar and the weatherstrip seal
(1). Yes - proceed to Step 2.
(2). No - this article does not apply.
2. Remove and replace the affected driver or passenger side curtain airbag.
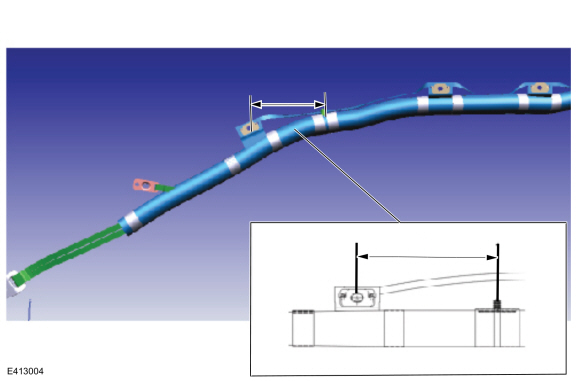
NOTE: Measure the distance between the hanger and the pin retainer in the affected side curtain airbag. (Figure 3). The distance should be between 137-143 mm. Document the measurements in the warranty claim.
Figure 3
(1). Remove both A-pillar trim panels. Refer to the WSM, Section 501-05 > Interior Trim and Ornamentation > Removal and Installation.
(2). Remove both B-pillar lower trim panels. Refer to the WSM, Section 501-05 > Interior Trim and Ornamentation > Removal and Installation.
(3). Depower the supplemental restraint system (SRS). Refer to the WSM, Section 501-20B > Supplemental Restraint System > General Procedures.
(4). Remove both B-pillar upper trim panels. Refer to the WSM, Section 501-05 Interior Trim and Ornamentation > Removal and Installation.
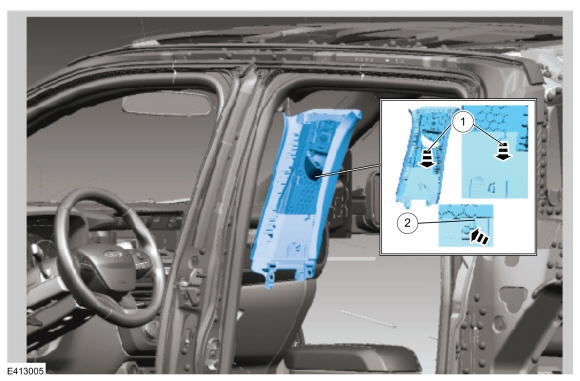
(5). Adjust both B-pillar sliders down, pull the sliders down to the lower position and engage the B-side hooks into the pocket. (Figure 4)
Figure 4
(6). Pull both height adjusters down. (Figure 5)
Figure 5
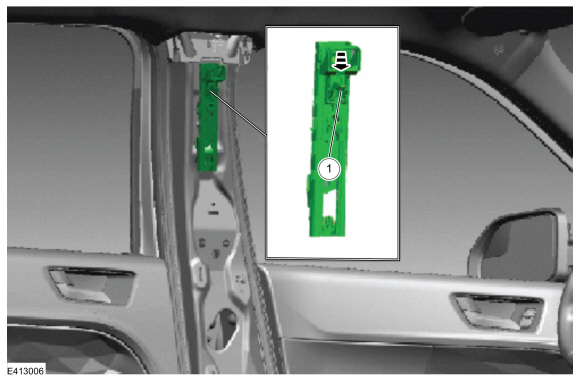
(7). Lower the headliner. Refer to the WSM, Section 501-05 Interior Trim > Headliner Lowering Note: Do not remove the C-Pillar trim panels.
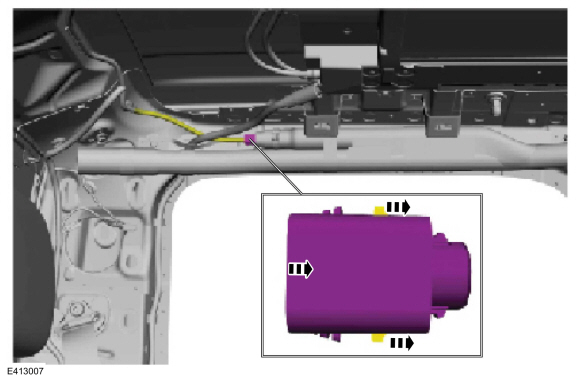
(8). Release the locking tabs of the side curtain airbag electrical connector and disconnect the side curtain airbag electrical connector. (Figure 6)
Figure 6
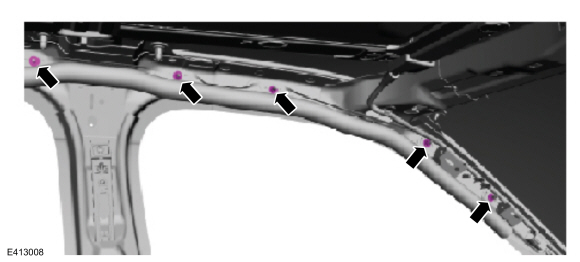
(9). Remove the side curtain airbag nuts. (Figure 7)
Figure 7
• Tighten the bolts to 9 Nm. (80 lb-in)
• Tighten the T50 bolt of the step (12) to 47.5 Nm. (36 lb-ft)
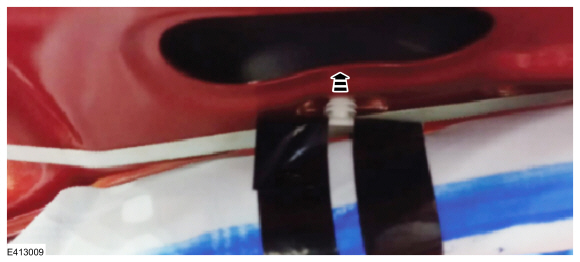
(10). Remove the side curtain airbag pin retainer. (Figure 8)
Figure 8
(11). Detach the airbag hangers retainers. (Figure 9-10)
Figure 9
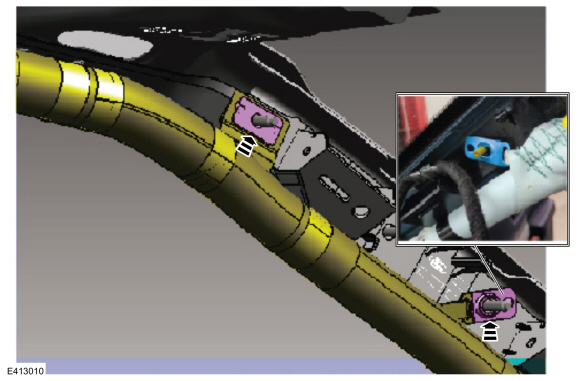
Figure 10
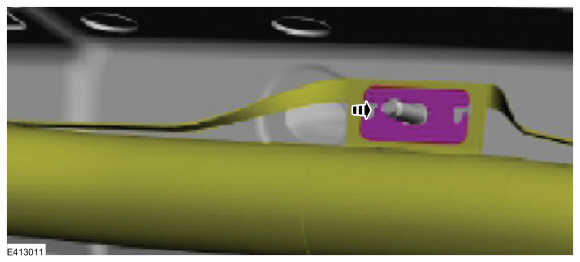
• Make sure that the upper tether is not twisted during installation.
(12). Remove the T50 Torx bolt attach to the new side curtain airbag lower tether. (Figure 11)
Figure 11
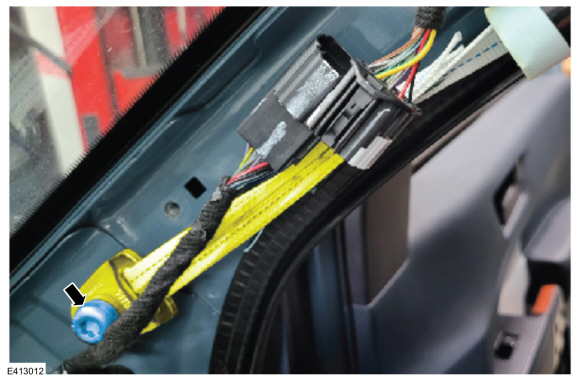
• Hand tighten the bolt during installation.
(13). Detach the airbag hanger retainers. (Figure 12)
Figure 12
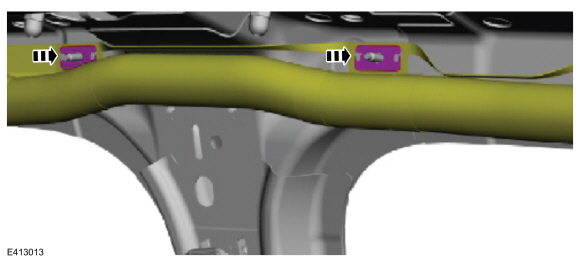
(14). Remove the side curtain airbag rear bolts. (Figure 13)
Figure 13
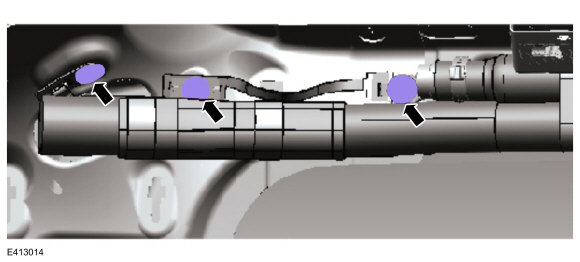
(15). Slide the side curtain airbag rearward, disengaging the retainer to the sheet metal and remove the side curtain airbag. (Figure 14)
Figure 14
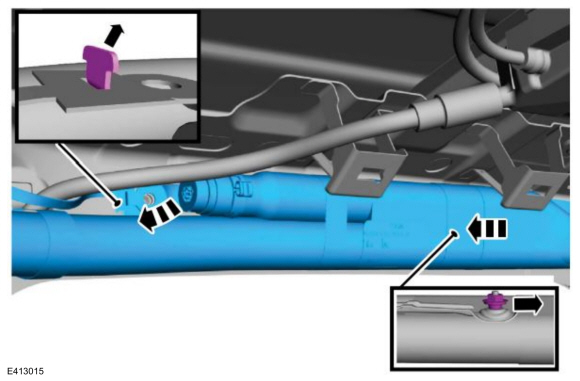
(16). Install a new side curtain airbag.
 WARNING: Avoid any damage to the harness, connectors or terminals during removal and installation of the air bag. Failure to follow this direction may cause communication issues or a system malfunction. WARNING: Avoid any damage to the harness, connectors or terminals during removal and installation of the air bag. Failure to follow this direction may cause communication issues or a system malfunction.
3. To assemble the vehicle, reverse the removal procedure of Step 2.
(1). During the installation of the B-pillar upper trim, make sure the correct connection exists between the height adjuster and B-pillar upper trim. (Figure 15)
Figure 15
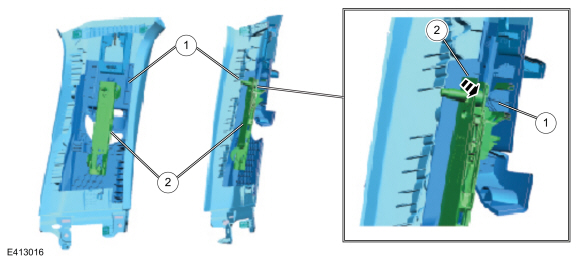
(2). When reassembled, make sure that the B-pillar clips are correctly inserted in the T-shape slots. An audible click is heard when correctly reassembled. (Figure 16)
Figure 16
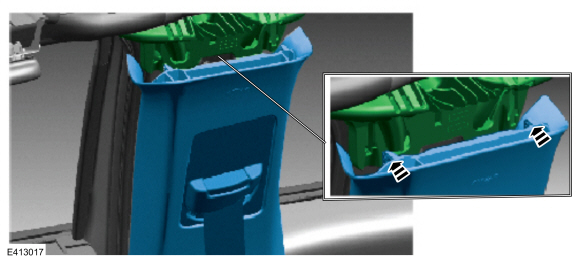
(3). Slide the B-pillar upper trim up and down 3 times to make sure it is properly assembled. (Figure 17)
Figure 17
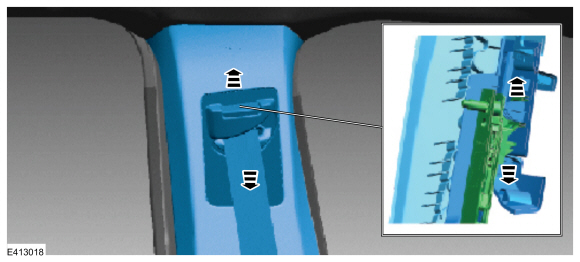
(4). Inspect and position the front and rear door weatherstrip edges so that they overlap the top of the B-pillar upper trim panel. (Figure 18)
Figure 18
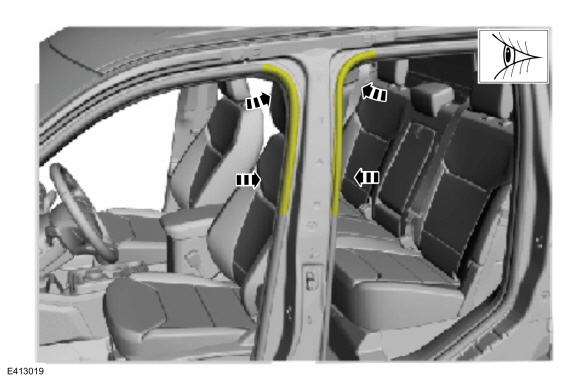
(5). Check the seatbelt system for correct operation. Refer to WSM, Section 501-20A Seatbelt Systems > General Procedures.
4. Inspect the headliner for any exposed edges at A-pillar trim panel or gaps between the A-pillar trim panel and the weatherstrip. If no exposed edges or gaps appear, the repair is complete. If one of the conditions persist, proceed to Step 5.
5. Inspect if the headliner is detached with exposed edges in the upper section of the A-pillar. Is the headliner detached with exposed edges at driver or passenger A-pillar trim panel?
(1). Yes - replace the headliner. Refer to the WSM, Section 501-05 > Interior Trim and Ornamentation > Removal and Installation > Headliner. Repair is complete.
NOTE: Do not remove the C-pillar trim panels.
(2). No - proceed to Step 6.
6. Inspect the A-pillar for a gap between the A-pillar and weatherstrip. If the gap persists, replace the A-pillar trim panel. Refer to WSM, Section 501-05 Interior Trim and Ornamentation > Removal and Installation > A-Pillar Trim Panel.
|